


307745 7
Operation
Pressure Relief Procedure
WARNING
PRESSURIZED EQUIPMENT HAZARD
The system pressure must be manually relieved to
prevent the system from starting or spraying acci-
dentally. To reduce the risk of an injury from acci-
dental spray from the gun, splashing fluid, or
moving parts, follow the Pressure Relief Proce-
dure whenever you:
D are instructed to relieve the pressure,
D stop spraying,
D check or service any of the system equipment,
D or install or clean the spray nozzle.
1. Lock the gun trigger safety.
2. Shut off the air supply to the pump.
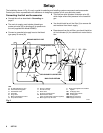
3. Close the bleed-type master air valve (required in
your system). On Model 230992, this is the red–
handled ball valve, assembled next to the air
regulator.
4. Unlock the gun trigger safety.
5. Hold a metal part of the gun firmly to the side of a
grounded metal pail, and trigger the gun to relieve
pressure.
6. Lock the gun trigger safety.
7. Open the drain valve (required in your system),
and have a container ready to catch the drainage.
8. Leave the drain valve open until you are ready to
spray again.
If you suspect that the spray tip or hose is completely
clogged, or that pressure has not been fully relieved
after following the steps above, very slowly loosen the
tip guard retaining nut or hose end coupling and relieve
the pressure gradually. Then loosen it completely.
Then clear the tip or hose.
Flushing
FIRE AND EXPLOSION HAZARD
Before flushing, read the section FIRE
AND EXPLOSION HAZARD on page
4. Be sure the entire system and
flushing pails are properly grounded.
Refer to Grounding on page 5.
WARNING
Flush the pump before first use. The pump is
tested with lightweight oil, which is left in to protect the
pump parts. If the fluid you are using may be contami-
nated by the oil, flush it out with a compatible solvent.
WARNING
To reduce the risk of serious injury whenever you
are instructed to relieve pressure, always follow the
Pressure Relief Procedure at left.
To clean any settled particles out of the system, flush
the entire system at least once each 90 days or less. If
possible, circulate the solvent and leave it in the lines
for two days, such as over the weekend, to help loosen
any dried paint.
1. Relieve the pressure.
2. Shutdown the system as explained in Shutdown
and Care of the Pump on page 9.
3. Start the pump and operate it at about 30 cycles
per minute.
4. Lubricate the agitator, if you haven’t already done
so, and then close its air valve to stop agitation.
WARNING
Failure to shut off the agitator before raising the
pump assembly may result in serious injury from
splashing paint in the eyes or contact with the
blades of the agitator.
5. Raise the pump out of the paint while it is still
running and let it run itself dry to force the paint
back into the drum. Shut off the pump.
CAUTION
Never leave water or water-based fluid in the pump
overnight. Flush with a compatible solvent to protect
the parts from corrosion.
6. Remove the paint drum and place a 55 gallon
drum, containing enough solvent to thoroughly fill
and flush the system, under the pump. Lower the
pump.
7. Start the pump again and allow the solvent to
circulate for at least one hour.