


306878 7
Operation
Pressure Relief Procedure
WARNING
INJECTION HAZARD
The system pressure must be manually
relieved to prevent the system from
starting or spraying accidentally. Fluid
under high pressure can be injected through the
skin and cause serious injury. To reduce the risk of
an injury from injection, splashing fluid, or moving
parts, follow the Pressure Relief Procedure
whenever you:
D are instructed to relieve the pressure,
D stop spraying,
D check or service any of the system equipment,
D or install or clean the spray tip.
1. Lock the gun trigger safety.
2. Close the bleed-type master air valve (required in
your system).
3. Unlock the gun trigger safety.
4. Hold a metal part of the gun firmly to the side of a
grounded metal pail, and trigger the gun to relieve
pressure.
5. Lock the gun trigger safety.
6. Open the drain valve (required in your system),
having a container ready to catch the drainage.
7. Leave the drain valve open until you are ready to
spray again.
If you suspect that the spray tip or hose is completely
clogged, or that pressure has not been fully relieved
after following the steps above, very slowly loosen the
tip guard retaining nut or hose end coupling and relieve
pressure gradually, then loosen completely. Now clear
the tip or hose.
Adjusting the Regulator
The fluid pressure regulator controls pressure down-
stream from its outlet.
To adjust the fluid regulator, first, back the knob out
until there is no spring pressure. Then, turn the knob
clockwise to increase pressure.
NOTE: If you are using an accessory fluid pressure
gauge, relieve the spray gun line when reducing pres-
sure to ensure a correct gauge reading.
Adjust the pump air pressure and the fluid regulator for
the best spraying combination. In a circulating system,
also adjust the back pressure valve.
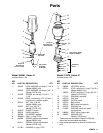
Record all the settings for future reference. The valve
cylinder (7) has exterior markings (set points 1 to 8) for
repeat settings.