


5
Indoor Unit Installation
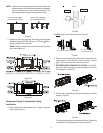
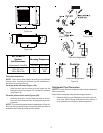
9. Pass the piping through the hole in the wall.
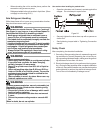
10. Place the upper claw on the back of the indoor unit on
the upper hook of the installation plate. Move the indoor
unit from side to side to ensure it is securely mounted.
(See Figure 10 ).
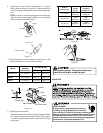
NOTE: By placing cushioning material between the in-
door unit and the wall, placement of piping is easier
(see Figure 11). REMOVE CUSHIONING MATERIAL
AFTER PIPING IS COMPLETED.
Upper Hook
Lower Hook
Cushioning
material
Figure 10 Figure 11
11. Push the lower part of the indoor unit up on the wall.
Move it from side to side, up and down to ensure the unit
is hooked securely.
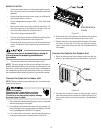
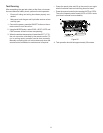
Piping and wrapping
Evenly bundle the tubing, connecting cable and drain hose
securely with tape as shown in Figure 12.
Because the condensed water from the rear of the indoor unit
gathers in the drain pan and is piped out of the room, do not
put anything else in the drain pan.
Figure 12
IMPORTANT NOTES:
• Indoor unit must be connected before the outdoor unit.
• Drain hose should not be allowed to become slack.
• Insulate both the auxiliary pipings.
• Ensure that the drain hose is positioned at the lowest
side of the bundled tubing. Positioning it at the upper
side can cause the drain pan to overflow inside the unit.
• Drain hose should be sloped downward to ensure con-
densate will drain correctly.
Do not allow piping to hold indoor unit away
from the wall.
Never intertwine power wiring and other wiring.
Outdoor Unit Installation
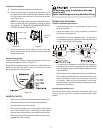
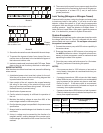
Outdoor Installation precautions
• Install the outdoor unit on a rigid base to prevent noise
level and vibration.
• Place the outdoor unit in such a manner to minimize
restriction of discharge air.
Protect the unit from prevailing winds. To ensure the
unit operates correctly, place the unit lengthwise along
a wall or use a dust or shield plate.
Figure 13A
Figure13B
• If a wall mount installation is required, the installation
bracket should meet the requirement in the installation
bracket diagram and the wall should be able to support
the installation.
• Be sure there are no obstacles blocking air discharge.
The installation wall should be constructed of brick, con-
crete or another surface of equal strength to hold the
unit safely. Make sure the connections to the wall,
bracket and unit are firmly seated and there are no ob-
structions to the airflow.
Anchoring the outdoor unit
The unit should be tightly anchored, horizontally, with a nut
and bolt ( 10 or 8) on a concrete or similarly rigid, stable
surface.