


2
NOTE: Contact Giant Industries for Service School Information. Phone: (419)-531-4600
REPAIR INSTRUCTIONS - P46HT
1. To Check Suction and Discharge Valves
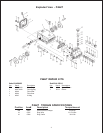
Loosen valve plugs (41 and 43) using a socket wrench. Note the arrangement for
reassembly and check the discharge valves underneath and suction valves (in
suction valve adapter 39).
2. To Check V-Sleeves
Separate valve casing (29) from the crankcase (1) and pull off over the plungers. If
the seals have to be replaced, remove all parts from the valve casing (29) in the
suction valve direction. Grease new v-sleeves (31) with grease before installing.
Examine the surfaces of the plunger pipes (24A) as damaged surfaces cause the
seals to wear out quickly.
3. To Check Plungers and Crankcase
If oil leaks at plunger outlet (22), and or the radial shaft seal (26), the worn plungers
and crosshead (plunger assembly) must be placed. Drain oil and remove crank-
case cover (3) and valve casing (29). Take off bearing cover (12) and shaft protec-
tor (17) on one side before removing the crankshaft (18). Then remove crankshaft
axially by means of a press or a rubber hammer. Do not force the cranks on the
shaft when pulling through the connecting rod (20). Do not bend connecting rod.
Dismantle crosshead and connecting rod and replace worn parts.
Reinstall the crankshaft first being particularly careful with the cranks. Then press on
the bearing on both sides and finally install radial shaft seal and bearing cover.
4. To Replace Plunger Pipes
Screw out tension screw (24B), pull off plunger pipes (24A) and clean plunger
surface. Install new plunger pipe. Fix tension screw with screw-glue and tighten
carefully at 106 ft.-lbs.
5. Drip-Return
After the valve casing has been removed, the weep seals (50) in the intermediate
casing (46) can be examined and replaced as necessary. Should lime deposits
occur in the valve casing, care must be taken in keeping the two holes in the valve
casing (29) free to ensure trouble-free drip-return.