


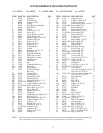
8
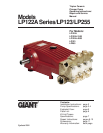
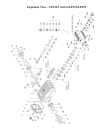
LP122A Series/LP123 - Repair Instructions
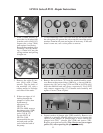
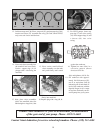
1. With a 30mm wrench, re-
move the six (6) plugs (48)
from the valve casing (43).
Inspect the o-rings (48A)
and replace if necessary.
Remove the complete valve
assembly (46A) by thread-
ing a 12mm bolt into the
spring retainer and pulling
straight out.
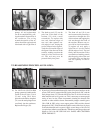
2. To disassemble the valve, screw the bolt into the retainer until
the valve plate (45) presses the valve seat (44) out of the spring
retainer. Examine all parts and replace if necessary. If the seat
doesn’t come out, use a valve puller to remove.
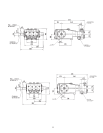
3. Remove the eight (8) hex
nuts (49A) with a 19mm
wrench. Tap the back of
the manifold (43) with a
rubber mallet to dislodge
and slide off the studs.
4. Remove the seal sleeve (35) from the manifold and/or crank-
case. Remove the pressure rings (39&36A), v-sleeves (40&36),
support ring (41) and o-rings (35A and 35B in Lp255A only)
from the manifold and seal sleeve, respectively. For LP255
only, remove support ring (37). Examine seals carefully and
replace if worn. Clean all parts.
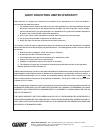
6. Inspect surface of plunger pipe (29B) carefully. Remove any
chemical or mineral deposits taking care not to damage the
surface of the plunger. If plunger pipe is worn, remove the
plunger bolt (29C) , plunger pipe (29B) and spacer (29E).
Replace worn parts necessary. Note:
Always use a new copper
gasket (29) when repairing the plunger assembly.
5. If there are signs of oil
leaking through the
plunger oil seals, then
replacment is
neccessary.For
LP122A &
LP122A-4000, remove
the plunger pipe (29B)
before inspecting oil
seals (31A & 33).
For the LP123 &
LP122A-3100
dissassemble the gear
end and push out the
seals from the back of
the pump.
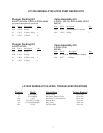
29E 29A 29B 29D 29C
36A 36 35 35A 35B 39 40 40 41 37
(LP255 only) (LP255 only)
44A 44 45 48 47