


8
9
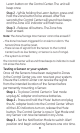
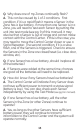
Follow these steps to assign a Sensor to a Zone.
Step 1 – Press and hold the Learn button on the
Control Center for three seconds. When the
Control Center sounds a long beep, release the
Learn button.
Step 2 – Press the Zone button (1, 2, 3 or 4) for the
Zone you want to assign to the Garage Door Sensor.
The LED indicator for that Zone will begin to flash.
Step 3 –
Release the Zone button.
Note: Zone 4 is for dedicated alerts only. Sensors in this Zone
will not trigger an alarm or chime.
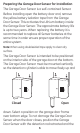
Step 4 – Activate the Garage Door Sensor
-
To activate The Garage Door Sensor, lower
the detection rod to its full extension; if mounted,
raise the garage door.
Erasing the Sensor from a Zone
Note: If you need to remove the Sensor from a Zone, the
system will erase the entire Zone, so any other Sensors will
need to be put back into that particular Zone.
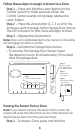
Step 1 - To erase a Zone, press and hold the
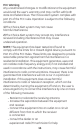
1 2 3 4
Arm
Zone
Armed Power
1 2 3 4
Alert
Chime
Off
Mute
Learn
Input DC 12V
-
+
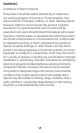
Add a Sensor
Step 1
Press and hold
the Learn button
for three seconds
Step 3
Release the
Zone button
Step 4
Activate the Garage
Door Sensor
Step 2
Select the Zone number