


9
MAINTENANCE and SERVICING
5.6 The replacement of the system is the reverse of the previous
operations.
5.7 It is important to remove and clean the baffle system to
ensure the flue ways are clear of and soot and debris to
ensure the safe and efficient operation of the appliance.
The frequency of cleaning will depend on the appliance
operating conditions.
5.8 The baffle system is designed to give safe and efficient
operation of the appliance. Replace any damaged baffles
immediately.
5.9 Do not modify the baffle system.
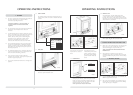
6.1 As part of the routine maintenance of the Riva stove you
may have to remove the firebricks from the stove. This can
be carried-out without the use of tools, but the bricks must
be removed and replaced, after removing the baffle system.
6.2 Allow the stove to cool fully before removing firebricks.
6.3 Replace the bricks in the reverse order from removal.
6. FITTING AND REMOVAL OF FIREBRICKS
6.4 Care should be taken when handling bricks, as they can
become fragile after a period of use. This normal and the
life will depend on the type of fuels burnt and the level of
use. Damaged bricks should be replaced as soon as
possible, and can be purchased from your Stovax dealer.
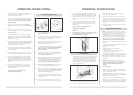
7.1 To maintain the safe use of your stove you may need to
replace a damaged door glass. To complete this operation,
use this method.
7.2 Remove the door from the Riva stove, by opening the door
by approximately 25mm and lifting the door free of the
hinge blocks on the left of the door. Then lie the door face
down on a soft flat surface, to protect the paintwork and
glass.
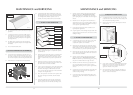
7.3 Remove the old door rope seal and scrape old glue from
the locating groove. Clean the locating groove with a clean
dry cloth to remove all old dust and debris.
7.4
Using a 2.5mm A/F hexagon key, remove the exposed fixing
screws in the rope seal locating groove, then remove the
trim/frame. The old glass can then be lifted clear of the
door. (Note how the edge sealing tape is fixed.) Remember
to dispose of the old glass safely.
7.5 Clean, and re-paint, the rear of the door if required. Clean
the screws with light oil or WD40®, this will aid future
removal.
7.6 Fit the edge sealing tape to the new glass, and place the
glass into position in the door. Place the door trim/frame
back in to position and re-fix with the clean fixing screws.
7. FITTING A NEW DOOR GLASS
Door Rope Seal
Fixing Screw
Trim / Frame
G
lass Edge Seal Tape
Glass
Door
1
23 4
5
6
7
8
PR7101
PR7102
PR7100
Upper baffle
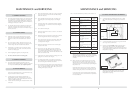
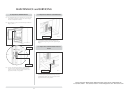
9.1 To maintain the safe use of your Riva stove, you may need
to adjust the door catch to ensure safe correct closing of the
door. Complete this operating as follows.
9.2 Open the door to give access to the fixed part of the door
catch as shown.
9.3 Using a 3mm A/F hexagon head key (supplied) loosen the 2
fixing screws, as shown, and reposition the catch block to
achieve a correct fit. This may require a trial and error
approach to find the correct position.
9.4 If the door feels loose after correcting the catch the door
rope seal is worn and requires replacement, as detailed in
section 7 of the user instructions.
10
MAINTENANCE and SERVICING
7.7 Squeeze a generous bead of fresh Thermic Seal glue into
the rope locating groove. Do not glue over the screw
heads. Press the new door sealing rope into the locating
groove, placing the joint in the middle of the lower edge of
the door.
7.8 Refit the door on to the appliance and close the door to
apply pressure to new rope. Leave the appliance closed for
at least 12 hours before lighting the appliance and using at
a low output for approximately one day.
7.9 Fit only Stovax ceramic glass, which is suitable to use in
high temperature applications.
7.10 Using the appliance with a damaged door glass could cause
dangerous fumes to enter the room, or the stove to overfire,
resulting in damage.
8.1 To maintain the safe use of your Riva stove you may need
to replace a damaged or worn door sealing rope. To
complete this operation, use this method.
8.2 Remove the door from the stove, by opening the door by
approximately 25mm and lifting the door free of the hinge
blocks on the left of the door. Then lie the door face down
on a soft flat surface, to protect the paintwork and glass.
8.3 Remove the old rope and scrape old glue from the locating
groove. Clean the locating groove with a clean dry cloth to
remove all old dust and debris.
8.4 Squeeze a generous bead of fresh Thermic Seal glue into
the rope locating groove. Do not glue over the screw
heads. Press the new rope into the locating groove, placing
the joint in the middle of the lower edge of the door.
8.5 Refit the door and close the door to apply pressure to new
rope. Leave the appliance closed for at least 12 hours
before lighting and using at a low output for approximately
one day.
8.6 Using the Riva stove with a damaged door seal could cause
dangerous fumes to enter the room, or the appliance to
overfire, resulting in damage.
8.7 If you require help your local dealer will be able to carry-
out all of your service and maintenance requirements for a
reasonable cost.
8. FITTING A NEW DOOR SEAL
9. ADJUSTING DOOR CATCH
3mm Hex Key
Fixing Screws
PR7103
PR7104