


2
GENERAL
Before installation of this product please read these instructions fully.
It is very important to also understand the requirements of the UK Building Regulations (England and Wales – Document J /
Scotland - Part F), along with any local regulations, and working practices that may apply. Should any conict occur between these
instructions and these regulations then the regulations shall apply.
All electrical connections should meet the requirements of UK Building Regulations
(England and Wales – Document P / Scotland - Part N).
Your local Building Control Ofce would be happy to advise should questions arise, regarding the requirements of the regulations.
The replace should be tted by a HETAS (GB only) registered installer, or approved by your local building control ofcer. Your
Stovax dealer should be able to arrange this service for you.
Any gas appliance installation completed in conjunction with the replace must be completed by a CORGI registered gas
engineer, in accordance with the manufactures installation instructions. Your Stovax dealer should be able to arrange this service
for you.
Your building insurance company may also require you to inform them that you have installed a new heating appliance, so check
with your insurers that your cover is still valid after installing the replace.
When completing the installation and building works you should comply with your responsibilities under the Health and Safety at
Work Acts, and any new regulations, which may be introduced during the lifetime of these instructions.
A faulty installation could cause danger to the inhabitants and structure of the building.
3
SITE REQUIREMENTS / INSTALLATION
Hearth
The constructional and superimposed hearth must meet the
requirements of the Building Regulations for the re and
surround to be tted.
Flue
The ue system should meet the requirements of the Building
Regulations for the re to be tted and the fuel to be used.
The ue exit from the building should be positioned to comply
with the requirements of the Building Regulations.
Any existing ue should be conrmed as suitable for the new
intended use, as dened in the Building Regulations.
Any existing ue or chimney system must be inspected and
swept by a NACS registered (UK only) chimney sweep, to
conrm that the system is structurally sound and free from any
obstructions.
Suitable access should be provided to enable the collection and
removal of debris.
Provision should be made to sweep and inspect the ue when
the appliance is installed.
No other heating appliances should be connected to, or share,
the same ue or chimney system.
Check the ue draught. This should be done with all windows
and doors closed and any extraction fans in this or adjoining
rooms running at maximum speed.
Note: A guide containing general information on Chimneys and
Flues is obtainable from: -
The British Flue & Chimney Manufacturers’ Association,
FETA
2 Waltham Court, Milley Lane,
Hare Hatch
Reading,
Bucks ,
RG10 9TH
Tel : - 01189 403416 e-mail :- info@feta.co.uk
Where a hearth, replace, ue or chimney is provided or
extended (including cases where a ue is provided as part
of refurbishment work), information essential to the correct
appliance and use of these should be permanently posted
in the building, to meet Requirement J4 of the Building
Regulations (England and Wales), F3.12 (Scotland).
Fireplace opening
As all replaces are different it is not possible to give full details
of the construction of the replace opening. But this should be
constructed using ‘best practice’ construction methods using
suitable non-combustible materials.
Additional ventilation
If the replace is to be used with Solid fuel, Gas, or Oil products
additional ventilation will be required. This should meet the
requirements of the Building Regulations for the re to be
tted and the fuel to be used. This should be provided using a
permanently open air vent, which is positioned so that it is not
liable to be blocked both inside and outside the building.
If any of these checks reveal problems do not proceed with
the tting of the replace until they have been rectied.
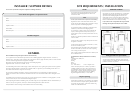
Dimensions
Fitting optional insert panel (8904)
The insert panel is tted to the back of the main front panel
using the 4 xing screws supplied. This will then allow tting of
both Stovax and Gazco 16” products.
INSTALLER / SUPPLIER DETAILS
To assist us in any Guarantee claim please complete the following information: -
Stovax dealer the appliance was purchased from
Name: ...........................................................................................................................................................................................
Address: ........................................................................................................................................................................................
.....................................................................................................................................................................................................
Telephone number:.......................................................................................................................................................................
Date installed: ...............................................................................................................................................................................
Model description: ........................................................................................................................................................................
Installation Engineer
Name: ...........................................................................................................................................................................................
Address: ........................................................................................................................................................................................
.....................................................................................................................................................................................................
Telephone number:.......................................................................................................................................................................