


21
INSTALLATION INSTRUCTIONS
PR7218
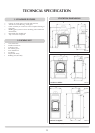
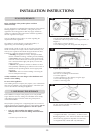
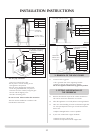
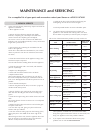
Seal Collar with Fire Cement
Self Tapping Screw
Tee
Size Stovax Part No.
5" 4516*
6" 4616
Cap
PR7195
600mm min
1000mm max
unsupported
Elbow with access cover
Size Stovax Part No.
5" 4512
6" 4612
7" 4712
Flue Pipe 915mm (3ft)
Size Stovax Part No.
5" 4502*
6" 4602
7" 4702
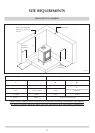
To chimney connection
as detailed in building
regulations
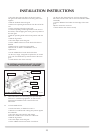
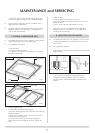
2. REMOVAL OF THE LOG GUARD
2.1 To remove the Log guard:
•LiftLogGuardclearofthesupportingbrackets
•Rotatetoclearthesidesofthedooropening.
Do not use appliance without the log guard in position.
3. FITTING AND REMOVAL OF
THE FIREBRICKS
3.1 Remove the firebricks as part of the routine maintenance.
This can be carried out without the use of tools.
3.2 Allow the appliance to cool fully before removing firebricks.
3.3 Take care when handling, as bricks can become fragile after
use. Life span depends on the type of fuels burnt and the
level of use.
•Replacedamagedbricksassoonaspossible
3.4 If your stove is fitted with 4 upper firebricks:
•Removethelower2bricksfirst
•Removethetopbricksfromthesupportrails
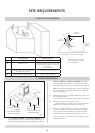
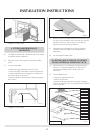
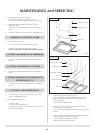
PR7196
Self tapping
screw at rear
Flue Pipe 915mm (3ft)
Size Stovax Part No.
*5" 4502
6" 4602
Seal flue collar
with Fire Cement
PR7193
600mm min
1000mm max
unsupported
Elbow with access cover
Size Stovax Part No.
5" 4512
6" 4612
7" 4712
Flue Pipe 915mm (3ft)
Size Stovax Part No.
5" 4502*
6" 4602
7" 4702
To chimney connection
as detailed in building
regulations
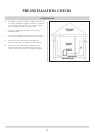
1.3 Rear flue pipe installation
•Insertateeintothefluecollar
The tee piece is used as cleaning access.
•Liftapplianceintoposition
Take care not to damage the hearth finish.
•Levelusingadjustablebolts,seepicture1
•Connectteetothechimneyusingfluepipe
•Securewithselftappingscrew
•Sealtheconnectingjoints
Do not use a 90˚ elbow to make this connection
The Flue must be installed in accordance with
manufacturers instructions.