


Temp/Hour
Power
PM
Cool
Fan Only
Heat
Clock
Start Time
Stop Time
Smart
Fan
Fan
Speed
Mode
Timer
On/Off
Money
Saver
Set
Hour
Temp/Hour
Cool
Money Saver
®
Fan Only
Clock
Start Time
Stop Time
Power
Fan
Speed
Mode
PM
Timer
On/Off
Set
Hour
5
2 3 4
1
6
5
7
9
8
10 11 12
14
13
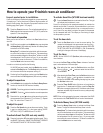
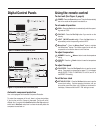
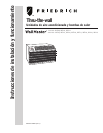
Figure 1: WS Model cool-only control panel
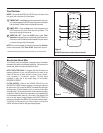
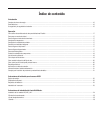
Figure 2: WY/WE Model heat-cool control panel
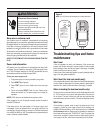
Automatic component protection
Your unit is equipped with Automatic Component Protection.
To protect the compressor of the unit, there is a three minute delay
if you turn the unit off or if power is interrupted. The fan will not be
affected. Also, if you switch from Heat/Cool mode to Fan Only mode, and
switch back to Heat/Cool
mode, there is a three-minute delay before the
compressor comes back on.
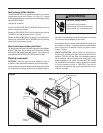
Using the remote controlDigital Control Panels
To start unit (See Figure 3, page 6)
1
POWER - Press the Power button once. The unit will automatically
start in the mode and fan speed it was last left on.
To set mode of operation
2
COOL - Press the Cool button to automatically switch the operat-
ing mode to COOL.
3
FAN ONLY - Press the Fan Only button if you want to run the
fan only.
4
HEAT (WY/WE models only) - Press the Heat button to
automatically switch the operating mode to HEAT.
5
MoneySaver
®
- Press the Money Saver
®
button to activate
the MoneySaver
®
feature. This feature cycles the fan with the
compressor so that the fan does not run all the time.
To adjust temperature
6
WARMER - Press the
Warmer
button to raise the temperature
7
COOLER - Press the
Cooler button to lower the temperature
To adjust fan speed
8
FAN SPEED - Press the Fan Speed button to see the current
setting. Press again to change the fan speed. F1 is the lowest
setting (SLEEP / LOW), F2 is MEDIUM, F3 is HIGH, and SF is
the SMART FAN setting.
To set the hour clock
9
SET HOUR CLOCK -
Press the Set Hour. button once to see the
current clock setting. Continue pressing the button until you
arrive at the current time (Hour only). Minutes are not shown on
the display. Make sure that the A.M. / P.M. setting is correct.
setting.
setting.