www.fmiproducts.com
122274-01G28
INSTALLATION
Continued
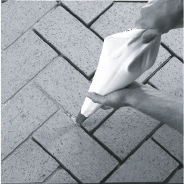
Figure 16 - Grouting Brick
GROUTING INSTRUCTIONS
Material provided:
1 or 2 - 10 lb. bags of cement (depending
on model)
1 or 2 - 10 lb. bags of sand (depending
on model)
Material required:
1 - Piping bag
1 - Joints striker
1 - Heavy duty mixing bucket
1 - Trowel
1. Moisten brick surface with damp sponge
or spray bottle just prior to application.
When bricks are wet, any excess grout
mixture on bricks will easily wipe off.
2. In a heavy duty mixing bucket, pour seven
(4-1/2) cups of water. Add 5 lbs. (half of a
bag) of sand and 5 lbs (half of a bag) of
cement. Mix together well using a power
drill with mixing wand attachment to a yo-
gurt like consistency, not adding enough
water can lead to grout falling out after
burning.
3. The overall length of piping bag should be
about 16". If the bag is longer than 16",
cut it down to size by removing end with
larger opening. This will make the bag
easier to handle.
4. Put 2 to 3 cups of grout mixture into piping
bag making sure the smaller opening is
downward and over a moist towel to avoid
spilling. Place a wet towel over the bucket
making sure it is directly on the surface of
grout mixture. This will keep the mixture
moist and it will not dry out before use.
5. Begin grouting by first doing a “Filler
Pass”. This is done by lling the joint about
3/4 full with grout mixture. It is important
to work with only 6 bricks at a time so
grout doesn't have time to set up before
striking.
6. Complete a “Finishing Pass” around 6
bricks you just put ller pass around. This
is done by slowly lling in remainder of the
joint with a thick amount of grout mixture.
Mixture should be a little higher than the
brick surface.
7. Using a trowel, remove excess grout mix-
ture by moving trowel in the direction of the
joint. Grout mixture in the joint should now
be ush with brick surface. If not enough
grout is applied into each space, grout may
fall out after burning.
8. Using a joint striker, force grout mixture
into joint and sweep back and forth
until grout is smooth and round. If grout
becomes too shallow, add more grout
mixture with piping bag and strike again.
9. Continue procedure around each group of
6 bricks until an entire panel is nished.
10. Using trowel, scrape in direction of joints
to remove any grout that may have col-
lected around bricks during striking. If
desired, take a moist sponge and lightly
sweep over bricks to remove any grout
that may have gotten on bricks. DO NO
PRESS HARD OR RUB IN A CIRCULAR
MOTION. This will press the grout into
brick and turn brick a different color.
INSTALLING FIREPLACE HOOD
AND SCREEN
1. Attach hood to rebox using screws pro-
vided (see Figure 17, page 29).
2. Mount screen rod brackets on left and right
side of smoke shelf with #8 x 1/2" screws
provided (see Figure 18, page 29).
3. Slide round end of screen rod into rings
at top of screen. Attach one push-on nut
to end of rod before attaching last ring of
screen.
4. Insert round end of rod into rod bracket
on left side of replace.


