


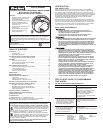

3
HO
W TO INSTALL THIS ALARM
This combination Smoke/CO Alarm was designed to be mounted on the
ceiling or wall. It is not a tabletop device.
You must install this device on the
ce
iling or wall as outlined below. Read “Where To Install This Alarm” before
starting.
Tools you will need: pencil, drill with 3/16” or 5mm drill bit,
fla
thead screwdriver, hammer.
•
D
o not connect this unit to any other alarm or auxiliary device. It is a
single-station unit that cannot be linked to other devices. Connecting
anything else to this unit may prevent it from working properly.
• Do not install this unit over an electrical junction box.Air currents
ar
ound junction boxes can prevent smoke from reaching the sens-
i
ng chamber and prevent the unit from alarming. Only AC powered
units are intended for installation over junction boxes.
If you want to lock the battery compartment, or lock the Smoke/CO
Al
arm to the mounting bracket, please read the “Optional Locking
F
eatures” section in the “Programming Guide” attachment before you
begin installation.
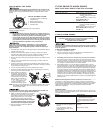
1. Hold base firmly and twist the mounting bracket counterclockwise (left) to
se
parate it from the unit.
2.
Hold the mounting bracket against the ceiling (or wall) so the vertical
mou
nting slot is aligned in the 12 o’clock position and trace around the
inside of the mounting slots (vertical and horizontal mounting).
3. Put the unit where it won’t get covered with dust when you drill the mount-
ing holes.
4. Using a 3/16”(5 mm) drill bit, drill a hole through the center of the oval
outlines you traced.
5. Insert the plastic screw anchors (in the plastic bag with screws) into the
holes.Tap the screw anchors gently with a hammer, if necessary, until they
are flush with the ceiling or wall.
6. Line the mounting bracket up over the plastic screw anchors.
7. Screw the mounting bracket to the ceiling or wall through the mounting
slots using the two screws provided.
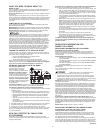
8. Before attaching the Alarm to
the bracket, insert the two (2)
AA batteries (included) into the
battery compartment. Match
the terminals on the end of the
battery with the terminals on
the unit. Match “+” to “+” and
“-” to “-.” If the batteries are
not fully inserted, the unit
cannot receive battery power.
NOTE: The unit may beep briefly when you install the batteries. This is normal.
The GREEN Light flashes about every 60 seconds when the unit is
r
e
ce
i
v
ing battery power.
The battery door will resist closing unless batteries are installed. This
warns you the unit will not operate without batteries.
9
. Attach the Smoke/CO Alarm to the mounting
br
ack
e
t
. Line up the guides on the alarm’s
base with the guides on the mounting bracket.
W
he
n guides are lined up, turn the base
clockwise (right) until it snaps into place.
NOTE: Once the Smoke Alarm is snapped
on
t
o the mounting bracket, you can rotate
the Smoke Alarm to adjust the alignment.
10. Test the Smoke/CO Alarm. See “Weekly
T
e
sting” for details.
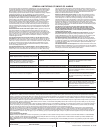
Type of Alarm
Carbon Monoxide (CO)
What You See and Hear
Voice: “Warning, evacuate carbon
mono
xide in [Location,
e
xample: “Kitchen”]. Evacuate.”
“
____ ppm.”
H
orn:
4 be
eps, pause, 4 beeps, voice
Power/Smoke LED: Off
C
O LED:
F
lashes Red
Smo
ke
V
oice:
“W
arning, evacuate smoke in
[L
ocation, example: “Kitchen”].
Evacuate.”
H
orn:
3 be
eps, pause, 3 beeps, voice
Power/Smoke LED: Flashes Red
C
O LED:
O
ff
IF THE CO ALARM SOUNDS
A
ctuation of your CO Alarm indicates the presence of carbon monoxide
(C
O) which can kill you. In other words, when your CO Alarm sounds, you
mus
t not ignore it!
IF THE CO ALARM SIGNAL SOUNDS:
1. Operate the Test/Silence button.
2
. Call your emergency services, fire department or 911. Write down the
n
umber of your local emergency service here:
__________________________________________________________________
3. Immediately move to fresh air—outdoors or by an open door or window.
Do a head count to check that all persons are accounted for. Do not re-
enter the premises, or move away from the open door or window until the
emergency services responder has arrived, the premises have been aired
out, and your CO Alarm remains in its normal condition.
4. After following steps 1-3, if your CO Alarm reactivates within a 24-hour
period, repeat steps 1-3 and call a qualified appliance technician to investi-
gate for sources of CO from fuel-burning equipment and appliances, and
inspect for proper operation of this equipment. If problems are identified
during this inspection have the equipment serviced immediately. Note any
combustion equipment not inspected by the technician, and consult the
manufacturers’ instructions, or contact the manufacturers directly, for more
information about CO safety and this equipment. Make sure that motor
vehicles are not, and have not, been operating in an attached garage or
adjacent to the residence.Write down the number of a qualified appliance
technician here:
__________________________________________________________________
NOTE: A qualified appliance technician is defined as “a person, firm,
corporation, or company that either in person or through a representative,
is engaged in and responsible for the installation, testing, servicing, or replace-
ment of heating, ventilation, air conditioning (HVAC) equipment, combustion
appliances and equipment, and/or gas fireplaces or other decorative
combustion equipment.”
“
ALARM-MOVE TO FRESH AIR”
If y
ou hear the CO alarm horn and the CO red light is flashing,
move everyone to a source of fresh air.
D
O NOT remove the batteries!
AFTER AN ALARM
After the emergency responders arrive, the premises aired out, and your CO
Alarm remains in its normal condition, you can check what the highest carbon
monoxide level sensed was:
Action:
1
.
Press & Hold Test Button
Alarm Will Say:
“
H
ighest carbon monoxide level was
___ ppm. Please see manual.”
“To clear highest carbon monoxide
level, press and hold test button
now.”
2. Press & Hold Test Button, if you
w
ou
ld l
i
k
e t
o clear t
he highest level
se
nsed.
I
f you would like to keep the
highest level in memory, do not
press anything.
“Highest carbon monoxide level
clear
e
d
.
”
Alarm w
i
ll say nothing.
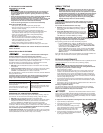
P
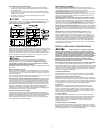
ARTS OF THIS SMOKE/CO ALARM
1
Test/Silence Button and Remote
Control Sensor
2 Battery Compartment
3
Power/Smoke Alarm LED
4
CO Alarm LED
IF YOUR SMOKE/CO ALARM SOUNDS
WHAT TO DO FIRST–IDENTIFY THE TYPE OF ALARM