


HOW TO INSTALL THIS SMOKE ALARM
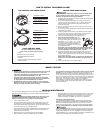
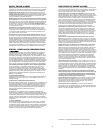
THE PARTS OF THIS SMOKE ALARM
FOLLOW THESE SIMPLE STEPS!
1. Mounting bracket
2. Mounting slots
3. Battery drawer, install 9V
battery her
e
4. Turn this way to remove
fr
om bracket
5.
Turn this way to attach
to bracket
1. T
est/Silence button
2. Battery drawer
3.
Power indicator light and
alarm indicator
4. Escape
Light
®
If you want to lock the battery drawer, or lock the Smoke Alarm
to the mounting bracket, please r
ead the “Optional Locking
Featur
es” section before you begin installation.
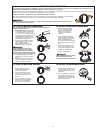
1.
Hold base firmly and twist the mounting bracket counterclockwise
to separate it fr
om the base.
2.
Hold the mounting bracket against the ceiling (or wall) so the
vertical mounting slot is aligned in the 12 o’clock position and
trace around the inside of the mounting slots (vertical and
horizontal mounting).
3.
Put the unit where it won’t get covered with dust when you drill
the mounting holes.
4.
Using a 3/16” (5 mm) drill bit, drill a hole through the center of the
oval outlines you traced.
5.
Insert the plastic screw anchors (in the plastic bag with screws)
into the holes. Tap the screw anchors gently with a hammer, if
necessary
, until they are flush with the ceiling or wall.
6. Attach the mounting bracket to the ceiling or wall.
7.
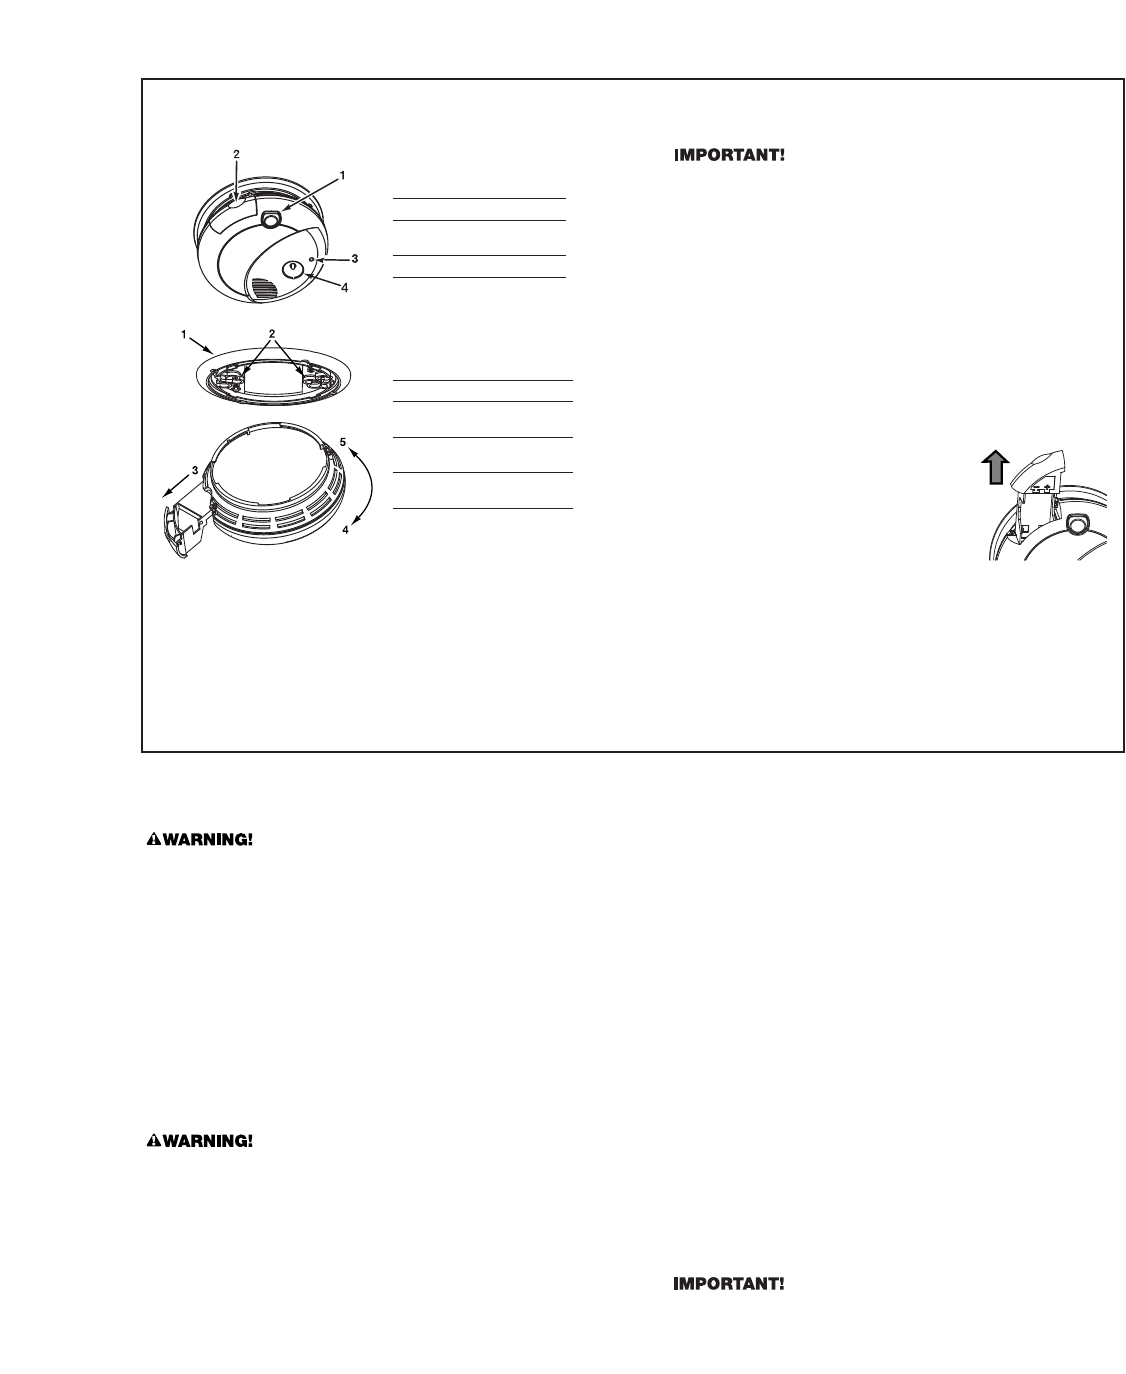
Install the battery (included). Open the
battery drawer
. Match the terminals on the
end of the battery with the terminals on the
unit. Match “+” to “+” and “-” to “-.” Push
the battery in until it snaps in secur
ely and
cannot be shaken loose. If the battery is
not snapped in completely, the unit cannot
r
eceive battery power.
NOTE: After you install the battery, the power indicator light
may flash. (If the unit alar
ms, the light will blink rapidly
, and the
horn will repeatedly sound 3 beeps, pause, 3 beeps.)
8. Attach the Smoke Alarm to the mounting bracket. Line up the
guides on the alarm’s base with the guides on the mounting
bracket. When guides are lined up, turn the base clockwise (right)
until it snaps into place.
NOTE: Once the Smoke Alarm is snapped onto the mounting
bracket, you can rotate the Smoke Alarm to adjust the align-
ment.
9. Test the Smoke Alarm. See “Weekly Testing.”
TOOLS YOU WILL NEED:
This unit is designed to be mounted
on the ceiling, or on the wall if necessary.
• Pencil
• Drill with 3/16” (5 mm) drill bit
• Standard flathead scr
ewdriver
• Hammer
• Pliers to activate optional “tamper-resistant”
locking features
2
• NEVER use an open flame of any kind to test this unit. You might
accidentally damage or set fire to the unit or to your home.
The built-in test switch accurately tests the unit’s operation as
required by Underwriters Laboratories, Inc. (UL).
• If the Alarm ever fails to test properly, replace it immediately.
Products under warranty may be returned to the manufacturer
for replacement. See “Limited Warranty” for details.
• DO NOT stand close to the alarm when the horn is sounding.
Exposur
e at close range may be har
mful to your hearing. When
testing, step away when hor
n starts sounding.
It is important to test this unit every week to make sure it is working
properly.
Using the Test/Silence button is the recommended way to
test this Smoke Alarm. Press and hold the Test/Silence button on the
cover of the unit until the alarm sounds and the Escape Light
®
turns on
(the unit may continue to alarm for a few seconds after you release the
button). If it does not alarm, make sure the unit is receiving power and
test it again. If it still does not alarm, replace it immediately.
During testing you will hear a loud, repeating horn pattern: 3 beeps,
pause, 3 beeps, pause. The Escape Light
®
will turn on. LED flashes
once every second.
WEEKLY TESTING
REGULAR MAINTENANCE
This unit has been designed to be as maintenance free as possible, but
ther
e ar
e a few simple things you must do to keep it working pr
operly
.
Use only the replacement batteries listed below. The unit may not
operate pr
operly with other batteries. Never use r
echar
geable
batteries since they may not provide a constant charge.
•
T
est it at least once a week.
• Clean the Smoke Alarm at least once a month; gently vacuum off
any dust using your household vacuum’
s soft brush attachment,
and test the Smoke Alarm after cleaning. Never use water, cleaners
or solvents since they may damage the unit.
• If the Smoke Alarm becomes contaminated by excessive dirt, dust
and/or grime, and cannot be cleaned to avoid unwanted alarms,
r
eplace the unit immediately
.
• Relocate the unit if it sounds frequent unwanted alarms.
See “Locations to A
void For Smoke Alarms” for details.
• When the battery becomes weak, the Smoke Alarm unit will “chirp”
appr
oximately once a minute (the low battery war
ning). This low
battery warning should last for up to 30 days, but you should
replace the battery immediately to continue your protection.
Choosing a r
eplacement batter
y:
Y
our Smoke Alarm r
equires one standard 9V battery. The following
batteries are acceptable as replacements: Duracell #MN1604, (Ultra)
#MX1604; Ever
eady (Energizer) #522. You may also use a Lithium
battery like the Ultralife U9VL-J for longer service life between battery
changes.
These batteries ar
e available at many local retail stores.
Actual service life depends on the Smoke Alarm and the environment
in which it is installed. All the batteries specified above are acceptable
r
eplacement batteries for this unit. Regar
dless of the manufactur
er’s
suggested battery life, you MUST replace the battery immediately once
the unit starts “chirping” (the “low battery war
ning”).