


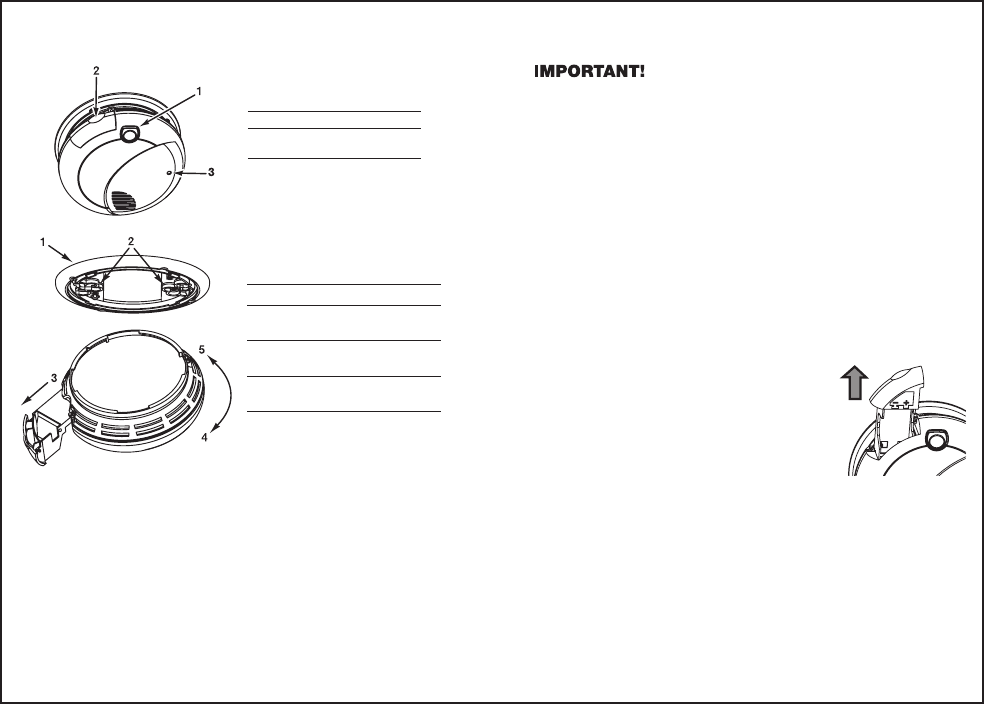
HOW TO INSTALL THIS SMOKE ALARM
THE PARTS OF THIS SMOKE ALARM FOLLOW THESE SIMPLE STEPS!
2
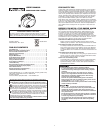
1. Mounting bracket
2. Mounting slots
3. Battery drawer, install 9V
battery here
4. Turn this way to remove
from bracket
5. Turn this way to attach
to bracket
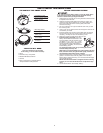
1. Test/Silence button
2. Battery drawer
3. Power indicator light and
alarm indicator
If you want to lock the battery drawer, or lock the Smoke Alarm
to the mounting bracket, please read the “Optional Locking
Features” section before you begin installation.
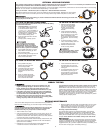
1. Hold base firmly and twist the mounting bracket counterclockwise
to separate it from the base.
2. Hold the mounting bracket against the ceiling (or wall) so the
vertical mounting slot is aligned in the 12 o’clock position and
trace around the inside of the mounting slots (vertical and
horizontal mounting).
3. Put the unit where it won’t get covered with dust when you drill
the mounting holes.
4. Using a 3/16” (5 mm) drill bit, drill a hole through the center of the
oval outlines you traced.
5. Insert the plastic screw anchors (in the plastic bag with screws)
into the holes. Tap the screw anchors gently with a hammer, if
necessary, until they are flush with the ceiling or wall.
6. Attach the mounting bracket to the ceiling or wall.
7. Install the battery (included). Open the
battery drawer. Match the terminals on the
end of the battery with the terminals on the
unit. Match “+” to “+” and “-” to “-.” Push
the battery in until it snaps in securely and
cannot be shaken loose. If the battery is
not snapped in completely, the unit cannot
receive battery power.
Or, activate the battery back-up by removing the “Pull to
Activate Battery Back-Up” tab.
NOTE: After you install the battery, the power indicator light may
flash. (If the unit alarms, the light will blink rapidly, and the horn
will repeatedly sound 3 beeps, pause, 3 beeps.)
8. Attach the Smoke Alarm to the mounting bracket. Line up the
guides on the alarm’s base with the guides on the mounting
bracket. When guides are lined up, turn the base clockwise (right)
until it snaps into place.
NOTE: Once the Smoke Alarm is snapped onto the mounting
bracket, you can rotate the Smoke Alarm to adjust the align-
ment.
9. Test the Smoke Alarm. See “Weekly Testing.”
TOOLS YOU WILL NEED:
This unit is designed to be mounted
on the ceiling, or on the wall if necessary.
• Pencil
• Drill with 3/16” (5 mm) drill bit
• Standard flathead screwdriver
• Hammer
• Pliers or utility knife, to activate optional
“tamper-resistant” locking features