


Page 9
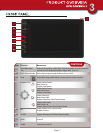
TV
Video
Audio
CAMERAS & WIRELESS RECEIVER
INSTALLATION
4
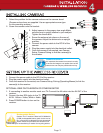
INSTALLING CAMERAS
1. Select the position for the camera and secure the camera stand.
(Screws and anchors are supplied. Use an appropriate screw type
for the mounting surface.)
2. Screw the camera onto the bracket.
SETTING UP THE WIRELESS RECEIVER
1. Connect the power cable to the DC IN of the receiver.
2. Plug the power supply into the electrical outlet.
3. Once the receiver is connected, see Camera Setup, Pairing (Operating Menus) to link the
camera(s) to the receiver.
OPTIONAL: VIEW ON TELEVISION OR OTHER MONITOR
1. If connecting to another monitor such as a TV: Connect the AV cable into the AV OUT of the
receiver.
2. Connect the two RCA jacks to the TV
AV IN. Yellow = Video; White = Audio
3. Press POWER button to turn on the
receiver.
3. Adjust camera to the proper view angle Make
sure the lens is upright relative to your subject.
Tighten the thumb bolt.
4. Screw the antenna into place on the rear of
the camera. Adjust the antenna to an upright
position.
5. Connect the power cable to the DC IN of the
camera.
6. Plug the power supply into the electrical outlet.
7. Once the camera is connected, see Camera
Setup, Camera Pairing to link the camera(s) to
the receiver.
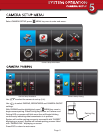
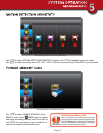
Camera Orientation
It’s important the camera is mounted correctly
to ensure the image is not upside down as the
camera lens can only be positioned one way.
Rechargeable Battery
Caution: The 7” monitor is fitted a 3.7V 2000mAH
(LI-ON) rechargeable battery pack. At the end of
life, it should not be disposed of with household
waste. Please recycle where the facilities exist.
Check with your local authority or retailer for recycling advise.