


3
4
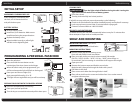
INITIAL SETUP
EMERGENCY OVERRIDE KEY USE
Insert emergency override key into
the lock, turn it counterclockwise
and pull the door open.
BATTERY INSTALL
1
Remove battery cover.
2
Install four (4) AA batteries. Make sure to
install them facing the proper direction.
3
Replace the battery cover.
4
When installed correctly, a yellow light
will ash on the digital keypad.
PROGRAMMING A PERSONAL PASSCODE
1
Open the safe door.
2
Press and hold the reset button on the
inside edge of the door closest to the hinges.
3
When the safe is ready to be programmed, you
will hear a beep and a light will ash on the keypad.
3
Enter your new three to eight (3-8)
digit passcode followed by ‘A’ or ‘B’.
3
The light will once again ash and you will hear a beep.
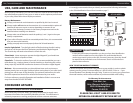
OPENING YOUR SAFE WITH THE DIGITAL KEYPAD
1
Insert the companion key or knob key.
2
Enter your personal passcode.
3
Turn the key to counterclockwise and pull the door open.
3
2
1
6
5
4
9
8
7
B
0
A
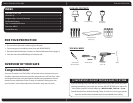
Initial Setup Shelf and Mounting
CLOSING SAFE
IMPORTANT
Turn the light switch o before closing the safe. Leaving the
light switch on will result in loss of battery power.
1
Push door closed.
2
Turn key clockwise fully into locked position.
If safe fails to open with your personal passcode, try the following:
1
Check to see if the batteries have been installed properly and replace if necessary.
2
Lock-out may have occurred. Wait 15 minutes before trying again.
3
Contact Consumer Aairs at 1-800-323-9005.
SECURITY LOCKOUT PERIODS
For added security, the safe will automatically lockout entry for 15 minutes after
three attempts to open with an invalid passcode.
SHELF AND MOUNTING
INSTALLING THE SHELF 2072F ONLY
Slide shelf into place on top of shelf racks.
MOUNTING INSTRUCTIONS
1
Remove rubber feet and mounting screws
from safe with Phillip’s head screwdriver.
2
Place your safe where you want it to be mounted. Safe weighs
(36.1 lbs - 2072F; 19.8 lbs. – 2073F; 13.2 lbs. – 2025F) when empty so
be sure that if you’re mounting on a shelf that it will support the weight.
3
Open your safe.
4
Remove the bottom carpet and nd the screw holes.
Mark the safe’s placement through the holes with a pencil.
5
Drill holes in the shelf.
6
Place screws and rubber feet through holes in shelf.
7
Place safe on shelf over the screws and rubber feet. Use a socket wrench
to tighten safe into place.
3
2
1
6
5
4
9
8
7
B
0
A
AA
AA
+
-
AA
+
-
AA
+
-
AA
+
-
AA
+
-
AA
+
-
AA
+
-
AA
+
-
AA
+
-
AA
+
-
AA
+
-
AA
+
-
AA
AA
+
-
AA
+
-
AA
+
-
AA
+
-
AA
+
-
AA
+
-
AA
+
-
AA
+
-
AA
+
-
AA
+
-
AA
+
-
AA
+
-
3
2
1
6
5
4
9
8
7
B
0
A
Beep
3
2
1
6
5
4
9
8
7
B
0
A
Beep
AA
AA
+
-
AA
+
-
AA
+
-
AA
+
-
AA
+
-
AA
+
-
AA
+
-
AA
+
-
AA
+
-
AA
+
-
AA
+
-
AA
+
-
AA
+
AA
+
-
AA
+
-
AA
+
-
AA
+
-
3
2
1
6
5
4
9
8
7
B
0
A
3
2
1
6
5
4
9
8
7
B
0
A
1
2
3
4
AA
+
AA
+
-
AA
+
-
AA
+
-
AA
+
-
1
5
6
7
4
4
1