


Water
• Use tap water for all your cleaning
needs.
• However, if you live in an area with
hard water, use de-mineralized /
distilled water when steaming light
colored fabrics to eliminate the
possibility of hard water stains.
IMPORTANT: Do NOT add cleaning
solutions, scented perfumes, oils or any
other chemicals to the water used in
this appliance. Use tap water or
distilled/purified water if the tap
water in your area is very hard.
Efficient Work
• For vertical surfaces, wipe with a
towel from the top down, in this
way the dirty water will not soil
surfaces already cleaned.
• Avoid changing brushes back and
forth while cleaning.
• Start with the smallest brush to
clean tight spots and corners first.
• Use a towel to wipe dirt as soon as
possible, otherwise it will dry and
re-adhere to the surface.
If you consistently use demineralized or
distilled water, cleaning the tank is
unnecessary.
Rinsing Out the Steam Cleaner
Normally, a periodic rinse of your steam
cleaner will free it from deposits. This is
recommended every 10-15 tankfulls, to
free up any scale deposits from the tank.
Fill the boiler with 20 oz. of water and
shake the cleaner vigorously. Tilt the
cleaner upside down to empty the boiler of
water and any scale deposits.
Descaling Your Steam Cleaner
If the tap water in you area contains a high
level of calcium deposits and you have
been using tap water to do your steam
cleaning, you should descale your unit
after 10-15 tankfulls.
Step 1: Unplug the steam cleaner from
the power source before you
descale the boiler. Allow to cool.
Step 2: Fill the boiler with 1 part
vinegar and 5 parts water and
leave overnight or for a period
of approximately 8 hours. Do
not screw the safety/filler cap
onto the steam cleaner while
you are descaling the boiler.
Do not use the steam cleaner
while descaling solution is
inside the boiler.
Step 3: After the period of soaking, turn
the steam cleaner upside down
to empty solution from the
boiler. Due to the fact that a
small amount of solution will be
left in the boiler, it is necessary
to rinse the boiler out with clean
water 2 or 3 times. Your steam
cleaner is now ready for use.
Note: When storing your unit, always
drain any residual water in the boiler and
do not tighten the safety filler cap onto the
unit. Always leave the safety filler cap
loose on the unit when not in use.
To Descale the Steam Cleaner
Care and Maintenance
TIPS ON HOW TO USE YOUR SYSTEM OPERATING INSTRUCTIONS
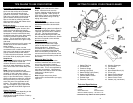
Components
On/Off Switch: The unit is “On” when the
switch is in the “Pushed down” position.
The light on the On/Off switch will
illuminate when the unit is on. The unit is
“Off” when the switch is in its “Up”
position.
Heating Light (red): This light will
illuminate when the unit is heating up the
water.
Steam Ready Light (green): When this
light is “On”, it indicates that the steam is
ready to use.
Pressure Gauge: This helps you to
monitor the steam pressure in the unit as
you are working.
CAUTION: Read the instructions
for “Filling the Water Tank” before
opening the Safety Cap.
CAUTION: Always unplug before
filling. ALLOW UNIT TO COOL
FOR FIFTEEN (15) MINUTES
BEFORE REFILLING.
IMPORTANT: Do NOT add cleaning
solutions, scented perfumes, oils or any
other chemicals to the boiler in this
appliance. Use tap water or
distilled/purified water if the tap water
in your area is very hard.
IMPORTANT: Always insure that the
unit is “UNPLUGGED” from the wall
receptacle prior to initial filling or re-filling
the water tank and has been allowed to
cool for 15 minutes. Never attempt to fill
this unit under a water tap, always use
the filling funnel provided.
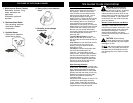
Fig. 1
Step 1: Before refilling the steam cleaner,
make sure that the unit is NOT
plugged in and has been allowed to
cool for fifteen (15) minutes.
Step 7: Connect desired attachments
onto the flexible steam hose.
Step 8: Plug the unit into a standard (120
volt, grounded) wall receptacle.
Allow approximately 15 minutes
for vapor to reach its working
temperature and pressure. The
green ready light will illuminate
when the unit is ready for use.
Always point nozzle outlet in a safe
direction.
NOTE: When the steam cleaner has run
out of water, steam output will
cease.
WARNING: Allow
unit to cool for
15 minutes before refilling.
When refilling the steam
cleaner while the boiler is still hot, there
is a risk that water will squirt back
during filling and cause scalding.
Extreme care should be taken when
refilling the unit. Use caution when
opening the Safety/Filler Cap as cap
may become hot during use and
escaping steam can cause scalding.
Fig. 2
Assembly of Casters
The casters for your new steam cleaner
are packed and shipped unassembled.
To assemble the casters to the base of
the steam cleaner, simply insert the
caster stems onto one of the four (4)
posts on the base and push downward
with the palm of your hand. Repeat for
the next three (3) casters.
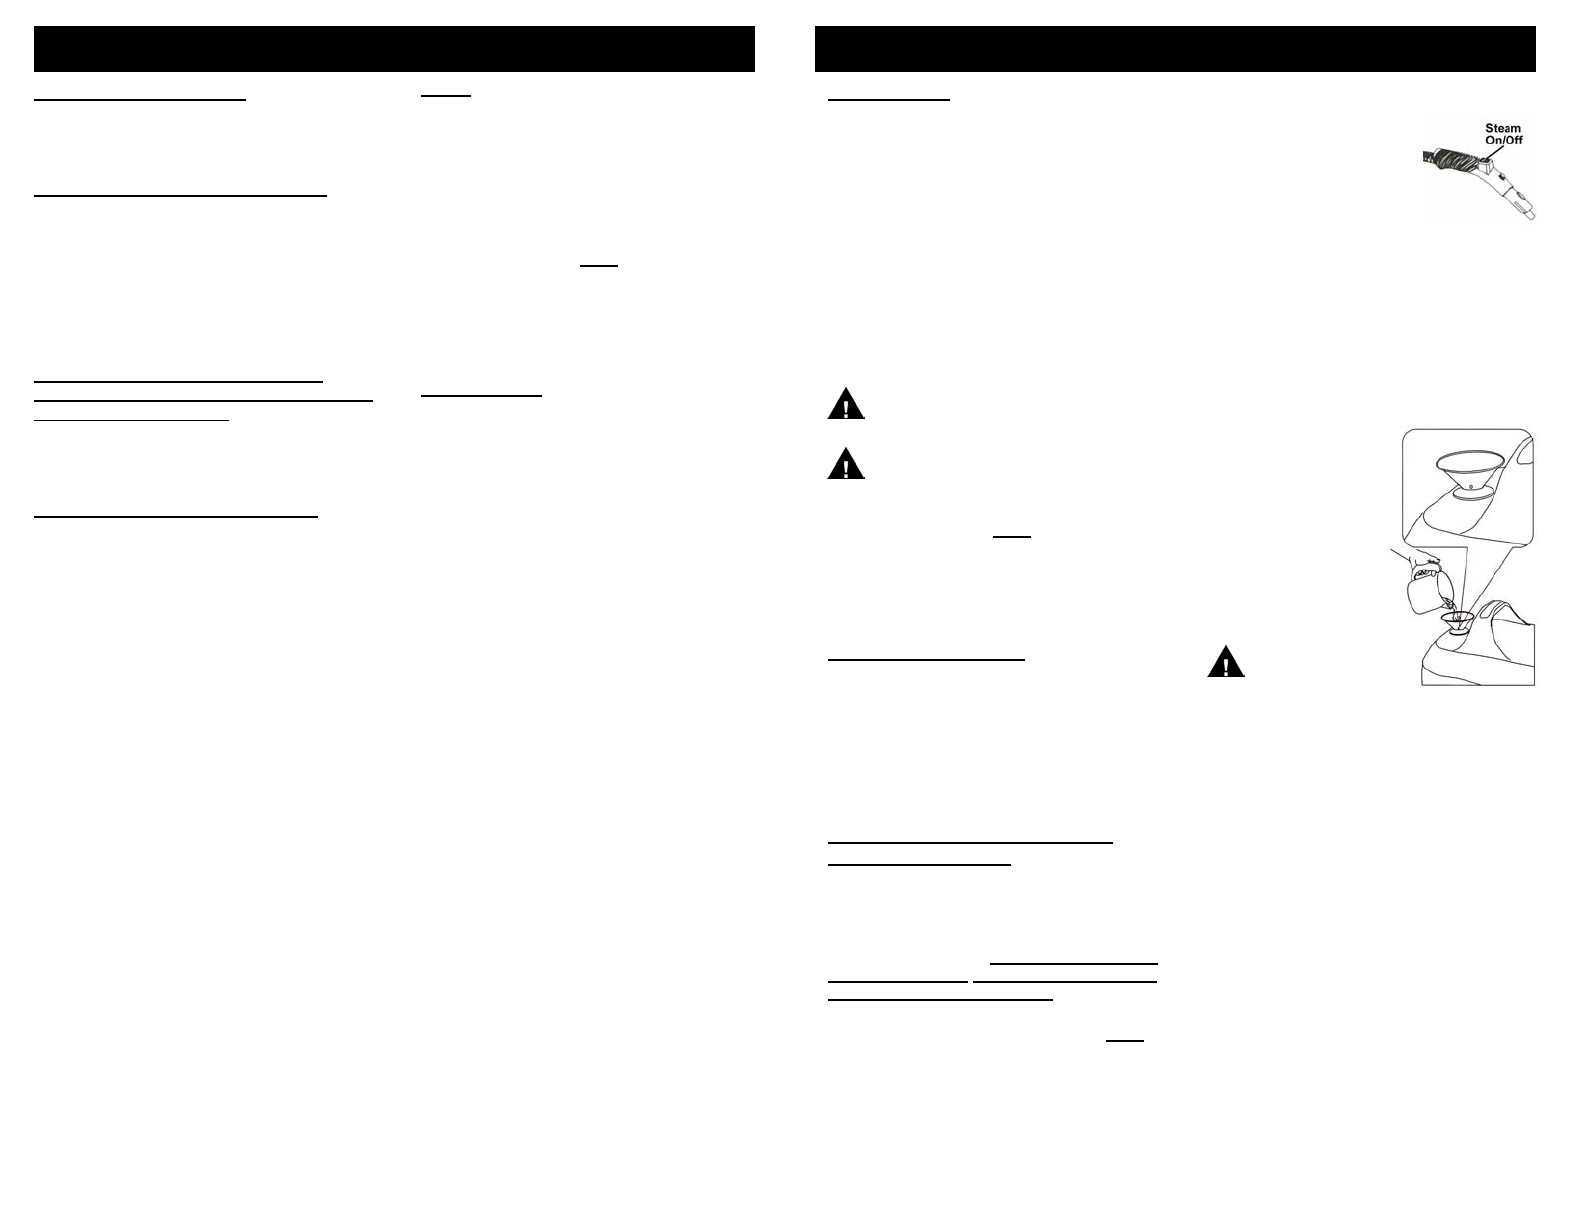
Step 2: Plug the power cord into an
electrical outlet and press the
steam switch on the
hand grip to the
“ON” position to
vent any residual
steam that is in the
boiler. (Fig 1)
Step 3: Remove the power cord from the
electrical outlet and turn the steam
switch on the hand grip to the “OFF”
position. (Fig. 1)
Step 4: Place the unit on a flat, stable
surface. Slowly turn the safety
filler cap counter clockwise until it is
removed.
Step 5: Place the funnel in the tank
opening as illustrated in Fig. 2.
For optimum
steam, it is
recommended
that no more
than 84 US fluid
ounces of water
be added to a
dry unit.
Do Not Overfill.
Step 6: Replace the
Safety Filler Cap.
Filling or Refilling Your Steam
Cleaner With Water
8 5