


OPERATING INSTRUCTIONS
Before Use
1. This cordless vacuum is powered by
rechargeable nickel-cadmium
batteries. Before using the vacuum,
charge the vacuum cleaner for a
minimum of 20 hours.
NOTE: Ensure that the On/Off
switch is in the “Off” position
before charging.
3
NOTE:Peak performance may only
be realized after the unit has been
charged and discharged two (2) or
three (3) times.
IMPORTANT:To maintain peak
performance of your cordless hand
vacuum, it is recommended that the
unit be fully discharged, then
completely re-charged at least once a
month.
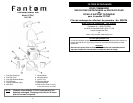
Fig. 1
4. Do not store in areas of high
temperature or humidity.
5. After 3 months of non-use, the
product should be fully discharged
and then recharged to maximize
battery power.
6. Use only the charger supplied with
the product. If other chargers are
used, the batteries can fail causing
damage to the battery, product, or
personal property.
NOTE: NiCd batteries have a long
useful life but at some time they will
need to be replaced. To purchase
replacement batteries, visit:
www.fantom.com.
NOTE: If the product has never been
used or has been stored for an extended
period of time without use – it will take
several complete charge and discharge
cycles to realize the full operational time
of your product.
To maximize the life of your NiCd batteries:
1. Charge for a minimum of 20 hours
before initial use. Failure to do so will
reduce the product’s battery life
significantly.
2. Do not store unit with the charging adapter
attached and plugged in.
3. Only recharge when the batteries are fully
discharged (or as close to fully discharged
as possible).
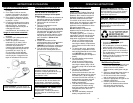
Assembly
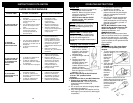
NOTE: Dust cup filter must always
be used when operating the hand
vacuum.
1. To open the dust cup compartment,
push the dust
cup release
button and
remove the
dust cup
container.
(Fig. 2)
2. Verify that the
dust cup filter
is inside, then
re-attach the
dust cup
container to
the hand
vacuum.
(Fig. 3)
3. To attach the crevice tool or the
dusting brush to the hand vacuum,
push the attachment into the
suction hole in the
front of the dust
container.
(Fig. 4)
Fig. 2
Fig. 4
Fig. 3
INSTRUCTIONS D’UTILISATION
14
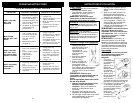
GUIDE DE DÉPANNAGE
PROBLÈME CAUSE POSSIBLE SOLUTION POSSIBLE
LA BALAYEUSE NE
FONCTIONNE PAS
1. Les piles ne sont pas
chargées.
2. Les piles sont épuisées (ne
conservent pas leur
charge).
3. Les contacts entre l'unité et
la base du chargeur sont
sales.
4. Aucune alimentation de
courant à la prise de
courant qui alimente le
transformateur.
1. Recharger l'unité.
2. Remplacer les piles.
Composez le :
1(800) 275-9251
3. Essuyer et nettoyer la
saleté sur les contacts.
4. Vérifier le fusible ou le
coupe-circuit. Remplacer le
fusible ou réarmer le
coupe-circuit.
LA BROSSE
MOTORISÉE NE
FONCTIONNE PAS
1. Les deux tiges métalliques
de la brosse motorisée ne
sont pas en contact avec la
balayeuse.
2. La brosse motorisée est
bloquée.
1. Insérer fermement la
brosse motorisée dans
l'orifice d'admission d'air.
Ceci produira le contact
entre le bec de la brosse
motorisée et le circuit
d'alimentation électrique de
l'unité.
2. Retirer les peluches,
cheveux, etc., de la brosse
motorisée.
LA BALAYEUSE NE
RAMASSE PAS OU
LA PUISSANCE DE
SUCCION EST
FIABLE
1. Le boîtier du collecteur de
poussière est plein.
2. Le filtre du collecteur de
poussière droit être nettoyé
ou remplacé.
3. L'unité droit être rechargée.
1. Vider le contenant du
collecteur de poussière.
2. Enlever e filtre du
collecteur de poussière et
vérifier pour des objets
dans le conduit d'air et
retirer. Nettoyer ou
remplacer le filtre du
collecteur de poussière.
3. Charger l'unité.
LA POUSSIÈRE
S'ÉCHAAPPE DE LA
BALAYEUSE
1. Le boîtier du collecteur de
poussière est plein.
2. Le filtre du collecteur de
poussière n'est pas installé
correctement.
3. Le filtre du collecteur de
poussière est perforé.
1. Vider le boîtier du
collecteur de poussière.
2. Réviser les directives
d'installation du filtre du
collecteur de poussière.
3. Remplacer le filtre du
collecteur de poussière.
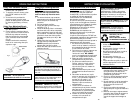
Charging Your Vacuum Cleaner
1. Place the charging base
near an electrical power
outlet (120 V., 60 Hz.)
and plug in the charging
adapter's jack into the
charging base.
2. Plug the charger into wall
outlet.
3. Place the unit in the
charging base. The
charging indicator light
will shine green to
indicate that the vacuum
cleaner is properly
positioned in the charging
base and that the unit is being
charged. (Fig. 1)
NOTE: Ensure that the On/Off switch
is in the “Off” position before
charging.