into the clear bowl. Wipe off any excess ScaleKleen
™
material which may be on the bowl threads or O-ring.
8. Thread the bowl back into the head – hand tight only!
NOTE: The dip tube may become packed with ScaleKleen
™
. This is normal and will not affect the deliming procedure.
9. Turn on the inlet water to the KleenSteam unit by rotating the inlet valve handle.
10. Turn on the power to the steamer. NOTE: This action will quickly introduce the ScaleKleen
™
material directly into the boiler chamber. If you
are deliming a countertop steamer, proceed to step 11. If you are deliming a boiler-base unit, monitor ScaleKleen
™
level in bowl. When
it drops to 1", quickly turn off inlet water at valve handle. Now relieve pressure and unscrew bowl from head. Add another kilogram of
ScaleKleen
™
to the bowl and reintroduce the material into the boiler. Repeat this procedure until four (4) kilograms of ScaleKleen
™
have been
introduced into the boiler chamber.
11. With ScaleKleen
™
material introduced into the boiler chamber and the inlet water turned on, make sure the boiler sump is flooded. Allow the
steamer (countertop or boiler-based) to come up to operating temperature and pressure, and hold for one hour.
12. Thirty minutes into the deliming procedure, turn on steam to cooking chamber(s) for one minute. This will delime the distribution lines, small
orifices, and steam solenoid valves.
13. After one hour of deliming the steamer at operating temperature and pressure, turn the steamer power switch to the off position.
14. Manually blow down the steamer if it is not done automatically when the power is turned off.
15. Fill the boiler with fresh, clean water and repeat blow down a second time to void the boiler chamber of any undissolved loose scale.
NOTE: Depending on the steam generator fill probe configuration on your steamer, de-scaling compounds may leave residual foam bridging
probe electrodes. This can cause a false water level indication leading to “dry firing” of the boiler that can burn out heating elements.
To help ensure against incorrect probe operation, follow all of the instructions provided for de-scaling. This includes adding an additional 1 to 1-
1/2 gallons of water to the de-scaling port(s) once automatic filling has stopped after the de-scaler drain cycle. This raises the water level above
the fill probes, permitting them to be flushed clean and drained with the following drain cycle.
16. After the second blow down, turn the steamer power switch to the off position, and turn off the inlet water at the valve handle on the
KleenSteam unit.
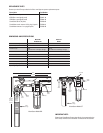
17. Relieve system pressure by depressing the red relief button on the tttt head until all air is expelled and water begins to escape.
18. Unscrew the clear bowl and remove the dip tube from the head. BE SURE TO REPLACE THE DIP TUBE IN IT’S HOLDER ON THE BACKPLATE!
19. Install a new SS-10 cartridge into the head, and screw the bowl back into the head. Hand tighten only!
20. Turn on the inlet water. Relieve trapped air in the clear bowl by depressing the red relief button on the AR-X head until all air is expelled and
water starts to escape.
21. Turn the steamer power switch to the on position. Steamer is now ready to be placed back into service.


