VII. Specific Model Data
Mounting
The Kooltronic Special Purpose Air Conditioners K_NA4C3P21R have been engineered to be installed easily.
These units utilize double layer gaskets. The first gasket layer is placed on the outside perimeter of the front panel
that is sealed against the customer enclosure. The second layer is placed on the two cutouts in the front panel.
The first gasket layer will allow a small amount of water between the two layers. The second gasket layer totally
protects an enclosure from ambient air, rain or hose down water.This gasket arrangement assures the integrity of
the closed loop system and is necessary to maintain the NEMA 4 rating.
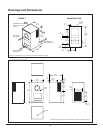
Prior to mounting, refer to page 8 for the general arrangement drawing showing dimensions and locations of
mounting holes and cutouts. Prior to cutting or drilling, make sure that cutouts and mounting holes do not interfere
with components inside the cabinet. To avoid damaging your air conditioner, please read the following information
before installation:
CAUTION
7
If the air conditioner is mounted to the cabinet door you must be sure that the door hinges will
support the additional weight of the air conditioner. Also be certain that when the door is
opened fully, the cabinet does not become unbalanced. The actual weight of the unit can be
found in the performance specifications.
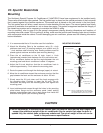
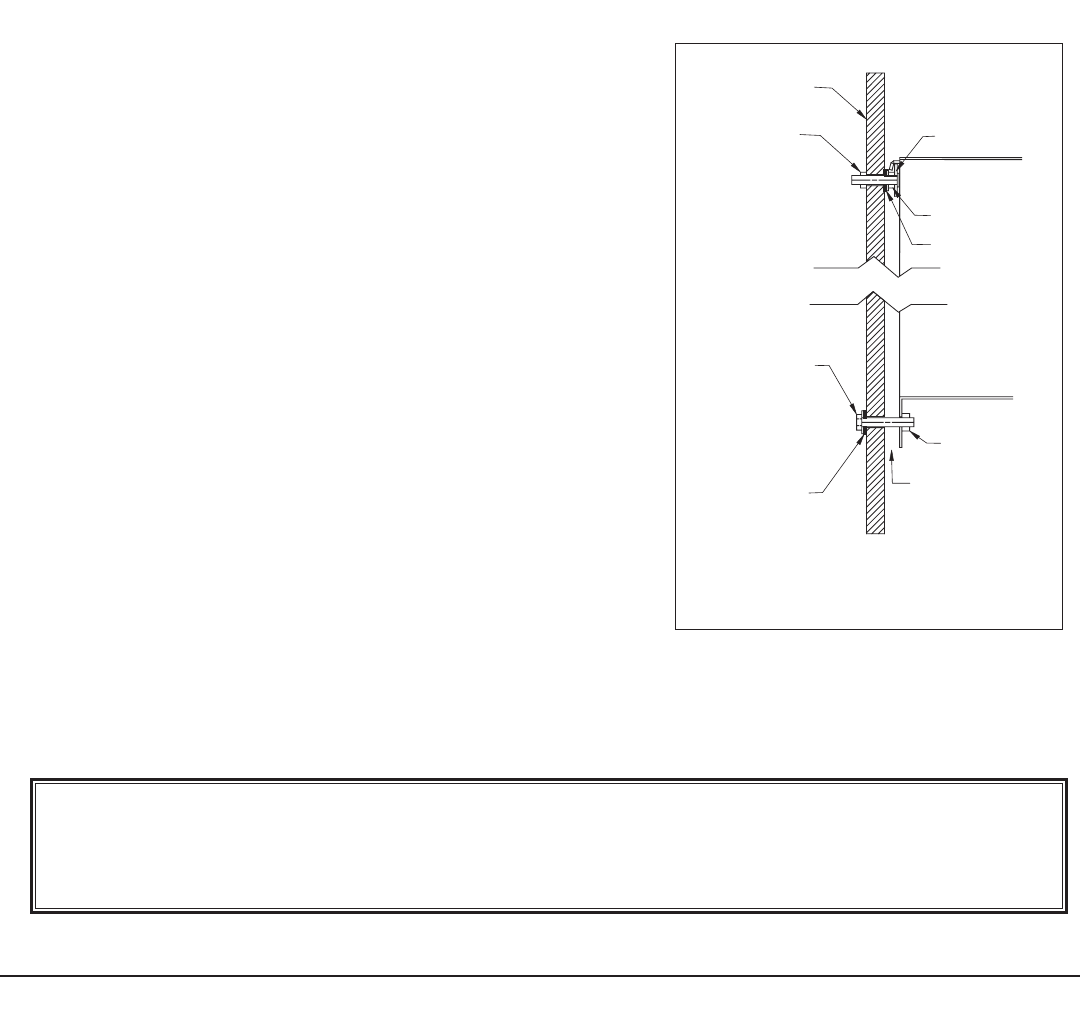
MOUNTING DRAWING
INSTALL THE MOUNTING PLATE W/STUDS
TO THE OUTSIDE WALL OF THE CUSTOMER'S
ENCLOSURE BEFORE INSTALLING A/C UNIT.
NOTE:
ENCLOSURE WALL
TYP. (3) PLACES
1/4'' NUT
CUSTOMER'S
ENCLOSURE
TYP. (3) PLACES
BOLT 1/4'' X 1-1/4''
RUBBER WASHER
MOUNTING PLATE
WITH STUDS
TOP SECTION
OF A/C UNIT
BOTTOM SECTION
OF A/C UNIT
RUBBER WASHER
1/4'' NUT
1/4'' NUT
TIGHTEN NUT TO
CLOSE GAP
1. It is recommended that a lift truck be used for installation.
2. Attach the Mounting Plate to the enclosure using (3)
1
/
4
-inch
stainless steel nuts, (3) sealing washers as a spacer and (3)
1
/
4
-inch stainless steel mounting nuts. Sealing washers must be
placed against customer enclosure (see mounting drawing).
3. Place the air conditioner on the lift truck. Insert a 1-inch
(approximate) wooden block between the lift truck bottom and
the air conditioner bottom so that the angle between the unit
mounting panel and the air conditioner is about 15 degrees.
4. Adjust the lift truck height so that the air conditioner hook is
located approximately
1
/
2
-inch above the mounting plate.
5. Route the power cord through the discharge (upper) air cutout.
6. Move the air conditioner toward the enclosure panel so that the
gap between the hook and the enclosure is about .05-inch.
7. Slowly move the lift truck down until the hook engages with
the mounting plate. Continue to lower the lift truck. The air
conditioner will hang from the mounting plate flush against the
mounting panel.
8. Insert stainless steel screws through the holes in the mounting
plate bottom flange and the enclosure panel. Install sealing
washers and stainless steel nuts on each screw from inside the
enclosure and tighten (see mounting drawing).


