


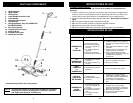

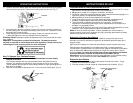


Fig. 2
Lower Handle
Lower Handle
Extension Tube
Folding Pivot
Upper Handle
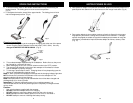
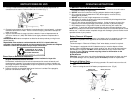
1. To assemble your sweeper, first remove the captive nut and bolt located on the
power nozzle. Push the lower handle onto the power nozzle and then replace the
captive nut and bolt. Tighten using a screw driver. (Fig. 1)
Note: DO NOT over tighten as doing so could damage the sweeper.
Assembling Your Cordless Sweeper
You should remove it from the carton and familiarize yourself with all the components
listed per the exploded view drawing. (Pg. 2) This will help you in the assembly and
operation of your cordless sweeper.
Note: The charging adapter and lower handle may be shipped inside the dust cup.
For shipping, the captive nut and the bolt are securely fastened to the power nozzle,
where the lower handle will attached.
3
OPERATING INSTRUCTIONS
2. Assemble the handle by inserting the lower handle extension tube into the lower
handle. Push until you hear it snap into place. Next, push the plastic forward
folding hinges onto the lower handle extension tube until you hear it snap into
place. Finally, insert the upper handle into the forward folding until you hear it
snap into place. (Fig. 2)
Captive Nut
Lower Handle
Bolt
Fig. 1
18
INSTRUCCIONES DE USO
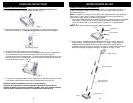
Fig. 12
Fig. 11
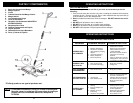
Fig. 13
Limpieza del Recipiente de la Tierra
Para obtener el mejor rendimiento, limpie el recipiente para la tierra luego de cada uso.
1. Tire del recipiente para la tierra hacia fuera desde el costado. (Fig. 11)
2. Vacíe el contenido del recipiente para la tierra. (Fig. 12) Si lo desea, puede
enjuagarlo con agua, pero debe secarlo completamente antes de colocarlo
nuevamente en la barredora.
3. Deslice el recipiente vacío dentro de la barredora.
4. Periódicamente, puede ser necesario quitar la cubierta transparente del cepillo,
ubicada en el frente del cabezal motorizado, para quitar pelusa, pelos y tierra
acumulada alrededor del cepillo giratorio. Para quitar la cubierta transparente del
cepillo, sosténgala y jale hacia arriba hasta que se destrabe de las lengüetas
ubicadas en la parte superior del cabezal motorizado. (Fig. 13)
5. Para volver a colocar la cubierta transparente del cepillo, alinee la cubierta con las
dos trabas de la parte superior del cabezal motorizado y presione hacia abajo y
hacia la parte posterior de la unidad.
Advertencia: NO encienda la unidad accidentalmente mientras la limpia.
Advertencia: No debe guardarse ni colocarse ningún artefacto eléctrico o
electrónico en zonas con mucho calor o humedad. NO guarde su barredora
inalámbrica cerca de cocinas, radiadores, calefactores o en un baño o lugares
para bañarse.