


8 TOLL FREE: 1-800-798-7398 9www.sharkclean.com
CARE AND MAINTENANCE - cont.
For any other servicing, call Customer Support at 1-800-798-7398
or visit www.sharkclean.com
TROUBLESHOOTING GUIDE & REPLACEMENT PARTS
PROBLEM
Vacuum will not operate
Charging indicator does not
illuminate
Motorized brush will not work
Vacuum will not pick up or suction
power is weak
Dust escapes from vacuum
Vacuum turns off on its own
Run time has decreased over time
SUGGESTED SOLUTION
1 The battery may be depleted. Charge the vacuum until the complete oval
around the power button is illuminated, indicating a complete charge.
2 See “Restarting after a jam” on page 8.
1 Check to see if the charge adapter is plugged in properly to the outlet and to
the charge stand.
2 Ensure that the vacuum is properly seated in the charging base.
3 Ensure there is no debris accumulated on the metal charge contacts on the
back of the nozzle and on the charge base.
4 Ensure that the electrical outlet is supplying power to the charger. Check the
fuse/breaker.
1 See “Cleaning the Motorized Brush and Clearing Blockages” on page 7 and
“Restarting after a jam” on page 8.
2 Ensure that the motorized brush is properly attached.
1 Empty the dust cup container.
2 Remove the dust cup filter, check for blockages and remove. Clean or
replace the dust cup filter (See “Replacement Parts” below). Note: It is
important to clean the dust cup filter every month.
3 The battery may need to be charged, charge until the complete oval around
the power button is illuminated.
4 Ensure that the motorized brush is properly attached.
1 Empty the dust cup container.
2 Ensure that the filter is inserted completely into its holder below
the dust cup.
3 Check for punctures in dust cup filter or cracks in the dust cup and replace.
1 Charge the unit until the complete oval around the power button is
illuminated.
1 Perform the following steps:
a Charge the vacuum for a minimum of 7 hours.
b Run the vacuum until it turns itself off.
c Charge the vacuum for a minimum of 7 hours.
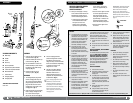
REPLACEMENT PARTS
A XA1106 Charging Adapter
B XBT1106 Battery pack
C XF1100 Filters (2)
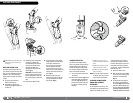
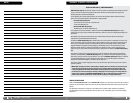
4 Inspect the rotating brush for
a build-up of debris. Remove
anything wound around the
brush by carefully cutting it
with scissors. The brush roll is
equipped with a raised cutting
guide to make inserting scissors
easier. Avoid damaging or cutting
the bristles. (fig. 13)
5 Use a flashlight to inspect inside
the air duct at the bottom of the
main body and remove any debris
or blockages that may be there.
Reattach the motorized brush,
ensuring it clicks into place.
6 Remove the dust cup and use the
flashlight to check the air path
on the spine of the vacuum and
remove any debris or blockages.
Then replace the dust cup.
BRUSH BAR REMOVAL
1 For easier cleaning, the brush roll
can be removed from the nozzle.
Using a coin, turn the dial next to
the brush roll access door to the
unlock position. (fig. 14) Remove
the brush roll access door.
(fig. 15)
2 Slip the black belt off of the white
gear and lift out the brush roll.
(fig. 16)
BRUSH BAR INSERTION
1 To reinsert the brush roll, first slip
the black belt onto the white gear
(fig. 17a), then align the white
square on the opposite side of
the brush roll into the square slot.
(fig. 17b)
2 Align the white square on the belt
side and position into its slot.
(fig. 18)
3 Replace the door, inserting the
wheel side first. Use a coin to
move the dial to the lock position.
RESTARTING AFTER A JAM
If the indicator light around the power
button flashes, the brush bar has
jammed and will cease to operate.
1 Turn the unit off and allow it to
cool down for 10 seconds.
2 Ensure that nothing is blocking
the motorized brush or wrapped
around the brush bar.
3 Turn the power on and the unit
should operate normally.
fig. 14
fig. 15
fig. 16
fig. 17a
fig. 17b
fig. 18
fig. 13