


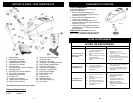
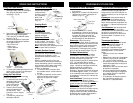


On/Off Power
Button
Red Mark
Yellow Mark
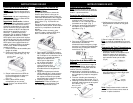
Using Your Vacuum
1. Insert the power plug into the wall outlet.
2. Press the Power On/Off button located
on the unit to turn the vacuum cleaner
“On”. (Fig. 13)
3. To rewind the power cord, press the
cord rewind button with one hand
and guide the power cord with the
other hand to ensure that it does not
whip causing damage or injury.
Note: Once all attachments are in place,
unwind a sufficient length of cable and
insert the plug into the wall outlet. A
yellow mark on the power cord shows the
ideal cable length. Don't pull the power
cord beyond the red mark. (Fig. 13)
OPERATING INSTRUCTIONS
Fig. 13
Dust Bag Full Indicator
The dust bag full indicator may turn on
while you are cleaning to indicate that
the HEPA dust bag is full and requires
replacement or if there is a blockage in
the hose.
Note: You can test the dust bag full
indicator by placing your hand over the
end of the flexible hose when the
vacuum is running. The dust bag full
indicator should turn red.
Important: This unit is equipped with a
motor protective thermostat. If for some
reason the vacuum cleaner should
overheat, the thermostat will automatically
turn the unit off. Should this occur:
• Push the On/Off button once.
• Disconnect the plug from the power
source.
• Check the source of overheating
problem. (i.e. clogged hose or
filter.)
• If clogged hose or filter is found,
unclog the hose and replace the filters.
• Wait at least 45 minutes before
attempting to reuse the vacuum.
• After unit has cooled down for 45
minutes, plug in the cleaner and push
the On/Off button. The vacuum
should start again.
• If the vacuum still does not start,
contact customer service at
1 (800) 798-7398.
Motor Thermostat
Warning: To reduce the risk of electric
shock, the power cord must be
disconnected before removing the dust
bag cover, the HEPA dust bag, the filters
or performing maintenance/trouble
shooting checks.
Power Cord
Your vacuum cleaner includes a power
cord which is automatically retractable.
To extend your power cord, pull from rear
and extend to desired length up to the
yellow mark on the power cord. (Fig. 13)
Do not pull the power cord beyond the
red mark. When vacuuming is finished,
first switch off power and disconnect plug
from electrical outlet. Then press on cord
rewind button. If the cord does not fully
retract, pull it out again and then press on
cord rewind button.
Warning: Hold the plug when rewinding
the cord. Do not allow the cord to whip
when rewinding.
Note: Before using the appliance,
unwind a sufficient length of cable and
Insert the plug into the wall socket. A
yellow mark on the power cord shows the
ideal cable length. Don’t pull the power
cord beyond the red mark.
6
Suceur Plat
Pour radiateurs, fissures,
coins, plinthes et entre les
coussins.
25
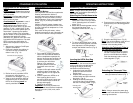
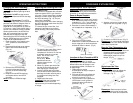
CONSIGNES D’UTILISATION
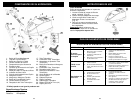
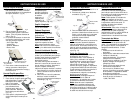
Utilisation du Bec Électrique
1. Pour attacher le bec électrique au tube
télescopique, insérez-le tube dans le
réceptacle du bec électrique. (Fig. 8)
Brosse à Meubles
La brosse à meuble est
utilisée sur les meubles.
Sa surface unique
en fait un excellent outil pour éliminer les
poils d'animaux.
Remarque: Cet outil n’est pas un
appareil de toilettage et ne doit pas être
utilisé sur les animaux.
La brosse à épousseter
s’utilise sur les meubles.
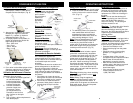
Commande de Succion Variable
La commande de succion variable située
sur le dessus de l'appareil est
recommandée pour les travaux légers
tels les rideaux ou les surfaces fines qui
ne nécessitent pas une succion
puissante.
La commande de succion variable vous
permet d'augmenter ou de réduire la
force de succion selon la tâche de
nettoyage. Augmentez la succion lorsque
vous nettoyez les tapis et réduisez-la
lorsque vous époussetez les meubles ou
les rideaux.
1. Pour réduire le niveau de succion,
faites glisser le bouton de commande
de succion variable vers la gauche.
2. Pour revenir au mode de succion
puissante, faites glisser le bouton à
la droite jusqu'à ce qu'il s'arrête.
(Fig. 12)
Faible
Commande
de succion
variable
Fig. 12
Fig. 8
2. Appuyez sur le sélecteur de hauteur
de tapis pour régler la hauteur du
batteur. Il y a quatre (4) hauteurs
différentes de tapis. (Fig. 9)
3. À chaque pression sur la pédale, la
fenêtre de sélection de hauteur de
tapis change de couleur.
- Bleu : Ultra court
- Vert : Court
- Jaune : Moyen
- Blanc : Long
Relâche du
tube
télescopique
Fig. 9
Sélecteur de
hauteur de
tapis
4. Pour retirer le tube télescopique du bec
électrique, appuyez sur la relâche du
tube télescopique et retirez le tube.
Fenêtre du
sélecteur de
hauteur de tapis
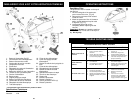
Compartiment de Rangement
d'outils
Votre aspirateur est doté d'un
compartiment de rangement
pour le suceur
plat, la brosse à
meubles et
la brosse à
épousseter.
(Fig . 11)
Compartiment de
rangement
Fig. 11
Élevée
Brosse à Épousseter
Fig. 10
Sélecteur
plancher-à-tapis
Utilisation de la Brosse à Plancher
La brosse à plancher convient aux
planchers nus et aux tapis.
1. Pour attacher la brosse à plancher
au tube télescopique,
insérez le tube aussi
loin que possible dans
la brosse à plancher.
2. Poussez le sélecteur
plancher-à-tapis vers
l’avant pour l’utiliser
sur les planchers nus.
Poussez-le vers l’arrière
pour l’utiliser sur les tapis.
(Fig. 10)
3. Pour la retirer, retirez simplement le
tube télescopique.