


OPERATING INSTRUCTIONS OPERATING INSTRUCTIONS
Warning: To reduce the risk of electric
shock, the power cord must be
disconnected before changing the dust bag or
performing maintenance/trouble shooting checks.
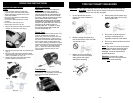
Replacing the Dust Bag
1. To open main unit, press the storage
compartment release button to unlock and lift
the cover. (Fig. 4)
Note Vacuuming new carpet or carpet
with fine powders may clog the dust
bag, so check the bag more often.
Never operate without dust bag in
place.
2. Remove the old dust bag by pushing the
paper bag holder towards the rear of the
unit and then pull up on the cardboard
collar. Dispose of paper bags
. Never
reuse Paper Bags.
3. To insert a new dust bag slide the
cardboard collar end with the slot into the
matching slot on the holder (a). Cardboard
should be behind the (2) two securing tabs
on holder. Press the paper bag holder (b)
toward the front of the unit and make sure
that the paper bag is locked in place.
(Fig. 5)
4. Close storage compartment cover.
Warning: Before closing main unit,
make certain that paper bag is well inside
the compartment and does not get caught
between the hinges when closing the cover.
Fig. 4
Fig. 5
Paper bag
holder
b) Push in
a) Cardboard
insert
The vacuum cleaner has a built-in pressure
safety valve. As soon as the dust bag is full
or the suction hose is blocked, the dust bag
full light will come on. If the suction power is
noticeably diminished, first check if the
suction hose is blocked. Then check if dust
bag is full. If this is the case, change it. We
recommend that the dust bag be changed
when it is 2/3 full so that full suction can
be maintained.
Changing the Pre-Motor Filter
The pre-motor filter is located inside the
storage compartment behind the dust bag.
(Fig. 6)
• The pre-motor filter should be cleaned at
least twice a year or when it becomes
visibly soiled.
• Always operate the cleaner with the filter
installed.
• Disconnect from electrical outlet
before cleaning the filter.
• Do not use a washing machine to
rinse the filter.
• Do not use a hair dryer to dry it.
• Always allow 24 hours to air dry.
1. Press the storage compartment release
button and open the cover.
2. Remove the paper bag from the unit.
3. Pull the pre-motor filter assembly out of
the unit.
4. Remove the pre-motor filter from the
filter grill.
5. Rinse the pre-motor filter in lukewarm
water and let the pre-motor filter air dry
for 24 hours until it is completely dry.
(Fig. 7)
6. Replace the pre-motor filter into the filter
grill and replace back into the unit.
7. Replace the dust bag and close the
storage compartment cover.
Pre-motor
filter
Fig. 6
Full Dust Bag Indicator
Your vacuum cleaner includes a manual
variable suction control. The suction power can
be adjusted by moving the slide regulator to the
desired position between Open and Closed.
(Fig. 3) Open gives you less suction, closed
maximum suction. For example, less suction is
required on upholstery and draperies compared
to thick carpets, which require maximum
suction.
Fig. 3
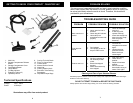
1. Crevice Tool with Brush
For radiators, crevices,
corners, baseboards and
between cushions.
2. Upholstery Brush
The upholstery brush is
used for the furniture
Note: Once all
attachments are
in place, unwind
a sufficient length
of cable and insert
the plug into the
wall outlet. A
yellow mark on
The power cord
shows the ideal
cable length. Don't pull the power cord
beyond the red mark.
1. Insert the power plug into the wall
outlet. (Fig. 1)
2. Press the Power
On/Off button
located on the
unit to turn the
vacuum cleaner
"On".
3. To rewind the
power cord, press the cord rewind
button with one hand and hold the
plug of the power cord with the other
hand to ensure that it does not whip
causing damage or injury. (Fig. 2)
Using your Vacuum
Fig. 2
Fig. 1
On/Off
Switch
Crevice Tool and Dusting Brush
Assembling Your Vacuum Cleaner
Note: Always remove the power plug
from the wall outlet before assembling or
removing accessories.
2. Fitting the Extension Tubes
to the Flexible Hose
Push the extension tube that is
without the parking position hook
into the curved wand / hose
extension, as shown in the
illustration below. Then insert the
other extension tube into this one.
1. Attaching the Flexible Hose
to the Vacuum
Connect the flexible hose into the
hose inlet. Push in until you hear a
“click”, indicating it is in its locked
position.
3. Fitting the Floor to Carpet
Brush to the Extension Tube
Push the end of the extension tube
into the floor-to-carpet brush as
show in the illustration below.
Floor to Carpet
Brush
Extension
Tube
Manual Suction Control
Fig. 7
5
4