


OPERATING INSTRUCTIONS
OPERATING INSTRUCTIONS
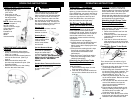
4. Hold the HEPA filter
by the edges and vigorously
“TapClean” the HEPA Filter
dirty side down on a hard,
flat surface until no more
dust is observed falling out
from between the pleats
of the filter. (Fig. 12) We
recommend washing the HEPA filter
once a month or when suction
appears to be reduced. Let the HEPA
filter air dry completely for 24 hours.
5. Rinse the non-woven pre-filter and let
air dry completely.
6. Insert the non-woven pre-filter.
Warning: Always unplug the
unit from electrical outlet before
opening the Dust Cup (container).
Warning: After each Use -
Always remove filter assembly
and the dust cup cover with the
debris screen, then vigorously
“TapClean” HEPA filter and
clean debris screen and non-
woven pre-filter until no more
dust can be removed.
Dust
Cup
Release
Button 2
Dust
Cup
Release
Button 1
Fig. 9
Fig. 10
Fig. 12
Fig. 13
Fig. 8
Fig. 11
HEPA
Filter
Non-Woven
Pre-Filter
3. The HEPA filter is
located underneath the
dust cup container. (Fig.10)
Remove the non-woven pre-filter.
(Fig. 11) Remove the HEPA filter, hold
the edges and pull it out slowly.
7. Reinstall the HEPA filter in the vacuum.
8. To separate the debris screen from
the dust cup, hold the dust cup in one
hand and turn the dust cup cover
counter clockwise and pull
apart. To clean the debris
screen, we
recommend that
you rinse it under
lukewarm running
water to remove
the dirt that
accumulates on it, but
always allow it to completely
air dry before inserting back into the
vacuum. (Fig. 13)
WARNING: Always remove the power
plug from the wall outlet before
assembling or removing accessories.
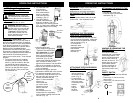
INSERTING THE TELESCOPIC
TUBE INTO THE MAIN UNIT
• Insert the telescopic tube into the hole
next to the dust cup handle. Make sure
that the slot in the handle fits correctly
into the opening. (Fig. 1)
• To remove the
telescopic tube,
press the telescopic
tube release
button and pull
the tube up.
EXTENDING THE TELESCOPIC
TUBE
Push the plastic button and pull out the
smaller tube. See illustration below
.
ATTACHING THE FLOOR BRUSH
TO THE MAIN UNIT
• Insert the floor brush
into its location, in
the direction of the
arrow. (Fig. 2)
• To remove the
floor brush from the
main unit, press
on the floor brush
release
button
and pull
the floor
brush out.
ATTACHING THE HOSE TO THE
MAIN UNIT
• Hold the end of the hose.
• Insert the hose into the hose
connector (Fig. 3).
WINDING & UNWINDING THE
POWER CORD
This vacuum cleaner is
equipped with a convenient
cord storage feature. The
power cord winds around
the two cord holders at
the back of the unit. The
bottom one has a quick
cord release feature.
Turn the cord hook to
the left or the right to
remove the power cord.
(Fig. 4)
ON/OFF SWITCH
• The On/Off switch has two different
positions.
• Push on the "I" side to turn the
vacuum ON.
• Push on the "O" side to turn the
vacuum OFF.
= OFF
= ON
Fig. 1
Fig. 2
Fig. 3
Fig. 4
Fig. 11
Emptying the Dust Cup Container
and Cleaning / Changing the Non-
Woven Pre-Filter, HEPA Filter &
Debris Screen
2. To empty the dust
cup container,
press on the trap
door release button
that is on the back
side of the dust cup
container. (Fig. 9)
Important: Do NOT use the vacuum
without the HEPA filter in place.
1. To remove the dust cup container,
first press on the dust cup release
button (1) that is located on the dust
cup handle and at the same time
press on the dust cup release button
(2) that is on the side of the upper
housing (Fig. 8). Then pull the dust
cup container out.
IMPORTANT
, Please Note : The
“TapClean” HEPA Filter will stop most of
the tiniest dust particles from re-entering
the air you breathe. In fact it stops 99.97%
of all particles as small as 0.3 microns -
many times smaller than a human hair!!!
Because of this incredible filtration
performance, the HEPA Filter will quickly
accumulate, inside the white filter folds,
many fine dust particles that are difficult to
see but which will eventually block or
reduce your suction power - if not cleaned
properly.
7
4