


OPERATING INSTRUCTIONS OPERATING INSTRUCTIONS
Cleaning & Changing the HEPA
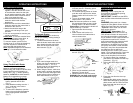
Dust Cup Filter
1. To open the Dust Cup (container),
push button and detach the Dust Cup
(container ). (Fig. 13)
2. Pull out the HEPA Dust Cup Filter.
(Fig. 14)
Fig. 13
IMPORTANT, Please Note : The
“TapClean” Rinseable HEPA Dust Cup
Filter & Debris Screen will stop most of
the tiniest dust particles re-entering the
air you breathe. In fact it stops 99.97% of
all particles as small as 0.3 microns -
many times smaller than a human hair!!!
Because of this incredible filtration
performance, the HEPA Dust Cup Filter
will quickly accumulate, inside the white
filter folds, many fine dust particles that
are difficult to see but which will
eventually block or reduce your suction
power - if not cleaned properly. Clean the
HEPA Filter and Debris Screen after
each use as described in this section.
Fig. 14
Fig. 15
Frame Flange
HEPA
Filter
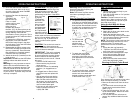
3. Empty the dust from the dust cup
(container).
4. Separate the debris screen from the
HEPA filter cartridge by grasping the
debris screen with one hand and the
filter frame with the other and pull
apart. (Fig. 15)
4. Depress on/off power switch located
on duster handle. Releasing power
switch will stop motor.
5. For constant turning motion of duster
push the on/off switch on the duster
forward, switch will lock into the “On”
position.
6. To turn off constant motion, slide
switch back to “Off” position.
Note: Do Not exert pressure on duster,
this causes the motor to stop. A light
dusting motion is all that is needed.
Please Note: Occasionally the duster will
require cleaning. To do this:
1. Remove duster from housing.
(Fig. 11)
2. Insert crevice tool into the unit.
Vacuum duster and intake tube to
remove excess dust.
Fig. 11
Pull out
Using The Retractor™ Cord Feature
1. Locate the cord Retractor™ button on
the unit. (Fig. 12)
Fig. 12
Cord
Retractor™
Button
2. When cord is extended, push cord
Retractor™ button down.
3. Release button to stop cord action.
WARNING: Do not allow cord to whip
as it retracts, this could cause injury.
Warning: Always unplug the unit
from electrical outlet before opening
the dust cup (container).
5
To Operate Duster
The duster is designed to suction up
dust as it is rotating, making dusting a
cleaner chore.
1. To attach the duster to the hose,
slide the duster intake tube onto the
hose. Attach the other end of the
hose into the suction hole of the
hand vacuum. (Fig 9)
Fig. 9
2. If you need a longer reach, the
duster can also be attached to the
extensions tubes, 1, 2 or 3, or
directly onto the unit depending on
the length that you need.
3. When using the duster, make sure
duster head is pointing downwards
and the vent holes are aligned with
duster before using on furniture or
other flat surfaces, as in Fig 10.
Vent
Holes
Fig. 10
1. To attach the extension tubes
together, slide the narrow end of one
of the extension tubes into the wide
end of another extension tube. Do the
same with the other extension tube to
form a long extension tube.
2. Slide the narrow end of the long
extension tube inside the floor
attachment.
3. Slide the wide end of the assembled
extension tube into the hose which is
attached to the vacuum.
4. Attach the shoulder strap to the
vacuum unit and hang it from your
shoulder.
5. You can now proceed to vacuum your
carpet or hard floor.
Please Note
: To vacuum wooden floors,
press Floor-to-Carpet Lever down, to
lower the bristles down. (Fig. 6)
To vacuum carpets, press Floor-to-
Carpet Lever up, to raise the bristles up.
Very flat carpets can sometimes be
vacuumed with the bristles down.
Note:
Adjustable height can be obtained
by using 1,2 or all extension tubes.
Fig. 6
Floor-to-Carpet
Lever
Using Floor Attachment
Fig. 7
IMPORTANT: Do NOT use the HEPA
dust cup filter without the debris screen in
place.
Fig. 8
+
-
WARNING: After each Use - Always
remove the Filter Debris Screen from the
HEPA Dust Cup Filter, then vigorously
“TapClean” HEPA Filter until no more
dust can be removed.
Using The Unit with Duster
The duster is powered by 2 AAA
batteries (packaged separately).
Before using your duster for the first time,
insert batteries as per illustration on
battery door. (Fig. 7) When replacing
batteries, ALWAYS use AAA batteries.
Battery life is dependant on usage.
To Insert or Change Batteries
1. To open the battery door pull
button upwards and lift door.
(Fig. 7)
2. Insert batteries making sure the ‘+’
and ‘-’ ends are in the correct
position. (Fig. 8)
3. To remove the batteries, open the
battery door and slide the batteries
out by tipping duster downward.
(Fig. 7)
Debris
Screen
4