


OPERATING INSTRUCTIONS OPERATING INSTRUCTIONS
Assembling Your Vacuum Cleaner
Using your Vacuum
Inserting a New Dust Bag
Warning: To reduce the risk of electric
shock, the power cord must be
disconnected before changing the bag or
performing maintenance/
troubleshooting.
1. To open the dust bag compartment,
lift up the cover locking tab. (Fig. 9)
2. Pull dust bag retaining clip forward.
Remove the dust bag from the dust
bag compartment by pulling up the
cardboard section. Dispose of paper
bags. Never reuse paper bags.
Fig. 9
Retaining
Clip
3. Insert a new dust bag back into the
dust bag support guide inside the
bottom of the dust bag compartment
making sure that the dust bag rubber
seal is aligned correctly against the air
intake hole on the unit. (Fig. 9) When
inserting the new dust bag, make sure
that the arrow on the bag is pointing
down. (Fig. 10)
4. Release the dust bag retaining clip,
ensuring that the dust bag is held in
place.
Lift Up
Fig. 10
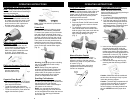
Fitting the Curved Wand to the
Extension Tubes
• Push the extension tube into the
curved wand / hose extension, as
shown in the illustration below.
Make sure that the extension tube
is secure. (Fig. 2) Attach the
second extension tube to the first.
Fig. 2
Fig. 1
Fig. 3
Fitting the Carpet to Floor Brush
to the Extension Tubes
• Push the extension tube
into the carpet / floor
brush as show in Fig. 3.
Note: Always remove the power plug
from the wall outlet before assembling or
removing accessories.
4
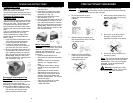
Attaching the Flexible Hose into
the Vacuum
• To connect the flexible hose into the
air intake duct, align the arrow on the
hose with the arrow on the unit and
push in and turn 180° clockwise to
lock the hose in place. (Fig 1)
• To remove, reverse process.
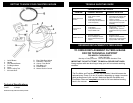
Dust Bag Full Indicator
The red dust bag full indicator may turn
on while you are cleaning to indicate that
the dust bag is full and requires
replacement or if there is a blockage in
the system or the vacuum.
Note: You can test the dust bag full
indicator by placing your hand over the
end of the flexible hose when the vacuum
is running. The dust bag full indicator
should turn red.
Fig. 5
Your vacuum cleaner includes a power
cord which is automatically retractable.
To extend your power cord, pull from the
rear and extend to desired length up to
the yellow mark on the power cord. When
cleaning is finished, first turn the unit off
and disconnect from the electrical outlet.
Then press on the cord rewind button to
retract the power cord. If the cord does
not fully retract, pull it out again and then
press on the cord rewind button again.
(Fig. 5)
Power Cord
Warning: Hold the plug when rewinding
the cord. Do NOT allow cord to whip
when rewinding.
NOTE: Before using the appliance,
unwind a sufficient length of cable and
insert the plug into the wall socket. A
yellow mark on the power cord shows
the ideal cable length. Don’t pull the
power cord beyond the red mark.
Floor Symbol
Carpet Symbol
Note: When one switch is up the other
will be down.
Carpet to Floor Brush
• The carpet to floor brush is equipped
with an easy toggle switch to convert
from carpet to bare floor.
• To set for carpet push down the
toggle with the carpet symbol. (Fig. 4)
• To set for bare floors, push down the
toggle with the floor symbol.
Fig. 4
Floor setting
Carpet setting
Fig. 7
Fig. 6
Note: Once all attachments are in place,
unwind a sufficient length of the power cord
and insert the plug into the wall outlet. A
yellow mark on the power cord shows the
ideal cable length. Don't pull the power
cord beyond the red mark.
1. Insert the power plug into the wall
outlet.
2. Press the Power On/Off button located
on the unit to turn the vacuum cleaner
"On". (Fig. 6)
3. To rewind the power cord, press the
cord rewind button with one hand and
hold the plug of the power cord with the
other hand to ensure that it does not
whip causing damage or injury.
(Fig. 7)
Manual Suction Control
On the handle of your flexible hose,
there is the manual suction control. To
adjust the suction, slide the manual
suction up or down to vary the amount
of suction. (Fig. 8)
Increase suction when vacuuming
carpets and reduce when dusting
furniture or draperies.
D
e
c
r
e
a
s
e
Suction
Control
I
n
c
r
e
a
s
e
Caution: Make sure that the cardboard
section of the dust bag is firmly in place
inside the dust bag support.
Caution: The dust bag compartment will
not close if the dust bag is not inserted
properly into the unit. Never use the
vacuum without a dust bag inserted into
the unit. NEVER reuse the paper dust
bags.
Fig. 8
5