


9
1
2
3
Fig. 1a
Fig. 1
Fig. 2a
Fig. 2b
Handle
Tab &
Slot
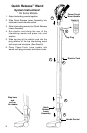
Cyclonic Bag Saver available with some models.
To assemble the cleaner with this option
follow these instructions.
This accessory reduces the need for
frequent bag changes. It does not eliminate
the use of a paper bag. To remove the
Cyclonic Bag Saver, follow the steps in
reverse and reattach the large upper wand.
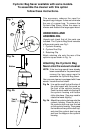
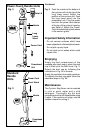
UNPACKING AND
ASSEMBLING
Unpack and check that all the parts are
included. The Cyclonic Bag Saver consists
of three main parts, see Fig.1:
1. Cyclonic Housing
2. Cyclone Dust Cup
3. Retaining Clip
Attach retaining clip onto the rear of the
cyclonic cup as shown in Fig. 1a.
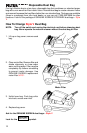
Attaching the Cyclonic Bag
Saver onto the vacuum cleaner
NOTE: If the two long wands have already
been assembled to the powerhead,
remove the long upper wand to
assemble the Cyclonic Bag Saver.
Your vacuum cleaner is equipped with three
wands. Locate the short wand.
Fig. 2a Line up the small hole at the top of
the short wand with the arrow on
the front of the cyclonic housing.
Push the short wand into the top of
the cyclonic housing until button
clicks into place. (You may need to
rotate the wand slightly.)
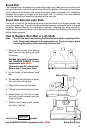
Fig. 2b Attach the cyclonic dust cup onto the
cyclonic housing. Place the slot in
the cyclonic dust cup over the tab
on the cyclonic housing. Then grasp
the handle on the cyclonic dust cup,
and pivot the cyclonic dust cup up
and over the ledge on the cyclonic
housing.
Button