


3
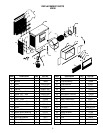
INSTALL OVERFLOW AND DRAIN
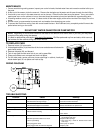
1. Slide the Rubber Washer over the Drain Bushing and push through the hole in the
bottom of the cooler from the top side.
2. Secure the Drain Bushing from beneath the pan with the Lock Nut. Make sure the
Rubber Washer does not twist while tightening, which could cause it to leak. NO
NOT OVERTIGHTEN.
3. Thread the Overfl ow Tube into the Drain Bushing and HAND TIGHTEN.
4. If leakage occurs after Reservoir is full retighten the Overfl ow Pipe until leaking
stops. A small amount of silicone caulk may be used if necessary.
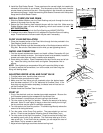
FLOAT VALVE INSTALLATION
1. Place the threaded portion of the Float Valve through the hole provided in the
Float Bracket (inside unit) as shown.
2. Slip the Fiber Washer over the threaded portion of the fl oat and secure with the
Ring Nut. Be sure the Float does not turn while you are tightening the nut.
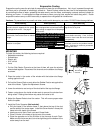
WATER LINE CONNECTION
1. Find the closest outside water faucet, and install a Water Connection Kit (not
included with cooler) as shown. If an exterior faucet is not available, locate the
closest cold water pipe and install a saddle valve assembly.
2. Route tubing into cooler. Place Compression Nut and Ferrule over end of tub-
ing. Insert the tubing into fl oat valve and tighten Compression Nut to
secure.
NOTE: Over tightening a compression fi tting will cause that fi tting to leak.
It is best to secure the connections, turn on the water, and then snug the
fi tting until leaking stops.
ADJUSTING WATER LEVEL AND FLOAT VALVE
1. To adjust water level, bend the fl oat valve rod.
2. Check all water connections for leaks.
3. Make sure the Float Valve cuts off completely when the desired water
level has been reached (1/2” to 3/4” below top of Overfl ow Tube). If the
fl oat does not stop the water completely, the water level will rise and run
out the Overfl ow Tube.
4. Double check the Overfl ow Tube for leaks.
START UP
1. Plug in the electrical cord to a standard grounded receptacle. Be sure the
circuit breaker protecting the receptacle is of suffi cient size.
2. Open windows in rooms where you want cooling to be directed.
3. Turn the cooler to the High Fan position. Observe the amount of air being
delivered. Note: On cool nights (or days) or when the humidity level is high,
the fan positions may be used for ventilation purposes.
4. Turn the cooler to the Low Fan position. This should signifi cantly reduce the
amount of air being delivered.
5. Turn the cooler to the Pump Only position. The pump should run and not
the fan. Check to see that water is fl owing from all three Water Trays.
6. Turn the cooler to the High Cool position. Check to see that all three Pads
are wetting evenly with no dry patches. The Pads may take up to 20 min-
utes to wet fully. If the Pads have dry patches, you can adjust the level of
each Water Tray by screws on each end.
7. Adjust window openings to achieve desired cooling level.
Reservoir
Lock
Nut
Rubber
Gasket
Bushing
Overflow
Tube
Side Sealer
Side Sealer Channel
Ferrule
Compression
Nut
Ring Nut
Fiber Washer
Float
Faucet
Sillcock
Water Supply
Valve
Ferrule
Compression
Nut
8. Install the Side Sealer Panels. These panels are the correct height, but need to be
trimmed to fi t the width of our window. Trim the panels so that they reach from the
window frame to the side of the duct. Slide the panels in the channels you placed on
the bottom duct fl ange. Install the remaining Side-Sealer Channels over the top duct
fl ange and the Side-Sealer Panels.