


3) The stove will not function in the “AUTO” mode when hot
- If the unit fails to operate, by-pass the auto side of the switch by inserting a jumper wire between the dual
black wires and the dual brown wires located on the back of the switch. Plug the stove back in. if the
stove operates , Replace the switch.
4) The exhaust blower will not function normally
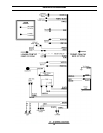
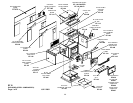
- Open the left side panel, check all connections against the wiring diagram.
- If all the connections are verified and the exhaust blower does not function at all , tap lightly on the
exhaust motors end cap, this may loosen a tight motor.
- Apply 115V AC directly to the exhaust blower. If the motor does not run, replace the blower.
- If the motor runs, have your dealer inspect the wiring harness
5) The convection blower will not function normally
- Check all of the connections between the fan controller, switch, and the convection blower against the
wiring diagram.
If the convection blower will not operate, Apply 115V AC to the motor directly, If the motor runs, Replace the fan
controller. If the motor does not run, the convection blower has failed. Replace the blower.
6) the auger motor will not function normally
- Make sure the exhaust blower is operating.
- Make sure the Dial-A-Fire is turned on.
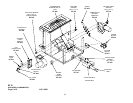
- Unplug the stove and open the side and back panels.
- Check all the connections to the auger motor, Dail-A-Fire, Vacuum sensor, 200°F (93°C) temperature
sensor and the timing control module against the wiring diagram in this manual.
- Check the condition of the Vacuum hose (located on the left-hand side of the stove). It should not be
cracked or torn and should be installed on the top air inlet tube of the sensor.
- Check the manual reset button on the 200°F (93°C) temperature sensor. If this sensor has been tripped
check the cause of the over-heating before pushing the red button in. check the auger for movement.
- If the auger still does not operate then apply 115V AC directly to the auger motor. If the auger motor does
not work. Replace the auger motor.
- By-pass the 200°F (93°C) temperature sensor with a jumper wire, check the auger. If the auger works
replace the 200°F (93°C) sensor.
- Check the voltage across the load pins of the timing module. It should be around 1-2 VAC, cycling to line
voltage during an auger pulse. If not, replace the timing control module.
- Check the Vacuum sensor by placing a jumper wire between the Blue and Black wires that are attached
to the sensor. If the auger works, test to see if the exhaust blower is producing enough vacuum.
- To test the exhaust vacuum place a magnehelic gauge in the sensor end of the vacuum tube. It should
read over 0.5. if the reading is good then replace the vacuum sensor.
- If the auger motor still does not work, then attempt to by-pass the auger Dial-A-Fire control by removing
the leads from the timing control module’s second delay pins and placing a jumper wire across the pins. If
the auger now cycles very quickly, test the Dial-A-Fire potentiometer. If the auger did not then replace the
timing control module.
- To test the Dial-A-Fire potentiometer, place the two test leads from a multimeter into the leads of the
potentiometer. The potentiometer should have a range of 68k OHMS to approximately 850k OHMS (plus
or minus 10%). If the range is not close then replace the potentiometer.
7) The Dial-A-Fire has no effect on the fire
- Make sure that all connections to the timer control module are correct and secure.
- Perform a resistance test to the Dial-A-Fire potentiometer, by placing the two leads from a multimeter into
the two leads of the potentiometer. The potentiometer should have a range of 68k to 850k OHMS (plus or
minus 10%)
-
25