


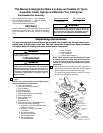
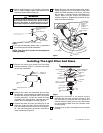

6. Remove the three switch housing screws from the
switch housing plate. Position the switch housing
assembly on the switch housing plate and align
the holes in the switch housing assembly with the
holes in the plate. Secure the switch housing
assembly by installing the three screws
(Figure 10).
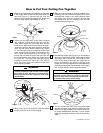
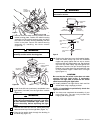
7. Install three 60-watt (maximum) candelabra base
light bulbs (included) into the light fitter sockets
(Figure 11).
8. Remove the finial nut, hex nut, metal safety cap,
and outer bowl cap from the light fitter (Figure 11).
9. Pass the fan switch chain through the bushing in
the bowl cap (Figure 11).
SWITCH
HOUSING
ASSEMBLY
MOTOR CONNECTOR
SWITCH HOUSING
CONNECTOR
Figure 9
6
Do not pinch wires between the switch housing
assembly and the switch housing plate.
WARNING
Over lamping the fan will result in the light
bulbs being automatically shut off. Use only
60-watt maximum candelabra light bulbs. Turn
off the electricity before replacing the light
bulbs.
WARNING
To avoid possible fire hazard, do not exceed wattage
indicated on the fitter.
WARNING
THREADED NIPPLE
BOWL CAP
LIGHT FITTER
GLASS
BOWL
60-WATT
CANDELABRA
BASE BULBS (3)
FINIAL NUT
LIGHT SWITCH
CHAIN
OUTER BOWL
CAP
FAN SWITCH
CHAIN
METAL SAFETY
CAP
HEX
NUT
PENDANTS (2)
Figure 11
MOUNTING
SCREWS (3)
SWITCH HOUSING
ASSEMBLY
LIGHT FITTER
Figure 10
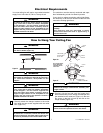
10. Position the glass bowl over the threaded nipple.
Slide the metal safety cap onto the threaded
nipple and gently tighten the hex nut to secure
the glass bowl and metal safety cap. Set the bowl
cap over the metal safety cap and against the
glass bowl. Pass the fan pull chain through the
bushing in the outer bowl cap and install the cap
on the threaded nipple. Install finial nut finger
tight (Figure 11).
CAUTION
Be sure that the fan switch chain does not make
contact with the light bulbs. If necessary
reposition the light fitter to avoid the fan switch
chain from touching the light bulbs.
11. Install pendants onto light fixture chain and fan
switch chain using couplings provided.
NOTE: It is advisable to periodically check the
tightness of the finial.
12. You have now completed the assembly of your
new ceiling fan. You can now proceed with
hanging and wiring your fan.
U.L. Model No.: CF775-2