


7
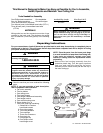
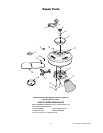
BLACK
FAN WIRE
BLUE
FAN WIRE
BLACK
SUPPLY (HOT)
SUPPLY
GROUND WIRE
GREEN GROUND
WIRE FROM HANGER
BRACKET
GREEN GROUND
WIRE FROM HANGER
BALL
WIRE CONNECTOR
WHITE SUPPLY
NEUTRAL)
WHITE FAN WIRE
Figure 9
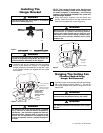
Check to see that all connections are tight, including
ground, and that no bare wire is visible at the wire
connectors, except for the ground wire. Do not
operate fan until blades are in place. Noise and fan
damage could result.
WARNING
!
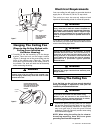
4. Cut the speed control switch pull chain and the
light switch pull chain to the desired lengths.
Connect the wood pendants (supplied) to the pull
chains by sliding the pendants (small hole first)
onto the pull chains. Then attach the chain
couplings (supplied) to the end of the chains and
allow the pendants to fall down over the couplings.
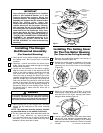
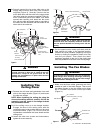
REMOVE THIS
SCREW AND
LOCKWASHER
LOOSEN THIS
SCREW
CEILING
COVER
TIGHTEN SCREW
INSTALL SCREW AND WASHER
Figure 10
To avoid possible fire or shock, make sure that the
electrical wires are completely inside the outlet box
and not pinched between the ceiling cover and the
ceiling.
WARNING
!
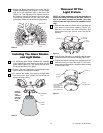
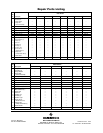
Installing The Fan Blades
1. Make sure the three rubber grommets are firmly
seated on each of the blade flanges. Then mount
the blade flanges to the fan blades using three
M5 x 6 washer head blade screws per blade
(Figure 11).
2. Securely connect the fan motor white wire to the
supply white (neutral) wire using wire connector
supplied (Figure 9). Securely connect the fan
motor black wire and blue wire to the supply black
(hot) wire using wire connector supplied (Figure 9).
After connections have been made, turn leads
upward and carefully push leads into the outlet
box, with the white and green leads on one side of
the outlet box and the black and blue leads on the
other side of the outlet box.
Installing The
Ceiling Cover
1. Remove the left screw and lockwasher from each
side of the hanger bracket (Figure 10) and loosen
the other two screws.
NOTE: When installing the ceiling fan using the
close-to-the-ceiling method, carefully lift the fan
assembly from the hook on the hanger bracket
and proceed as follows.
2. Lift the ceiling cover up to the hanger bracket.
Engage the slots in the ceiling cover with the
loosened screws in the bracket and turn the cover
counterclockwise (Figure 10). Be sure that the
lockwashers are between the screw heads and the
ceiling cover.
3. Install the other two screws and lockwashers;
tighten all screws securely.
To reduce the risk of personal injury, do not bend the
blade flanges when installing the flanges, balancing
the blades, or cleaning the fan. Do not insert foreign
objects between rotating fan blades.
WARNING
!
RUBBER GROMMETS
BLADE FLANGE
ALIGNMENT POST
FAN BLADE
M5 x 6 WASHER
HEAD BLADE SCREW (3 Per Blade)
Figure 11
U.L. Model No.: 42-ANT/52-ANT