4
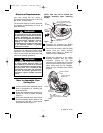
2. Remove the fan motor assembly from
the protective plastic bag. Place all
carton contents on a protective
surface.
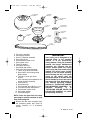
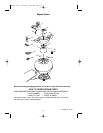
B. HANGER
BRACKET
C. 4.5" DOWNROD
ASSEMBLY
D. CEILING
COVER
F. COUPLER
COVER
H. SWITCH
HOUSING
G. FAN
BLADES (3)
E. DECORATIVE
LOWER COVER
A. FAN MOTOR
ASSEMBLY
J. LOOSE
PARTS BAG
4
0
3
2
1
I. SW46 WALL
CONTROL
NOTE: Place the parts from the loose
parts bags in a small container to keep
them from being lost.
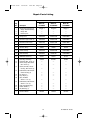
UL Model No.: CF130
a. Fan motor assembly
b. One hanger bracket
c. One 4.5” downrod assembly
d. One ceiling cover
e. One decorative lower cover
f. One coupler cover
g. Three fan blades
h. One switch housing
i. One SW46 wall control
j. One loose parts bag containing:
1. Three 12 ga. wire connectors
2. Seven M5 x 14mm flange head
blade screws
3. Four M5 x 10mm pan head
screws
4. Four external tooth lockwashers for
hanger bracket assembly
5. One clevis pin
6. One hairpin clip
7. Two threaded stud, #8-32 x 1-1/4”
8. Two external tooth lockwashers
9. Two knurled knobs, #8-32
10. One rubber gasket
11. One balancing kit
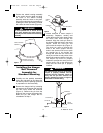
IMPORTANT
Your ceiling fan is designed to be
installed either in the standard
manner, or in the close-to-the-
ceiling manner. Using the standard
method, the hanger ball/downrod
assembly will suspend the fan
several inches below the ceiling
cover. Using the close-to-the-ceiling
method, the ceiling cover installs
directly on the fan motor housing,
thus mounting the fan 3-1/2 inches
closer to the ceiling than the
standard method. In no case should
the fan blades be lower than seven
feet above the floor. Depending on
your desired mounting method,
proceed to “INSTALLING HANGER
BALL/DOWNROD ASSEMBLY” for
standard mounting, or to
“INSTALLING CEILING COVER ON
FAN MOTOR HOUSING” for close-
to-the-ceiling mounting.
BP7404 Tilo 12/16/09 4:06 PM Page 4


