


9 10
GB
GB
GB
GB
concerning use of the appliance by a person responsible for their safety.
• Children should be supervised to ensure that they do not play with the
appliance.
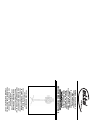
SPECIAL SAFETY INSTRUCTIONS
• The protection basket must be closed properly when operating the
device.
• Do not put your fingers or any other objects in the protection basket
during operation. Do not remove the protection basket during
operation.
• Infants, children and elderly persons should not be exposed to the cold
air stream over a long period of time.
• Do not operate the device in an extremely hot or moisten environment
(e.g. bathroom).
• Unplug the device before cleaning or demounting it.
• Do not operate the device in a horizontal position or without a base.
• Keep the device away from lose objects such as plants, curtains, etc.
• Do not plug the device into the socket before it is not mounted
completely.
INTENDED USE
• The device is intended for private use and fanning only. The device is
not intended for commercial or industrial use.
BEFORE FIRST USE
• Remove all packaging material.
• Clean the device as described below under
Cleaning and
Maintenance.
Dry all parts carefully before using the device.
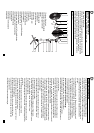
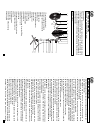
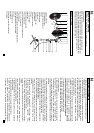
MOUNTING
• Remove the screws from both parts of the base plate and place them
crosswise on each other.
• To pull out the telescope tube from the stand tube casing, simply push
the telescope tube from the bottom of the stand tube casing if the
telescope tube is retracted. Use an auxiliary object such as a blunt
wooden stick.
• Place the stand tube on the base plate and tighten it with the four
screws.
• Unscrew the adjusting screw cap (19) from the stand tube counter
clockwise and slide the cover (20) on the junction between the base
plate and the stand tube.
• Place and screw the adjusting screw cap onto the stand tube. Pull out
the telescope tube until you have reach the desired extent, then
tighten the screw cap.
• Loosen the set screw (17). Please note that the hexagon nut (18) is
mounted on the inside. Turn the set screw until the upper part of the
device can be placed on the telescope tube. Place the upper part of
the device on the telescope tube and tighten the set screw.
• Turn the clamping knurled-head screw (3) at the front of the rotor shaft
(11) clockwise to the position “Loosen” and remove it.
• Turn the clamping ring (5) at the rear of the rotor shaft counter
clockwise and remove it from the motor casing (12). Place the rear
protection basket (7) on the motor casing and make sure that the
holes and handle line up properly. The round opening on the inside of
the protection basket’s metal ring must lay on the cam of the motor
casing.
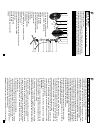
• Screw the clamping ring clockwise into the screw thread so that the
rear protection basket fits tightly to the motor casing.
• Slide the rotor (4) on to the rotor shaft (11). The mounting on the rotor
shaft must be placed on the designated opening of the rotor.
• Tighten the rotor by turning the clamping knurled-head screw (3) on
the rotor shaft counter clockwise to the position “TIGHTEN”.
• Place the front protection basket (1) in to the basket hook (8) and
close the four holding clips (6) at the rear protection basket.
• Put the front protection basket into position so that the bores on the
upper part of the protection baskets are on top of each other.
Therefore loosen the holding clips a little bit.
• Insert the screw (2) into the bore holes of the protection baskets and
secure it with the proper hexagon nut (9). Close all open holding clips
on the protection basket.
• The mounting is finished and the stand ventilator is ready to operate.
OPERATION
• Plug the power plug (23) into a suitable socket.
• Select your desired fanning speed by turning the switch in the 0 / 1 / 2
/ 3 (16) position.
0 = device is off.
1 = low speed
2 = medium speed
3 = high speed
• To let the ventilator head constantly oscillated from left to right, push
the oscillation switch downwards (13). To direct the air stream on a
concentrated place, simply pull the oscillation switch upwards until the
desired position is reached.
• The bend of the ventilator head can be adjusted. Turn off the
oscillation switch beforehand by pulling the switch upwards. Remove
the knurled-head screw (15) from the vertical joint (14). Take the
handle (10) of the protection basket and tilt the ventilator head to the
desired position. Tighten the knurled-head screw.