


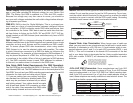

Operating Modes:
You can use the Opti RGB in four ways:
• Sound-Active mode -
The unit will react to sound, chasing through the
built in programs.
• Auto Mode - The unit will automatically chase through the different
colors.
• RGB Mode - Choose a single color or colors to stay static.
• DMX control mode - This function will allow you to control
each
individual fixtures traits with a standard DMX 512 controller such as
as the
Elation® Show Designer™.
Master-Slave Operation:
This function will allows you to link units together to run in a Master-
Slave mode. In Master-Slave operation one unit will act as the controlling
unit and the others will react to the controlling units built-in
programs.
Any unit can act as a Master or as a Slave however, only one unit can be
programmed to act as the “Master.”
Master-Slave Connections and Settings:
1. Daisy chain your units via the XLR connector on the rear of the unit.
Use standard XLR microphone cables to link your units together.
Remember that the Male XLR connector is the input and the Female
XLR connector is the ouput. The first unit in the chain (master) will
use the female XLR connector only. The last unit in the chain will use
the male XLR connector only.
2. Set dipswitch #10 to the “ON” position, on the “Master” unit. Then
on the ‘Master” unit, set the dipswitches for the mode you want to
run.
Example: On the “Master” unit set dipswitch #10 to the “ON” posi
-
tion, and then set dipswitch #9 to the “ON” position to run the
Master/Slave configuration in Auto Mode.
3. For the “Slave” unit(s), dipswitch #10 must remain in the “Off”
position, other then that you may
set the dipswitch(es) at any setting.
4. Connect the “Slave” unit or units and they will automatically start to
follow the “Master.”
Sound Active Mode:
In this mode the Opti RGB will react to sound, and chase through the dif-
ferent colors.
1. Plug the fixture in and put dipswitch #10 in the “ON” postion.
2. The fixture will now change via sound.
Opti RGB Operating Instructions
Elation Professional - www.elationlighting.com - Opti RGB Instruction Manual Page 8Elation Professional - www.elationlighting.com - Opti RGB Instruction Manual Page 7
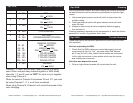
Auto Mode:
1. Plug the fixture in and put dipswitches # 9 and 10 in the “ON”
postion.
2. Adjust the speed by adjusting dipswitches 1-7. Dipswitch #7 in the
“On” position will make the color mix speed the slowest. To make the
the color mix faster put dipswitch #6 in the “On” position. So that now
you have dipswitches #7 and #6 in the “On” position. To speed up the
color mix even more continue to put dipswitches into the “On” posi-
tion. i.e. Dipswitch #5, then dipswitch #4, then #3........
When you have dipwitches 1-7 in the “On” position the color mix
will run the fastest.
RGB Mode:
1. Plug the fixture in and put dipswitches #8, 9, and 10 in the “ON” posi-
tion.
2. Dipswitch #1 alone will project Red at 25% intensity, dipswitch #2
alone will project Red at 50% intensity. Combine dipswitches 1 & 2
and Red will be projected at 100% intensity.
Dipswitch #3 alone will project Green at 25% intensity, dipswitch #4
alone will project Green at 50% intensity. Combine dipswitches 3 & 4
and Green will be projected at 100% intensity.
Dipswitch #5 alone will project Blue at 25% intensity, dipswitch #6
alone will project Blue at 50% intensity. Combine dipswitches 5 & 6
and Blue will be projected at 100% intensity.
DMX Mode:
Operating through a DMX controller gives the user the freedom to create
their own programs tailored to their own individual needs. This function
also allows you to use your fixtures as spot lights.
1. This function will allow you to control each individual fixture’s traits
with a standard DMX 512 controller such as the Elation® Show
Designer™ or the Elation® DMX Operator™.
2. The Opti RGB
uses seven DMX channels to operate see page 9 for
the DMX traits.
3. To run your fixture in DMX mode, plug in the fixture via the XLR
connections to any standard DMX controller. Use dipswitches #1-9
to set your desired DMX address. - Follow the set-up specifications
that come with your DMX controller.
NOTE: In DMX mode, dip-
switch #10 must be in the “OFF” position.
Opti RGB Operating Instructions