


8
USING YOUR DYSON APPLIANCE
PLEASE READ thE 'ImPORtANt SAfEtY INStRUCtIONS' IN thIS DYSON
OPERAtING mANUAL bEfORE PROCEEDING.
CARRYING thE APPLIANCE
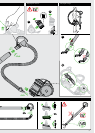
• Carrytheappliancebythemainhandleonthebody.
• Donotpressthecyclonereleasebuttonorshaketheappliancewhencarryingor
thecyclonecoulddisengage,falloffandcauseinjury.
OPERAtION
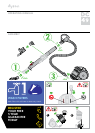
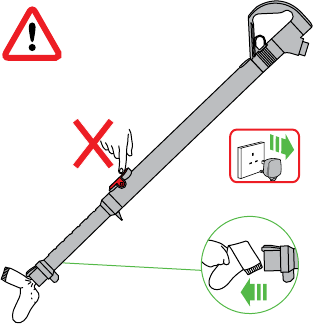
• Alwaysextendthecablefullytotheredtapebeforeuse.
• Plugtheapplianceintothemainselectricitysupply.
• Toswitch‘ON’or‘OFF’presstheredpowerbutton,locatedasshown.
• Afteruse:unplug,retractthecablesafely,puttheapplianceaway.
• Switch'OFF'theappliance,unplugandensureitisuprightbefore:
– changingorusingtools
– removingthehoseorairwayinspectionparts.
• Towatchashortonlinevideovisit:
– UK-www.dyson.co.uk/dc49gettingstarted
– ROI-www.dyson.ie/dc49gettingstarted
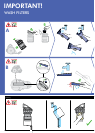
CARPEtS OR hARD fLOORS
• Thebrushbarwillalwaysdefaultto‘ON’(spinning)eachtimeyouswitchthe
appliance‘ON’.
• Toswitchthebrushbar‘OFF’(e.g.fordelicateflooring),twistthedialonthe
cleanerheadaquarterofaturn.Thebrushbarwillstop.
• Whentheapplianceisrunningandthebrushbarhasbeenswitched‘OFF’,the
brushbarcanbeswitched‘ON’againbytwistingthedialonthecleanerhead
aquarterofaturn.Thebrushbarwillstart.Alternatively,switchtheappliance
'OFF';thedialwillreturntoitsoriginalposition.Whentheapplianceisswitched
'ON'againthebrushbarstartsautomatically.
• Thebrushbarcanonlybeturnedoffoncethemachineisrunning.
• Thebrushbarwillautomaticallystopifitbecomesobstructed.See‘Brushbar–
clearingobstructions’.
• Beforevacuumingyourflooring,rugsandcarpets,checkthemanufacturer's
recommendedcleaninginstructions.
• Somecarpetsmayfuzzifarotatingbrushbarisusedwhenvacuuming.Ifthis
happens,werecommendvacuumingwiththebrushbarswitched'OFF'and
consultingwiththeflooringmanufacturer.
• Thebrushbarontheappliancemaydamagesomecarpettypes.Ifyouare
unsure,turn‘OFF’thebrushbar.
• Thisproducthascarbonfibrebrushes.Takecareifcomingintocontactwith
them,astheymaycauseminorskinirritation.Washyourhandsafterhandling
thebrushes.
LOOKING AftER YOUR DYSON APPLIANCE
• Donotcarryoutanymaintenanceorrepairworkotherthanthatshowninthis
DysonOperatingManual,oradvisedbytheDysonHelpline.
• OnlyusepartsrecommendedbyDyson.Ifyoudonotthiscouldinvalidate
yourguarantee.
• Storetheapplianceindoors.Donotuseorstoreitbelow3°C(37.4°F).Ensure
theapplianceisatroomtemperaturebeforeoperating.
• Cleantheapplianceonlywithadrycloth.Donotuseanylubricants,cleaning
agents,polishesorairfreshenersonanypartoftheappliance.
• Ifusedinagarage,alwayswipethebaseplateandballwithadrycloth
aftervacuumingtocleanoffanysand,dirt,orpebblesthatcoulddamage
delicatefloors.
VACUUmING
• Donotusewithouttheclearbinandfiltersinplace.
• Finedirtsuchasflourshouldonlybevacuumedinverysmallamounts.
• Donotusetheappliancetopickupsharphardobjects,smalltoys,pins,paper
clips,etc.Theymaydamagetheappliance.
• Whenvacuuming,certaincarpetsmaygeneratesmallstaticchargesinthe
clearbinorwand.Theseareharmlessandarenotassociatedwiththemains
electricitysupply.Tominimiseanyeffectfromthis,donotputyourhandor
insertanyobjectintotheclearbinunlessyouhavefirstemptieditandrinsedit
outwithcoldwater(see‘Cleaningtheclearbin’).
• Donotworkwiththeapplianceaboveyouonthestairs.
• Donotputtheapplianceonchairs,tables,etc.
• Beforevacuuminghighlypolishedfloors,suchaswoodorlino,firstcheckthat
theundersideofthefloortoolanditsbrushesarefreefromforeignobjectsthat
couldcausemarking.
• Donotpushhardwiththefloortoolwhenvacuuming,asthismay
causedamage.
• Donotleavethecleanerheadinoneplaceondelicatefloors.
• Onwaxedfloorsthemovementofthecleanerheadmaycreateanuneven
lustre.Ifthishappens,wipewithadampcloth,polishtheareawithwax,and
waitforittodry.
• Toparkthewand,collapsethewandandthenstorethecleanerheadby
insertingitintheclipatthebackofthemainbody
EmPtYING thE CLEAR bIN
• EmptyassoonasthedirtreachestheleveloftheMAXmark–donotoverfill.Be
carefulnottopullthe'ON'trigger.
• Switch‘OFF’andunplugbeforeemptyingtheclearbin.
• Toremovethecycloneandclearbinunit,pressdownontheredbuttononthe
topofthecarryinghandleonthecyclone.
• Toreleasethedirt,pressallthewaydownonthesameredbuttononthetopof
thecarryinghandleonthecyclone.
• Tominimisedust/allergencontactwhenemptying,encasetheclearbintightlyin
aplasticbagandempty.
• Removetheclearbincarefullyfromthebag.
• Sealthebagtightly,disposeasnormal.
• Torefit:
– ensuretheairwayinthebinbaseisclearofdustanddirt
– closetheclearbinbasesoitclicksintoplace
– pushthecycloneandclearbinunitintothemainbodyoftheappliance;itwill
clickintoplace
– ensurethecycloneandclearbinunitissecure.
• Forafreefactsheetvisit:www.dyson.co.uk/technology/allergy
CLEANING thE CLEAR bIN
• Removecycloneandclearbin(see'Emptyingtheclearbin').
• Toseparatethecycloneunitfromtheclearbinpresstheredbuttontoopen
theclearbinbase.Thisexposesasmallsilverbuttonbehindtheredopening
mechanism.Pressthesilverbuttonandseparatethecycloneunitfromthe
clearbin.
• Cleantheclearbinwithcoldwateronly.
• Donotusedetergents,polishesorairfreshenerstocleantheclearbin.
• Donotputtheclearbininadishwasher.
• Donotimmersethewholecycloneinwaterorpourwaterintothecyclones.
• Cleanthecycloneshroudwithaclothordrybrushtoremovelintanddust.
• Ensuretheclearbiniscompletelydrybeforereplacing.
• Torefit:
– fitthecycloneshroudintotheclearbinsothatthesilverbuttonclicksand
engages.Ensurethatthefrontoftheclearbinislockedinplace
– closetheclearbinbasesoitclicksintoplace
– pushthecycloneandclearbinunitintothemainbodyoftheappliance;itwill
clickintoplace
– ensurethecycloneandclearbinunitissecure.
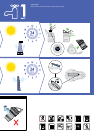
WAShING YOUR fILtERS
• Yourappliancehastwowashablefilters,locatedasshown.
• Checkandwashthefiltersregularlyaccordingtoinstructionsto
maintainperformance.
• Switch‘OFF’andunplugbeforecheckingorremovingthefilters.
• Thefiltersmayrequiremorefrequentwashingifvacuumingfinedust.
• Washthefilterswithcoldwateronly.Donotusedetergents.
• Donotputthefiltersinadishwasher,washingmachine,tumbledryer,oven,
microwaveornearanakedflame.
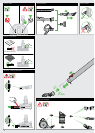
FilterA
• Removethecycloneandclearbin(instructionsabove).
• Releasethecatchonthefrontofthecyclonehandle.Swingthehandleback.
• Liftoutthefilter.
• Washthefilterwithcoldwateronly.Holdunderatapandrunwaterthroughthe
openenduntilthewaterrunsclear.Turnupsidedownandtapout.
• Squeezeandtwistwithbothhandstomakesuretheexcesswaterisremoved.
• Runwaterovertheoutsideofthefilteruntilthewaterrunsclear.
• Squeezeandtwistwithbothhandstomakesuretheexcesswaterisremoved.
• Standthefilteronitswide,openendtodry.Leavetodrycompletelyfora
minimumof24hours.
• Replacethefilterintothecyclone.Swingthehandlebackintoplace.Ensurethe
latchclickstoengageandissecure.Fitthecycloneandclearbinunitontothe
appliance(instructionsabove).
FilterB
• ToremovefilterB:
– useacointoturnthefastenerone-quarteranti-clockwisetothe
unlockedposition
– removethefiltercoverfromtheappliance
– separatethefilterfromthecover.
• FilterBshouldberinsedincoldwateronlyandtappedoutuntilthewaterruns
clear,thentappedoutagaintoensureallexcesswaterisremoved.Tapouton
thehardplasticedgeofthefilter,nottherubberedge.Leavetodrycompletely
for24hours.
• Torefit,re-assembleinreverseorder.
IMPORTANT:Afterwashingpleaseleavethefiltersatleast24hourstodry
completelybeforerefitting.
• Towatchashortonlinevideovisit:
– www.dyson.co.uk/dc49filterwash
– www.dyson.ie/dc49filterwash
bLOCKAGES – thERmAL CUt-OUt
• Thisapplianceisfittedwithanautomaticallyresettingthermalcut-out.
• Ifanypartbecomesblockedtheappliancemayoverheatandautomatically
cut-out.
• Thisincludestemporaryblockagesofthewandortoolinletbyflexibleitems
suchassoftfurnishings,clothingandlooselino,orbyinternalblockagesby
itemssuckedintothemachine.
• Ifthishappens,followtheinstructionsbelowin'Lookingforblockages'.
• NOTE:Largeitemsmayblockthetoolsorwandinlet.Ifthishappens,donot
operatethewandreleasecatch.Switch‘OFF’andunplug.Failuretodosocould
resultinpersonalinjury.
1
2
3