


Digital Timer Operation (see Fig. 6)
IMPORTANT: Remember to observe all safety warnings when operating
the heater on auto setting, either attended or unattended.
The timer allows you to select ‘AUTO’ or ‘MAN ON’ by pressing the ‘MODE’
button until the required MODE appears at the bottom of the timer
display.
‘AUTO’ MODE allows the heater to switch ON and OFF according to a set
24 Hour program period (see ‘Setting Programs’ section below).
‘MAN ON’ MODE allows power to the heater uninterrupted by the program
settings.
Key Lock:
If ‘ENTER’ and ‘MODE’ are pressed within 1 second, the keys will be
locked. The user will know the keys are locked as the lock symbol ‘ ’ will
be displayed on the top left hand corner of the screen. To unlock the
keypad, press ‘ENTER’ and then ‘MODE’ within 1 second.
Initial Operation
For initial use, plug the heater into a regular household power point and
turn the power on. The timer is now ready to be set up for use.
Setting Current Time
1. Press the ‘PROGRAM’ button ONCE. The clock symbol appears on
the top left hand side of the screen. The user can now set the clock.
2. The hour digit will flash. To adjust the hour use the ‘-‘ & ‘+’ buttons.
Confirm the hour digit by pressing ‘ENTER’.
3. Once ‘ENTER’ has been pressed the minutes will flash. To adjust the
minutes use the ‘-‘ & ‘+’ buttons. Confirm the minute digit by pressing
‘ENTER’.
4. The timer now returns to the default display.
5. To reset incorrect time, repeat previous steps.
Once the correct time is set, a total of four ON/OFF time programs can be
set for operation.
Setting Programmes
Press the ‘PROGRAM’ key twice to set the programs.
You are now setting the programs starting with P1 ‘ON’.
SETTING P1 ON TIME:
1. To set the hour use the ‘-‘ & ‘+’ buttons. Confirm the hour digit by
pressing ‘ENTER’.
2. To set the minutes use the ‘-‘ & ‘+’ buttons. Confirm the minute digit by
pressing ‘ENTER’.
Note: The minutes can only be set in 10 minute blocks in programme
‘MODE’.
SETTING P1 OFF TIME:
3. To set the hour use the ‘-‘ & ‘+’ buttons. Confirm the hour digit by
pressing ‘ENTER’.
4. To set the minutes use the ‘-‘ & ‘+’ buttons. Confirm the minute digit by
pressing ‘ENTER’.
Repeat steps 1 to 4 to programme P2, P3 & P4. After programming P4
‘OFF’ you automatically exit to the default display.
At any time while programming the timer you can press the ‘PROGRAM’
button to exit to the default display.
Note: If the ‘ON’ time is the same as the ‘OFF’ time the appliance will
ignore the program.
The Advance Function
When in ‘AUTO’ MODE, if the ‘+’ button is pressed for longer than 2
seconds the programme will ADVANCE to the next setting programmed
and will only revert back to the program when the subsequent programme
time is reached. When the ‘ADVANCE’ function is running the ‘ADVANCE’
segment will be displayed on the LCD screen. If the ‘-‘ button is pressed
when the ‘ADVANCE’ programme is running the ‘ADVANCE’ feature will
be automatically cancelled and the programme will run as normal.
Note - Timer Memory Back Up Batteries - Once the heater has been left
plugged in with the socket switched on for at least 72 hours the timer’s
memory back up batteries will be fully charged.
Once the timer batteries are fully charged, if there is a power cut or if the
heater is disconnected from the mains for less than six months, then the
timer will continue to keep time & the settings in the memory will remain
intact.
If however the timer back up batteries have not been charged fully, or if
the heater is deprived of power for longer than six months, then the time
and the programme settings are likely to be lost and you may therefore
need to reset the time and the programme before using the AUTO MODE
again.
Storage
If the radiator is not required for long periods, for example during the
summer, it should be stored in a dry place and preferably covered to
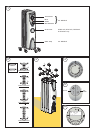
prevent the accumulation of dirt and dust. The supply cord should be
neatly coiled around the cable wrap (see Fig. 1) ensuring that the plug
does not trail on the floor.
IMPORTANT
The heater must be kept plugged in at the mains to retain the time and
the programmed settings. If unplugged from the mains, resetting the
time and the programmed settings will be necessary.
Cleaning
WARNING - ALWAYS DISCONNECT THE POWER SUPPLY BEFORE
CLEANING THE HEATER.
Do not use detergents, abrasive cleaning powder or polish of any kind on
the body of the heater.
Allow the heater to cool, then wipe with a dry cloth to remove dust and a
damp cloth (not wet) to clean off stains. Be careful not to allow
moisture in to the heater.
Recycling
For electrical products sold within the European Community.
At the end of the electrical products useful life it should not
be disposed of with household waste. Please recycle where
facilities exist. Check with your Local Authority or retailer for
recycling advice in your country.
After Sales Service
Your product is guaranteed for three years from the date of
purchase.
Within this period, we undertake to repair or exchange this
product free of charge provided it has been installed and
operated in accordance with these instructions.
Your rights under this guarantee are additional to your statutory rights,
which in turn are not affected by this guarantee.
Should you require after sales service you should contact our customer
services help desk on 0870 727 0101. It would assist us if you can quote
the model number, series, date of purchase, and nature of the fault at the
time of your call.
Please do not return a faulty product to us in the first instance as this may
result in loss or damage and delay in providing you with a
satisfactory service.
Please retain your receipt as proof of purchase.
Glen Dimplex UK Limited
Millbrook House
Grange Drive
Hedge End
Southampton
Hampshire. SO30 2DF
UK customer help line (8.00AM – 6.00PM Mon-Fri; 8.30AM-1.00PM Sat)
Customer Services: Tel. 0870 7270101
Fax. 0870 7270102
e-mail customer.services@glendimplex.com
Republic of Ireland Tel. 01 8424833
[c] Glen Dimplex UK Limited
All rights reserved. Material contained in this publication may not be reproduced in whole or in part, without prior permission in writing of Glen Dimplex UK Limited.