


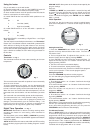

13 : 17
ON
OFF
ADVANCE
AUTO MAN ON
P1
Using the heater
Plug in and switch on at the wall socket.
On standard models with a neon, the red POWER ON neon will
light when the heater is connected to the power supply.
On timer models the timer clock will operate all the time that the
heater is connected to the mains supply.
On model DXLAT150 the heat selector switch positions are as
follows:
O - Off
I - Low Heat (750W)
II - High Heat (1500W)
On model DXLAT75 there is an On /Off switch – operation as
follows:
O - Off
I - On (750W)
Model DXLAT150Ti is controlled by a Digital Timer – see ‘Digital
Timer Operation’
The heat output is controlled by the thermostat - see ‘Thermostat’
Please note – the element has been coated with a protective film
which will burn off during the first few minutes of use and may
cause a small amount of fuming. This is quite normal – the fumes
are non-toxic and will quickly disappear. We recommend that you
open a window to ventilate the room when using the heater for
the first time.
Controls
Thermostat - see Fig. 3
The thermostat controls the heat output according to the room
temperature.
This ensures that the heater will not produce heat unnecessarily
when the room is warm.
To set the temperature you require, turn the thermostat knob
clockwise until the desired temperature is reached. Alternatively
to heat a cold room quickly, turn the thermostat knob up fully.
When the room has reached the desired temperature, turn the
thermostat knob anti-clockwise until the thermostat just clicks
off.
The heater will now automatically operate at this temperature.
The thermostat also has a frost protection setting marked ‘*’.
This setting is useful in areas such as garages to prevent frost
damage. If the thermostat is set to its minimum setting ‘*’, the
heater will cycle ON and OFF to maintain a temperature of
approximately 5°C to help protect against frosty conditions.
Digital Timer Operation - see Fig. 4
IMPORTANT: Remember to observe all safety warnings when
operating the heater on auto setting, either attended or
unattended.
The timer allows you to select ‘AUTO’ or ‘MAN ON’ by pressing
the ‘MODE’ button until the required MODE appears at the bottom
of the timer display.
‘AUTO’ MODE allows the heater to switch ON and OFF according
to a set 24 Hour program period (see ‘Setting Programs’ section
below).
‘MAN ON’ MODE allows power to the heater uninterrupted by the
program settings.
Key Lock:
If ‘ENTER’ and ‘MODE’ are pressed within 1 second, the keys will
be locked. The user will know the keys are locked as the lock
symbol ‘
’ will be displayed on the top left hand corner of the
screen. To unlock the keypad, press ‘ENTER’ and then ‘MODE’
within 1 second.
Initial Operation
For initial use, plug the heater into a regular household power
point and turn the power on. The timer is now ready to be set up
for use.
Setting Current Time
1. Press the ‘PROGRAM’ button ONCE. The clock symbol
appears on the top left hand side of the screen. The user can
now set the clock.
2. The hour digit will flash. To adjust the hour use the ‘-‘ & ‘+’
buttons. Confirm the hour digit by pressing ‘ENTER’.
3. Once ‘ENTER’ has been pressed the minutes will flash. To
adjust the minutes use the ‘-‘&‘+’ buttons. Confirm the minute
digit by pressing ‘ENTER’.
4. The timer now returns to the default display.
5. To reset incorrect time, repeat previous steps.
Once the correct time is set, a total of four ON/OFF time programs
can be set for operation. There are two program options.
Setting Programmes
Press the ‘PROGRAM’ key twice to set the programs.
You are now setting the programs starting with P1 ‘ON’.
SETTING P1 ON TIME:
1. To set the hour use the ‘-‘ & ‘+’ buttons. Confirm the hour digit
by pressing ‘ENTER’.
2. To set the minutes use the ‘-‘ & ‘+’ buttons. Confirm the minute
digit by pressing ‘ENTER’.
Note: The minutes can only be set in 10 minute blocks in
programme ‘MODE’.
SETTING P1 OFF TIME:
3. To set the hour use the ‘-‘ & ‘+’ buttons. Confirm the hour digit
by pressing ‘ENTER’.
4. To set the minutes use the ‘-‘ & ‘+’ buttons. Confirm the minute
digit by pressing ‘ENTER’.
Repeat steps 1 to 4 to programme P2, P3 & P4. After programming
P4 ‘OFF’ you automatically exit to the default display.
At any time while programming the timer you can press the
‘PROGRAM’ button to exit to the default display.
The Advance Function
When in ‘AUTO’ MODE, if the ‘+’ button is pressed for longer than
2 seconds the programme will ADVANCE to the next setting
programmed and will only revert back to the program when the
subsequent programme time is reached. When the ‘ADVANCE’
function is running the ‘ADVANCE’ segment will be displayed on
the LCD screen. If the ‘-‘ button is pressed when the ‘ADVANCE’
programme is running the ‘ADVANCE’ feature will be automatically
cancelled and the programme will run as normal.
Fig. 4
Fig. 3