


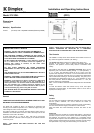

Installation FX 20VL Controls
The heater is fitted with a thermostat with Before undertaking installation work, ensure the electricity supply is
disconnected from any relevant fixed wiring. Supply cable is not supplied
with this appliance and it should therefore be installed by a competent
electrician in accordance with the IEE wiring regulations.
an Integrated ON/OFF switch, a cut-out,
and a thermal fuse link.
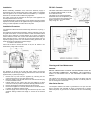
The heater has an external adjustable
thermostat which can be adjusted by user
The supply circuit must be adequate for the input of the appliance and
must be protected with a 13A fuse.
(i.e. by turning the knob to the side of the
heater), see Fig 4 for controls details.
A suitable termination to the fixed wiring of the premises must be provided
adjacent to the final position of the appliance through a double pole switch
having a contact separation of at least 3mm in all poles.
Temp. range 7°C - 32°C
Fig. 3
Installation Procedure
It is essential to observe minimum wall mounting clearances, as per Fig. 1
overleaf.
The appliance should be fitted horizontally, with the cable entry at the top
and grille at the bottom. It must be mounted not less than 600mm above
the floor with a clearance of at least 600mm to any shelf or projecting
surface below the heater and not less than 300mm below the ceiling or
other projecting surface. It must also be not less than 250mm from an
adjacent projecting surface. For most effective heating performance, the
heater should be mounted at the minimum height :-
i.e.- 600mm above the floor.
Care must be taken to ensure that when in use, the air stream is not
obstructed by a high shelf or cabinet.
Cleaning and User Maintenance
Fig. 2
WARNING
BEFORE UNDERTAKING CLEANING OR MAINTENANCE WORK ON
THE APPLIANCE IMMEDIATELY DISCONNECT THE ELECTRICITY
SUPPLY BY SWITCHING OFF AT THE ADJACENT DOUBLE POLE
SWITCH.
The appliance is secured to the wall with three screws, two through
keyhole slots and one through a centrally positioned lower hole to hold the
appliance firmly in position (see Fig 2).
1. Remove the top cover from the appliance by removing the two
screws securing the top cover and hinging it back.
The outside can be cleaned by wiping it over with a soft damp cloth and
then dried. Do not use abrasive cleaning powders or furniture polish as
this can damage the surface finish.
2. Mark the position of the keyhole slots on the wall and drill and plug
for the two suitable screws.
3. Partially insert the two screws, then hang the appliance on these
screws and mark the position of the lower centrally positioned screw.
After Sales Service
4. Remove the appliance and drill and plug for the third screw.
Your Dimplex downflow fan heater is guaranteed for one year from the
date of purchase. We undertake to repair or exchange free of charge
within this period, any part found to be defective due to a manufacturing
fault.
5. Remount the appliance on the wall, ensure that it is horizontal and fix
in position by tightening all three screws.
6. Feed the supply cord or wires through the inlet at the top rear of the
appliance leaving sufficient free length to connect to the terminal
block.