


W
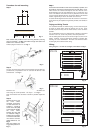
Procedure for wall mounting
Step 1
Mark suitable hole positions for the four fixing brackets (ensuring
they are horizontal) - see Fig. 2, and allow enough room above and
below for the clearance stated.
Drill and plug the wall to suit - see Fig. 3.
Step 2
The hex. stud screw in the slot has to be removed using the allen key
provided first, to separate the inner ‘Z’ and outer ‘W’ sleeves of the
wall brackets - see Fig. 4.
Mount the four outer sleeve wall brackets in line with the drilled out
holes using the screws provided - see steps 1 - 4 in Fig. 3.
Note: the brackets have slot holes to allow for possible adjustment
later.
Step 3
Remove the cap ‘Y’ from
the inner sleeve
assembly, unscrew the
nut and remove the rail
support ‘X’ - see Fig. 5.
On the inner side (wall)
of the towel rail position
the inner sleeve
between the cross rails
as indicated in Fig. 1.
Position the rail support
to receive the bolt on the
inner sleeve and hand
tighten with the nut - see
Fig. 3.
Slide into position (see
suggested positions in
Fig. 1).
Step 4
Lift the towel rail now with the inner sleeve assembly in position, and
align with the outer sleeve previously fixed to the wall. When all four
inner sleeves are inserted correctly into the outer sleeves of the
brackets tighten each nut fully. Replace the cap ‘Y’ and the hex. stud
screw. The distance the towel rail can be positioned from the wall
can be varied by adjusting the hex. stud screws. When in the desired
location, tighten fully to secure the towel rail to the wall.
To assist with the alignment of the outer ‘W’ and inner ‘Z’ sleeves the
outer sleeve may be adjusted using the slot provided, refer to Note in
step 2.
Drying and Airing Towels
It is recommended that for efficient drying, no more than two layers
of towels or similar fabric should be draped over the rail. Items
should be placed evenly over the whole surface of the rail where
possible.
It is not advisable to leave very damp towels or clothes on the towel
rail when not in use, as this may in time, affect the paint finish.
The rail, although hot to the touch is not hot enough to scorch or burn
fabrics. However, soap and detergents remaining in articles after
washing can cause discoloration. Therefore care should be taken
to thoroughly rinse articles before airing.
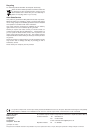
Wiring
Wiring Diagrams : for DTR175 see Fig. 6, and DTR350 see Fig. 7.
A B
DTR 175 250 390
DTR 350 380 625
B
A
Fig. 2
Fig. 3
Z
W
Fig. 4
X
Y
W
Fig. 5
Fig. 6
Fig. 7
C2
C1
DTR 175
A
N
L
N
L
A - Terminal Block
C1 - Cut-out 1
C2 - Cut-out 2
A
L
N
C1
C2
L
N
DTR 350
A - Terminal Block
C1 - Cut-out 1
C2 - Cut-out 2