


Glen Dimplex UK Limited
Millbrook House
Grange Drive
Hedge End
Southampton
Hampshire. SO30 2DF
UK customer help line (8.00AM – 6.00PM Mon-Fri; 8.30AM-1.00PM Sat)
Customer Services: Tel. 0870 7270101
Fax. 0870 7270102
e-mail customer.services@glendimplex.com
Republic of Ireland Tel. 01 8424833
The product complies with the European Safety Standards EN60335-2-30 and the European Standard Electromagnetic Compatibility
(EMC) EN55014, EN60555-2 and EN60555-3 which cover the essential requirements of EEC Directives 73/23 and 89/336
Operation
The unique flame effect may be enjoyed whether or not the
heating elements are in operation.
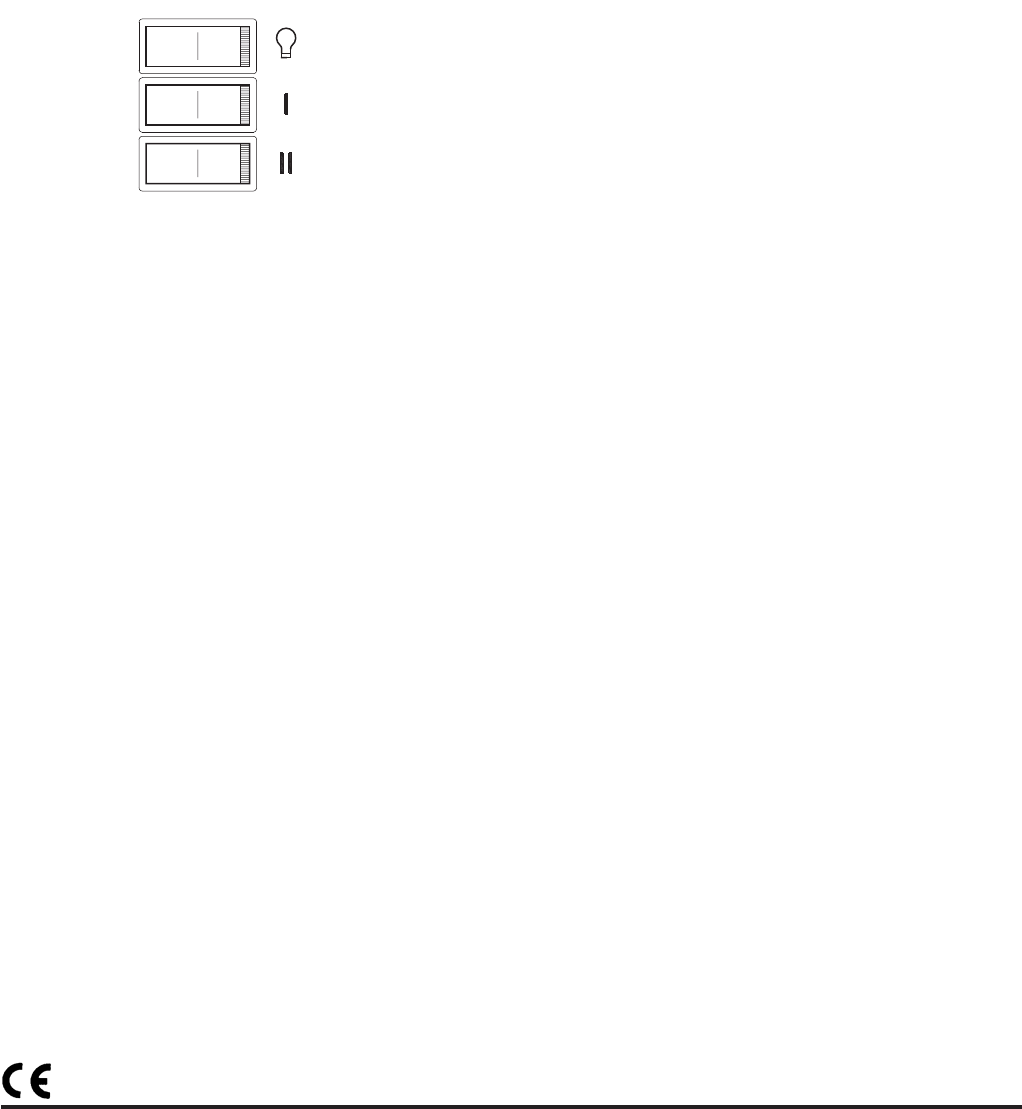
Controls
The heater controls are located on the left hand side of the
canopy heat outlet - see Fig. 1.
Three switches provide a choice of heat settings.
A switch is in the ON position when the red indicator mark on
the switch is visible.
Switch 1 - Controls the electricity supply to the heater
and the flame effect.
Note: This switch must be in the ON position
for the heater to operate.
Switch 2 - Provides 1kw heat output.
Switch 3 - Provides 2kw heat output with switch 2.
Setting the Thermostat
Plug in and set all switches to ON. Turn the thermostat knob to
MAX to warm the room rapidly. When the room temperature
has reached the desired level, turn the thermostat knob back
slowly until the thermostat just clicks off. The heater will then
maintain the room temperature at the chosen level.
NOTE – Should your heater fail to come on when the thermostat
is at a low setting, this may be due to the room temperature
being higher than the thermostat setting.
Maintenance
WARNING – BEFORE UNDERTAKING ANY MAINTENANCE
OR CLEANING, REMOVE PLUG OR DISCONNECT FROM
THE ELECTRICITY SUPPLY.
Lamp Replacement
There are two lamps located beneath the fuel effect.
To gain access to the lamp, the grate / fuel effect secured by
two screws, must be removed (see Fig.1).
Remove the coal and carefully lift the grate / fuel effect clear
and set aside.
Replace the defective lamp with a 240V 40 Watt E14 SES
clear candle lamp.
Replace grate/fuel effect, secure with screws.
Safety cut-out
For your safety, this appliance has been fitted with thermal
cut-out. In the event that the product overheats, the cut-out
switches the heat off automatically.
To bring the heat back into operation, remove the cause of
the overheating, then unplug or turn off the electrical supply
to the heater for up to 10 minutes.
When the heater has cooled sufficiently, re-connect and switch
on the heater.
Cleaning
Before commencing cleaning, unplug the heater and allow it
to cool.
The surfaces of the heater should be given an occasional
wipe over with a dry soft cloth.
Do not use detergents, abrasive cleaning powder or polish
on the metal body of the heater.
The glass screen should be cleaned carefully with a chamois
leather. DO NOT use proprietary cleaners.
To remove any accumulation of dust or fluff the soft brush
attachment of a vacuum cleaner should occasionally be used
to clean the outlet grille of the fan heater located under the
canopy.
To clean the fuel effect, remove the coal pieces or pebbles
and wash in warm water. The plastic tray should be wiped
clean with a damp cloth. When dry replace the coal pieces or
pebbles and arrange for best effect.
After Sales Service
Your product is guaranteed for one year from the date of
purchase.
Within this period, we undertake to repair or exchange this
product free of charge (excluding lamps & subject to
availability) provided it has been installed and operated in
accordance with these instructions.
Your rights under this guarantee are additional to your
statutory rights, which in turn are not affected by this
guarantee.
Should you require after sales service you should contact
our customer services help desk on 0870 727 0101. It would
assist us if you can quote the model number, series, date of
purchase, and nature of the fault at the time of your call.
The customer services help desk will also be able to advise
you should you need to purchase any spares.
Please do not return a faulty product to us in the first instance
as this may result in loss or damage and delay in providing
you with a satisfactory service.
Please retain your receipt as proof of purchase.
[c] Glen Dimplex UK Limited
All rights reserved. Material contained in this publication may not be reproduced in whole or in part, without prior permission in writing of Glen Dimplex UK Limited.
Switch 1
Switch 2
Switch 3
Fig. 2