


www.desatech.com
119794-01A
2
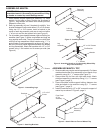
Right Leg
Assembly
Figure 1 - Assembling Legs
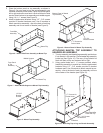
Figure 3 - Installing Header
Left Leg
Assembly
Header
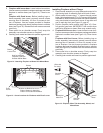
ASSEMBLING MANTEL TOP
1. Some models may require mantel top assembly. For these
models attach sides of top assembly to front panel of top
assembly using (6) 1
1
/
4
" screws (see Figure 5).
2. Placemanteltoponoorwithrightsidedown.Attach
side/front assembly to mantel top using (11) 1
1
/
4
" screws
(see Figure 6, page 3).
3. Placeunnishedmiddlesupporthalfwaybetweentwo
sides and attach to top and front using (6) 1
1
/
4
" screws
(see Figure 7, page 3).
4. Install 5 brackets using 1/2" or 3/4" screws for support of
mantel top as shown in Figure 8, page 3.
Figure 5 - Attach Sides to Front of Mantel Top
Front Panel
of Top
Assembly
Sides of Top
Assembly
Brackets
1/2" or 3/4"
Screw
1/2" or 3/4" Screw
Figure 2 - Attaching Brackets
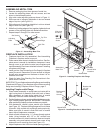
Figure 4 - Attaching Header to Leg Assembly (Mantel May
Vary from Illustraton)
Flat Bracket
1/2" or 3/4" Screws
Header
Leg
Assembly
1
1
/
4
" Screws
1
1
/
4
" Screws
ASSEMBLING MANTEL
IMPORTANT: More than one person is required to lift
assembled mantel. Lift mantel by leg assemblies. Lifting
by header or mantel top could damage mantel.
1. Some models require side/corner assembly. For these
models,laylegsideonoor.Positionlegasshownin
Figure 1. Align bottom and attach with screws provided.
Repeat for other side.
2. Each leg assembly will use 3 brackets for stability. Your
bracket hardware kit will contain either 1/2" or 3/4" screws.
Using two 1/2" or 3/4" screws, install a bracket in the
center of each leg assembly and one at each end within
1" of but not over the last pocket hole (see Figure 2).
3. For all models, place header between right and left leg as-
semblies (see Figure 3). Make sure header and legs are
snugagainsteachother.Thetopofheadermustbeush
with tops of leg assemblies. Attach header using 1
1
/
4
" in
pocket holes on each leg assembly as shown in Figure 4.
Be sure you have proper alignment between the header
andlegassemblies.Attachatbracketswith1/2"or3/4"
screwsusing1atbracketand4screwsperside(see
Figure 4).