


www.desatech.com 15113048-01C
If pilot does not light
• turn control knob clockwise to the
OFF position
• repeat steps 5 and 6
If pilot does not stay lit after several tries
• refer to Troubleshooting, page 20
• contact a qualified service person or gas
supplier for repairs
Until repairs are made, light pilot with
match. To light pilot with match, see
Manual Lighting Procedure.
7. Keep control knob pressed in for 30 sec-
onds after lighting pilot. After 30 seconds,
release control knob.
Note:
If pilot goes out, repeat steps 3
through 7.
8. Press in and turn control knob counter-
clockwise to the HIGH position. Set
control knob to desired heat setting.
CAUTION: Do not try to ad-
just heating levels by using the
equipment shutoff valve.
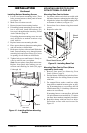
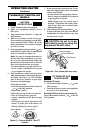
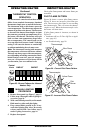
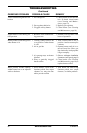
Figure 19 - Pilot (actual pilot may vary)
Ignitor Electrode
Pilot Burner
Thermocouple
OPERATING HEATER
Continued
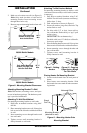
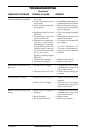
TO SELECT
HEATING LEVEL FOR
INFRARED HEATERS
WARNING: When running
heater, set control knob at LOW,
MED, or HI locked positions.
Never set control knob between
locked positions. Poor combus-
tion and higher levels of carbon
monoxide may result.
CAUTION: Do not try to ad-
just heating levels by using the
equipment shutoff valve.
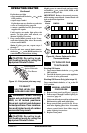
Slightly press in control knob and turn coun-
terclockwise to the LOW, MED, or HI
positions (see Figure 20).
IMPORTANT:
Release downward pressure
while turning control knob. Control knob will
lock at the desired position.
TO TURN OFF GAS
TO APPLIANCE
Shutting Off Heater
1. Turn control knob clockwise to the
OFF position.
2. Turn off all electric power to the appliance
if service is to be performed.
Shutting Off Burner Only (pilot stays lit)
Turn control knob clockwise to the PI-
LOT position.
MANUAL LIGHTING
PROCEDURE
1. Remove front panel (see Figure 7, page 9).
2. Follow steps 1 through 5 under Lighting In-
structions, page 14.
3. With control knob pressed in, strike match.
Hold match to pilot until pilot lights.
4. Keep control knob pressed in for 30 sec-
onds after lighting pilot. After 30 seconds,
release control knob. Now follow step 8,
under Lighting Instructions.
5. Replace front panel.
OFF
P
ILO
T
LOW
MED
HI
O
FF
PILOT
LOW
MED
HI
OFF
PILOT
LOW
MED
HI
OFF
PILO
T
LO
W
MED
HI
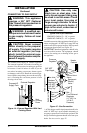
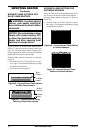
Control
Knob GMP16 GMP26
LOW
HIGH
OFF
MED
Figure 20 - Burner Patterns for Non-
Thermostat Models