


24
XI Start-up and Checkout
WARNING
• NEVER ATTEMPT TO FILL A HOT EMPTY BOILER.
• MAKE SURE THAT THE AREA AROUND THE BOILER IS CLEAR AND FREE FROM
COMBUSTIBLE MATERIALS, GASOLINE, AND OTHER FLAMMABLE VAPORS AND LIQUIDS.
• SAFE RELIABLE OPERATION OF THIS BOILER REQUIRES THAT THE BURNER BE CHECKED
AND ADJUSTED BY A QUALIFIED OIL SERVICEMAN USING COMBUSTION TEST
INSTRUMENTS.
• FAILURE TO PERFORM ALL OF THE CHECKS OUTLINED IN THE FOLLOWING PROCEDURE
COULD RESULT IN UNRELIABLE OPERATION, DAMAGE TO THE BOILER NOT COVERED
UNDER WARRANTY, PROPERTY DAMAGE, OR UNSAFE OPERATION.
Use the following procedure for initial start-up of the boiler:
1) Ensure that the boiler is filled to the normal water level.
2) Verify that the vent system is complete and free of obstructions prior to start-up of the boiler.
3) Inspect all wiring for loose or uninsulated connections, proper size fuses installed, etc.
4) Verify that oil tank is filled with #2 fuel oil meeting ASTM D396 specifications, oil piping has been tested and is air tight,
and shut-off valve(s) are closed.
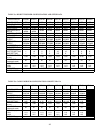
5) Check initial settings of oil burner air band and air shutter, head setting etc. and readjust if needed. See Table 3 for setup
and combustion data pertaining to a particular boiler/ burner combination.
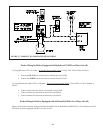
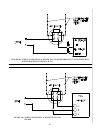
6) Attach plastic hose to oil pump vent fitting and provide a container to catch oil during oil pump bleeding procedure.
7) Install 0-200 PSI pressure gauge into oil pump gauge port.
8) Open all oil line shut-off valves.
9) Open flame observation port cover on burner swing door to see flame.
10) Adjust system thermostat to highest setting.
11) Set pressure limit control to suit individual requirements of the installation. For most steam systems, the cut-in pressure
should be set at 0.5 psi with a 1 psi differential.
12) Turn the line service switch to “ON” position.
13) Crack open vent fitting on the oil pump and allow burner to run until a solid oil stream, free of air bubbles, flows for 15
seconds into container. As the vent fitting is closed, the burner should fire and flame should be visible through observation
port immediately (or after prepurge timing has expired, if a burner is so equipped). Refer to burner instructions for more
details.
14) Immediately upon firing the boiler, check the smoke level. If the smoke level is in excess of a #1, open the air adjustment
to bring the smoke level below a #1.
15) Make sure that the oil pressure matches that shown in Table 3 for the burner supplied. Adjust pressure if required.
16) Check the vacuum at the inlet of the fuel pump. Make sure that the vacuum does not exceed the fuel pump manufacturer’s
limit (consult the pump manufacturer’s instructions).
17) Close the flame observation cover.
18) After chimney has warmed-up to operating temperature, adjust barometric draft regulator for a draft of -0.02 inch w. c.
over the fire.
19) Check the CO2 and confirm that it is between the minimum and maximum limits shown in Table 3. Adjust if necessary.
20) Verify that the smoke level still does not exceed #1 and that the draft over fire is -0.02 inch w.c.
21) Turn off the burner and remove pressure gauge. Install and tighten gauge port plug, than restart the burner.
22) Check for clean cutoff of the burner. Air in the oil line between fuel pump and nozzle will compress, while burner is
running, and expand, when burner shuts off, causing oil line pressure to drop and nozzle drip after burner stops. Cycle burner
on and off 5 to 10 times to purge air completely.
23) Check thermostat operation by raising or lowering its set point as required, cycling burner on and off.
23