


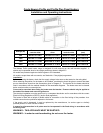
The Panel - How it works
A heating element within the metal case warms its front face for direct radiation into the room and a gentle circulation of
warm air around the room. The built-in thermostat with its adjustment knob located behind the controls door, controls
the room temperature by sensing this from the air passing upwards through the panel. The knob selection provides
settings from 1 to 6 and each increase in number equates to approximately 7°C temperature difference. Position 1
represents 7°C and would be used for frost protection when the property is not occupied. Position 3 represents 21°C
and is the normal comfort position.
NOTE – Should your heater fail to come on when the thermostat knob is at a low setting, this may be due to the
temperature of the room being higher than the thermostat setting.
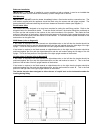
Timer/Programmer
A digital timer/programmer is built into the product and is situated behind the controls door. This will control the
operation of the heater for the time periods set at the thermostat setting.
Setting up
If, at any time during setting, a period of approximately 7 seconds passes with no button pressed then the timer reverts
to the clock display and saves the settings thus far.
To set the clock, firstly press the left button below where it says “SETUP” on the display. Five options will be
displayed on the right side of the display. These are PROG, DOWN, CLOCK, SUMMER and RANDOM. PROG will be
flashing at this time. Press the “+” button twice to move the flashing to “CLOCK”, and then press the left button to
“AFFIRM” the choice. The hour display will now be flashing and pressing the + or – buttons will set the display to the
required setting. Then press the AFFIRM button and the minutes display will be flashing and again the + and – buttons
will set the display to the required setting. Press the AFFIRM button and the day display will be flashing and the + and –
button will set the day to the required setting. Press the AFFIRM button to end the clock setting and return to the clock
display.
To set the Program, firstly press the left button below where it says “SETUP” on the display. Five options will be
displayed on the right side of the display. These are PROG, DOWN, CLOCK, SUMMER and RANDOM. PROG will be
flashing at this time. Press the AFFIRM button and the 01
ON
display will be flashing. Press the AFFIRM button and the
hour display will flash and be adjustable by the + and – buttons. Pressing AFFIRM will move the display to the minutes,
and then to the days. The days have special groupings that can be selected by pressing the + and - buttons. They are
MO TU WE TH FR , SA SU , MO TU WE TH FR SA , MO WE FR , TU TH SA , MO TU WE , TH FR SA ,
ALL DAYS and individual days. Make your selection and press AFFIRM. The 01
ON
display will flash. Pressing the +
button will advance the display to 01
OFF
and the same procedure should be followed for setting the OFF time
remembering to use the same day selection. The procedure should be followed through to complete your programming
requirements up to maximum step 12
OFF
. Any unwanted steps may be left blank.
Manual Over-ride The timer can be over-ridden at any time by pressing the right-hand button until the display
shows the required mode ALWAYS ON or ALWAYS OFF. The timer must be returned to the PROG position for the
timer and its programs to be active.
Summer Setting For setting the clock forward 1 hour for summer, press SETUP and select Summer on the
display then press
+. To unset the summer setting, repeat the procedure.
Down Timer The heater can be set to be ON for a fixed time by selecting DOWN from the SETUP screen
and using the
+ and – buttons to set the required hours. Then press AFFIRM and set the minutes followed by AFFIRM.
The heater will then operate until the time expires.
April 2005 577 2003 02A