6
ASSEMBLY
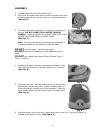
1. Lift the water tank off the central body.
2. Turn over the water tank and unscrew the water tank cap
at the bottom of the tank by turning it counterclockwise.
(See Fig. 6)
Fig. 6
3. Fill water tank with cold water; do not fill all the way to
the rim. DO NOT CARRY FULL WATER TANK BY
HANDLE. ALWAYS HOLD FULL WATER TANK WITH TWO
HANDS ON EITHER SIDE OF WATER TANK.
(See Fig. 7)
Note: To avoid possible white dust due to hard water it
is recommended to use filtered or distilled water.
DO NOT
use hot water. Use cool tap water.
DO NOT
add any medication to other additives to the
water
DO NOT
pour water into Vapor Outlet Channel (part 6,
Fig.2 on page 4)
Fig. 7
4. Replace the water tank cap, aligning the threads on the
tank with the threads on the cap, and turn it clockwise.
(See Fig. 8)
Fig. 8
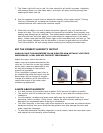
5. Turn the tank over, holding one hand by the top handle
and another hand under tank. Place full water tank on
the central body, making sure it fits perfectly. Place the
water tank lid with output slot on top of the water tank.
(see Fig. 9)
Fig. 9
6. Plug the power cord into a wall socket and turn on the unit. The On/Off switch is
located at the central body. (see figure 1).


