


GENERAL MAINTENANCE AND CLEANING
Before any cleaning operation, switch the humidifier off and unplug it.
1. Always unplug the unit before cleaning.
2. The humidifier must be drained and cleaned before storing.
3. Once unplugged the exterior of the unit may be cleaned by wiping with a dry cloth.
Caution: The ON/OFF switch must be thoroughly dry before unit is again plugged
into power source.
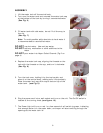
4. There may be some lime deposits in the nebulizer, particularly in areas with hard
water. Overcome this drawback by cleaning the nebulizer with water and vinegar on
a soft cloth regularly, as follows:
A. Dampen a cloth with vinegar and wipe the nebulizer gently, until the lime
deposits disappear completely.
B. Rub down gently with a dry cloth and remove remains of humidity.
C. Do not rub the nebulizer with solid objects.
D. Do not clean with chemical products
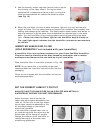
5. When cleaning the water basin do not place the nebulizer directly under the water
tap.
6. Never immerse the unit in water or let water enter the fan vent (see figure 3 on
page 4) or any other openings.
7. It is normal for water to be in the water basin. However water must not get inside
the central body. If this should happen, take the humidifier to an authorized service
center before using it again.
8. Clean the inside of the water tank at least once a week, as follows:
A. Fill the tank with clean water adding a few drops of bleach. Close the tank
completely with its cap and shake by holding the tank with both hands. Do
not hold by handle while shaking the tank.
B. Rinse thoroughly.
Note: Water accumulated over long periods may create bacteria and mildew (fungus).
It is important to remove the water in the humidifier if the humidifier is not being used.
Always use fresh clean water when filling the water basin.
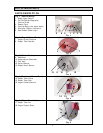
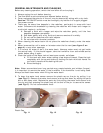
9. To clean the water level sensor remove the plastic cap on the pin by pulling it up
(see Fig.12). Remove the water level sensor and cap and clean by wiping the parts
with a soft damp cloth. Replace the parts by first putting the water level sensor onto
the pin and then pressing the plastic cap on the end of the pin to secure the sensor
(see Fig.13). Do not use excessive force.
Plastic Cap
Fig. 11 Fig. 12 Fig. 13
9