


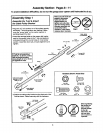


Assembly Step 2
Install the Trolley on the T-rail
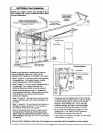
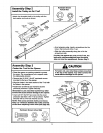
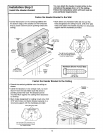
• Attach the threaded shaft to the trolley with the
lock washer and nuts as shown.
Lock Washer
Outer Nut 5/16"_
Troile_
Temporary Stop
Screwdriver
I
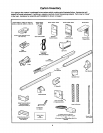
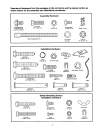
Hardware Shown
Actual Size
LoCk Washer Nut
5/16 ° 5/16" - 18
• As a temporarystop,inserta screwdriverintothe
holein thefront end of the T-rail.
• Slidethe trolleyassembly along the railtothe
screwdriverstop.
If trolley hits against any nuts on the T-ralt, the
bolts and nuts were attached from the wrong
side and must be reposltioned. Review Step 1.
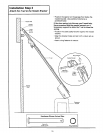
Assembly Step 3
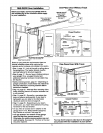
Fasten the T-raft to the Opener I
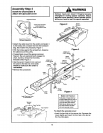
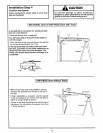
• Placethe opener on packing materialto protect
the cover. For convenience, puta supportunder
the cable pulleybracket.
i Rernovethe (2) 5/16"-18xl/2" washered screws
mounted in the top ofthe opener.
Alignthe holes in the backsectionofthe T-rail with
the holes inthe opener.
• Fasten the railwith the (2) washered screws
previously removed. Tighten securely.
Remember to use only these screws! Any other
screws will cause serious damage to the opener.
• Inserta 5/16"-18x7/8" hex screw intothe cover
protectionbelt hole in theT-rail as shown.Tighten
securelywith a 5/16" lockwasher and nut,
NOTE: This screw prevents trolley over-travel.
Keep a 2" minimum between the trolley and this
screw when adjusting travel limits (see page 28).
CAUTION
To fasten rail, use only those screws mounted
In the top of the opener. Any other screws will
cause serious damage to the opener.
Washered Screw
5/16"-18xl/2"
Hex Screw
5/16"-18X7/8'
Cover
Protection
5/16"*18
Hardware Shown Actual Size
Hex Screw Nut Lock Washer
_16' - 18 x 718" 5/16"- 18 5/16'