


6.0 INSTALLATION INSTRUCTIONS: CAUTION!! READ CAREFULLY
CAUTION:
THIS UNIT IS SEALED. THE COVER IS NOTREMOVABLE!
6.1 Select proper location
6.2 Amounting plate is provided on the back of the alarm. Remove the mounting plate from the back of the alarm
b
y holding the mounting plate and twisting the alarm in the direction indicated by the “OFF” arrow on the
alarm cover.
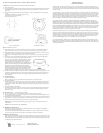
6.3 To insure aesthetic alignment of the alarm with the hallway or wall, the UPARROW on the mounting plate
m
ust be:
A.) Parallel with the hallway walls when ceiling mounting
B.) Pointed upward when wall mounting
(
See steps A& B in figure 2)
Step A: Ceiling mounting Step B: Wall alignment
Step C: Installation Step D: Installation / Removal
Figure 2: Installation Instructions
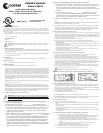
6.4 As described in Figures 1-2, attach the mounting plate on the wall. Be sure the “UP FOR WALLMOUNT-
ING” text and arrow are facing up. Use the screws and anchors provided to secure the mounting plate.
6.5 Follow applicable codes and regulations for wiring. Disconnect power before installation or service.Connect
Red Wires to 12 Volt DC power sources. Connect Yellow Wire to Ground
6.6 Twist the alarm in the direction indicated by the “ON” arrow on the alarm cover (see step D) until it locks in
place.
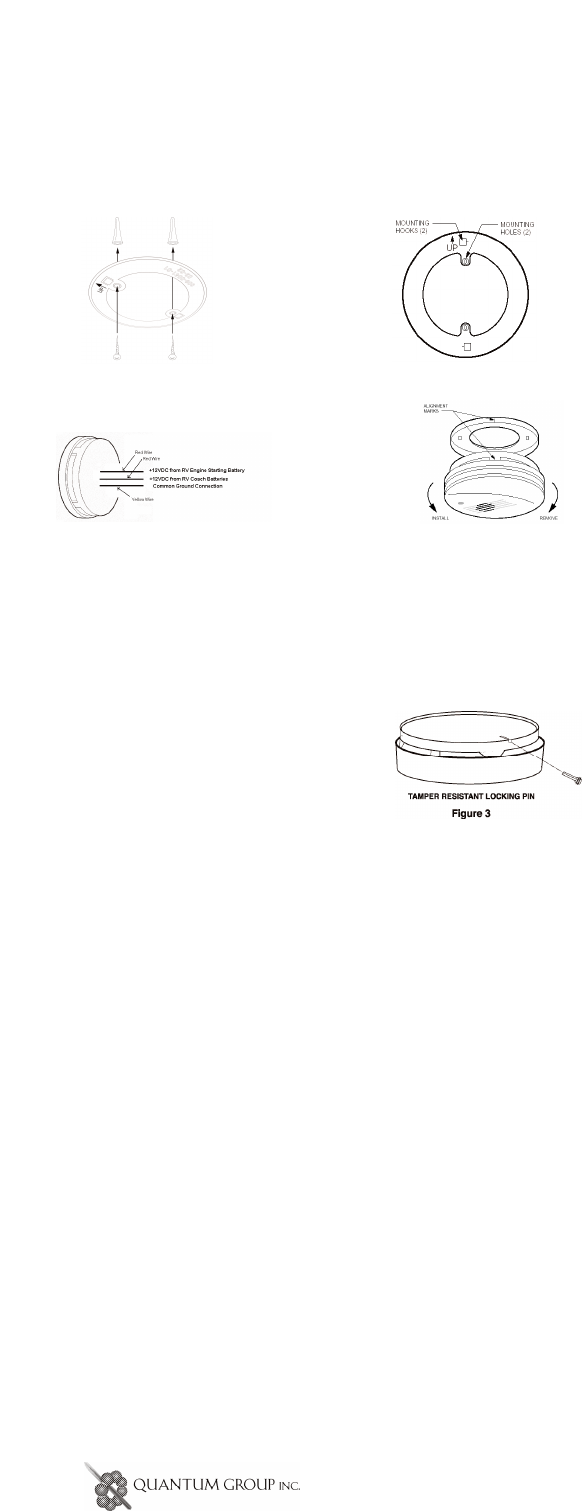
6.7 T
o make your carbon monoxide alarm tamper resistant, a locking pin has been provided in the bag with the
screws and anchors. Using this pin will deter children and others
from removing the alarm from the mounting plate. To use the pin,
insert it into the hole in the side of the alarm after the alarm has
been installed on the mounting plate (see fig. 3). Using long
nosepliers pull the pin out of the hole, it is now possible to remove
the alarm from the mounting plate.Test alarm immediately follow-
ing installation and weekly thereafter for proper operation by
pushing the test button until a short beep is heard (approximately
three seconds). Release the button. The alarm will then test itself
for proper operation and the RED L.E.D. will flash 5 times. At
completion of the self-test, the alarm will sound 2 patterns. The alarm then resumes normal operation.
6.8 This box contains two self-adhesive labels. You should write the telephone numbers of the emergency service
provider and a qualified technician in the space provided in the labels. Place one label next to the alarm, and
the other label near a source of fresh air where you plan to gather after the alarm indicates the presence of
carbon monoxide.
7.0 ALARM SIGNALS
7.1 NORMAL OPERATION
RED L.E.D. flashes once every 30 seconds, indicating that the alarm is powered and active.
7.2 ALARM CONDITION
RED LED turns “on” for 2 seconds and “off” for 4 seconds with a repetitive sound pattern of 4 short beeps for
1 second and 5 seconds of silence. Pushing and holding the test/reset button for 3 seconds will silence the
alarm for about 4 minutes. After 4 minutes, the alarm will once again sound until the unsafe CO concentration
is reduced.
7.3
TROUBLE/SER
VICE CONDITION
The detector self-tests every 10 minutes. The detector will beep and the Indicator/Test button will flash once
every 30 seconds if a fault is detected.
This is an indication of a malfunction and that the detector requires
immediate servicing.
8.0
MAINTENANCE
CLEANING
YOUR
ALARM:
8.1 To clean your alarm remove it from the mounting bracket as outlined in Section 6.2 and 6.7.
8.2 You can clean the interior of your alarm by using your vacuum cleaner hose and vacuuming through the open-
ings around the perimeter of the alarm.
8.3
The outside can be wiped with a clean towel.
Test your alarms weekly and repair or replace them when they no
longer function. As with any electronic product, it has a limited life. Alarms that do not work cannot warn you.
8.4 After cleaning, reinstall your alarm and test your alarm by using the TEST button.
W
ARNING:
Do not use any household cleaning agents, paints, varnishes or any other chemical on your
12R
V
-D alarm.
NOTE: REGULAR TESTING IS RECOMMENDED.
9.0
PERIODIC ALARM TESTING
Test the alarm weekly for proper operation by pushing the test button until a short beep is heard (approxi-
mately three seconds). Release the button.
The alarm will then test itself for proper operation and the RED L.E.D. light will flash 4-6 times. At comple-
tion of the self-test, the alarm will sound 2 patterns. The alarm then resumes normal operation.
10.0SERVICE AND WARRANTY
If after reviewing this manual you feel that your CO Alarm is defective in any way, do not tamper with the unit.
Before returning your device, call Quantum Group’s customer service line at 1-800-432-5599 to receive a return
merchandise authorization (RMA) number. Once an RMAnumber has been issued, return product along with a
note describing the problem and send it to:
7737 Kenamar
Cour
t
San Diego, CA92121-2425
LIMITED WARRANTY
COSTAR
®
Model 12RV-D
Q
uantum Group Inc. offers you this limited warranty on your new carbon monoxide alarm, including all of its
component parts. This limited warranty extends solely to the original end-user purchaser of this product, provided
your purchase was made from an authorized vendor. Transfer or resale of this product will automatically terminate
w
arranty coverage.
Quantum Group Inc. warrants the enclosed carbon monoxide alarm to be free from defects in materials and work-
m
anship under authorized use and service, as specified in the owner’s manual, for a period of six (6) years from the
date of manufacture. During the initial two (2) year period commencing with the date of manufacture, any repair or
replacement shall be made without charge with proof of purchase. During the latter four (4) years of the warranty
p
eriod, any repair or replacement shall be made at a charge to the purchaser not to exceed the manufacturer’s cost of
repair or replacement. All replaced items become the property of Quantum Group Inc.
Q
UANTUM GROUP INC. MAKES NO OTHER WARRANTIES, EXPRESS OR IMPLIED, EXCEPTAS
REQUIRED BY LAW, AND IN NO CASE FOR A DURATION LONGER THAN THAT OF THIS WRITTEN
WARRANTY, EXCEPTAS REQUIRED BYLAW, INCLUDING, BUT NOT LIMITED TO, ANYWARRANTY
OF MERCHANTABILITY OR FITNESS FOR A PARTICULAR PURPOSE OR AGAINST INFRINGEMENT,
OR ANY EXPRESS OR IMPLIED WARRANTYARISING OUT OF TRADE USAGE OR OUTOF A COURSE
OF DEALING OR COURSE OF PERFORMANCE. Quantum Group Inc. has not authorized any other party to
extend any other warranties in connection with the sale of the product, and will not accept responsibility for any
statements, representations, or warranties made by any other person.
This limited warranty does not cover: (1) products which have been improperly installed, repaired, maintained,
modified, or which have been subjected to misuse, abuse, accident, neglect, exposure to fire, water, or excessive
changes in climate or temperature, or combined with non-Quantum Group Inc.-approved accessories; (2) physical
damage caused from use other than normal and proper operation or handling, as specified in the owner’s manual;
(3) cosmetic damage; (4) products on which warranty stickers or product serial numbers have been removed,
altered, or rendered illegible; (5) the cost of installation, removal or reinstallation.
QUANTUM GROUP INC. SPECIFICALLYDISCLAIMS LIABILITY FOR ANYAND ALL DIRECT, INDI-
RECT, SPECIAL, GENERAL, INCIDENTAL, OR CONSEQUENTIAL DAMAGES, INCLUDING, BUTNOT
LIMITED TO, LOSS OF PROFITS OR ANTICIPATED PROFITS ARISING OUTOF USE OF OR INABILITY
TO USE THE PRODUCT.
P/N099-0104-01 REVC 041207