


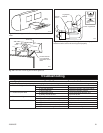


15
20008055
For Your Safety, Read Before Lighting
WARNING: If you do not follow these instructions exactly, a fire or explosion may result causing property damage,
personal injury or loss of life.
A. This appliance has a pilot which must be lighted by hand.
When lighting the pilot, follow these instructions exactly.
B. BEFORE OPERATION smell all around the appliance area
for gas. Be sure to smell next to
the floor because some gas is
heavier than air and will settle on
the floor.
WHAT TO DO IF YOU SMELL GAS:
• Do not try to light any appliance.
• Do not touch any electrical switch;
do not use any telephone in your
building.
• Immediately call your gas supplier from a neighbor’s tele-
phone.
• Follow the gas supplier’s instructions.
• If you cannot reach your gas supplier, call the fire department.
C. Use only your hand to push in or turn the gas control knob.
Never use tools. If the knob will not
push in or turn by hand, don’t try
to repair it. Call a qualified service
technician. Force or attempted
repair may cause a fire or an explo-
sion.
D. Do not use this appliance if any part
of it has been under water. Im
-
mediately call a qualified service
technician to inspect the appliance
and to replace any part of the con-
trol system or gas control which has
been under water.
E. Be sure to install a 9 volt battery in both the receiver and the
remote, as required.
T118
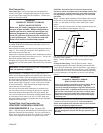
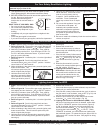
Lighting Instr
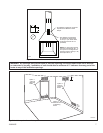
Piezo
10/28/03 djt
Piezo
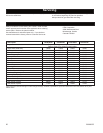
Fig. 19
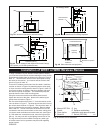
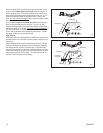
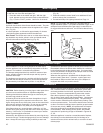
ON
PILOT
OFF
T119
Lighting Instr
Pilot knob
off
10/28/03 djt
Fig. 20
Lighting Instructions for Millivolt Wall Switch
1. STOP! Read the safety information above before proceeding.
2. Refer to Figure 20. To turn off the gas supply, depress the
knob slightly and turn clockwise to the OFF position.
3. Wait five (5) minutes to clear out any gas. Then smell for
gas, including near the floor. If you smell gas, STOP! Fol
-
low “B” in the safety information above. If you don’t smell
gas, go on to the next step.
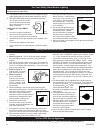
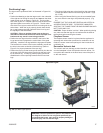
4. Refer to Figure 21. Locate the pilot. It is at the right side of
the burner.
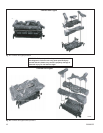
5. Refer to Figure 22. Push in the control knob and turn
counterclockwise to the “PILOT” position. Hold the
control knob in for a few seconds.
6. While still holding in the control knob, press the ignitor push-
button several times. This
will cause a spark at the pilot
which will ignite the pilot gas.
7. Hold the control knob for 60
seconds to prevent the flame
failure detector from shutting
off the gas while its probe is
warming up.
8. Release the control knob.
• If the knob does not pop up when re-
leased, stop and immediately call your
service technician.
• If the pilot will not stay lit after several
tries, turn the gas control knob clock-
wise to OFF (Fig. 20) and call
your service technician or gas sup-
plier.
9. When the pilot remains lit, turn the
control knob counterclockwise to
the “ON” position. (Fig, 23)
10. Lighting Instructions for Millivolt
Wall Switch. After the pilot is lit and
the control knob is released, the wall
switch can be switched to turn the
unit “ON” or switched to turn it “OFF” .
Refer to Page 5 for wiring.
T125
OP Pilot
10/28/03 djt
Fig. 21
ON
PILOT
OFF
T121
Lighting Instr
Pilot knob
ON
10/28/03 djt
Fig. 23
Fig. 22
ON
PILOT
OFF
T120
Lighting Instr
Pilot knob
pilot
10/28/03 djt
Lighting Instructions for WRD
1. STOP! Read the safety information above before proceed-
ing.
2. Refer to Figure 20. To turn off the gas supply, depress the
knob slightly and turn clockwise to the OFF position.
3. Wait five (5) minutes to clear out any gas. Then smell for
gas, including near the floor. If you smell gas, STOP! Fol
-
low “B” in the safety information above. If you don’t smell
gas, go on to the next step.
4. Refer to Figure 21. Locate the pilot. It is at the right of the
burner.
5. Refer to Figure 22. Push in the control knob and turn
counterclockwise to the “PILOT” position. Hold the
control knob in for a few seconds.
6. While still holding in the control knob, press the ignitor push-
button several times. This will cause a spark at the pilot
which will ignite the pilot gas.
7. Hold the control knob for 60 seconds to prevent the flame
failure detector from shutting off the gas while its probe is
warming up.
8. Release the control knob.
• If the knob does not pop up when released, stop and imme-
diately call your service technician.
• If the pilot will not stay lit after several tries, push in and turn
the gas control knob clockwise to OFF (Fig. 20) and
call your service technician or gas supplier.
9. When the pilot remains lit, turn the control knob counter-
clockwise to the “ON” position. (Fig. 23)
10. Lighting Instructions for On/Off Remote (WRD). After
the pilot is lit and the control knob is released, select either
the “ON” or “REMOTE” position of the receiver (Figure 5).
If “ON” is selected, the burners are lit by turning the con-
trol knob counterclockwise to “ON” (Fig. 23) or off
by turning the knob clockwise to “PILOT”. When
“REMOTE” is selected, you control the burner ignition with
the hand held remote. To operate the log set, press “ON” for
ignition and “OFF” to shut unit down. See page 5 for wiring
instructions.
To Turn OFF Gas to Appliance
Depress the control knob slightly and turn it clockwise to the OFF position. Refer to Figure 20.